


17
Jul
Studio Renovation and Plywood Flooring
Yesterday I shared a peek into my home! I hope you loved it! It has come together just as I imagined and we love our little space, even though it is crowded with a 1 year old getting into everything! Today I wanted to give you a glimpse at the renovation! Just a warning the photos are not so picturesque but they show the hard work that went into the space!
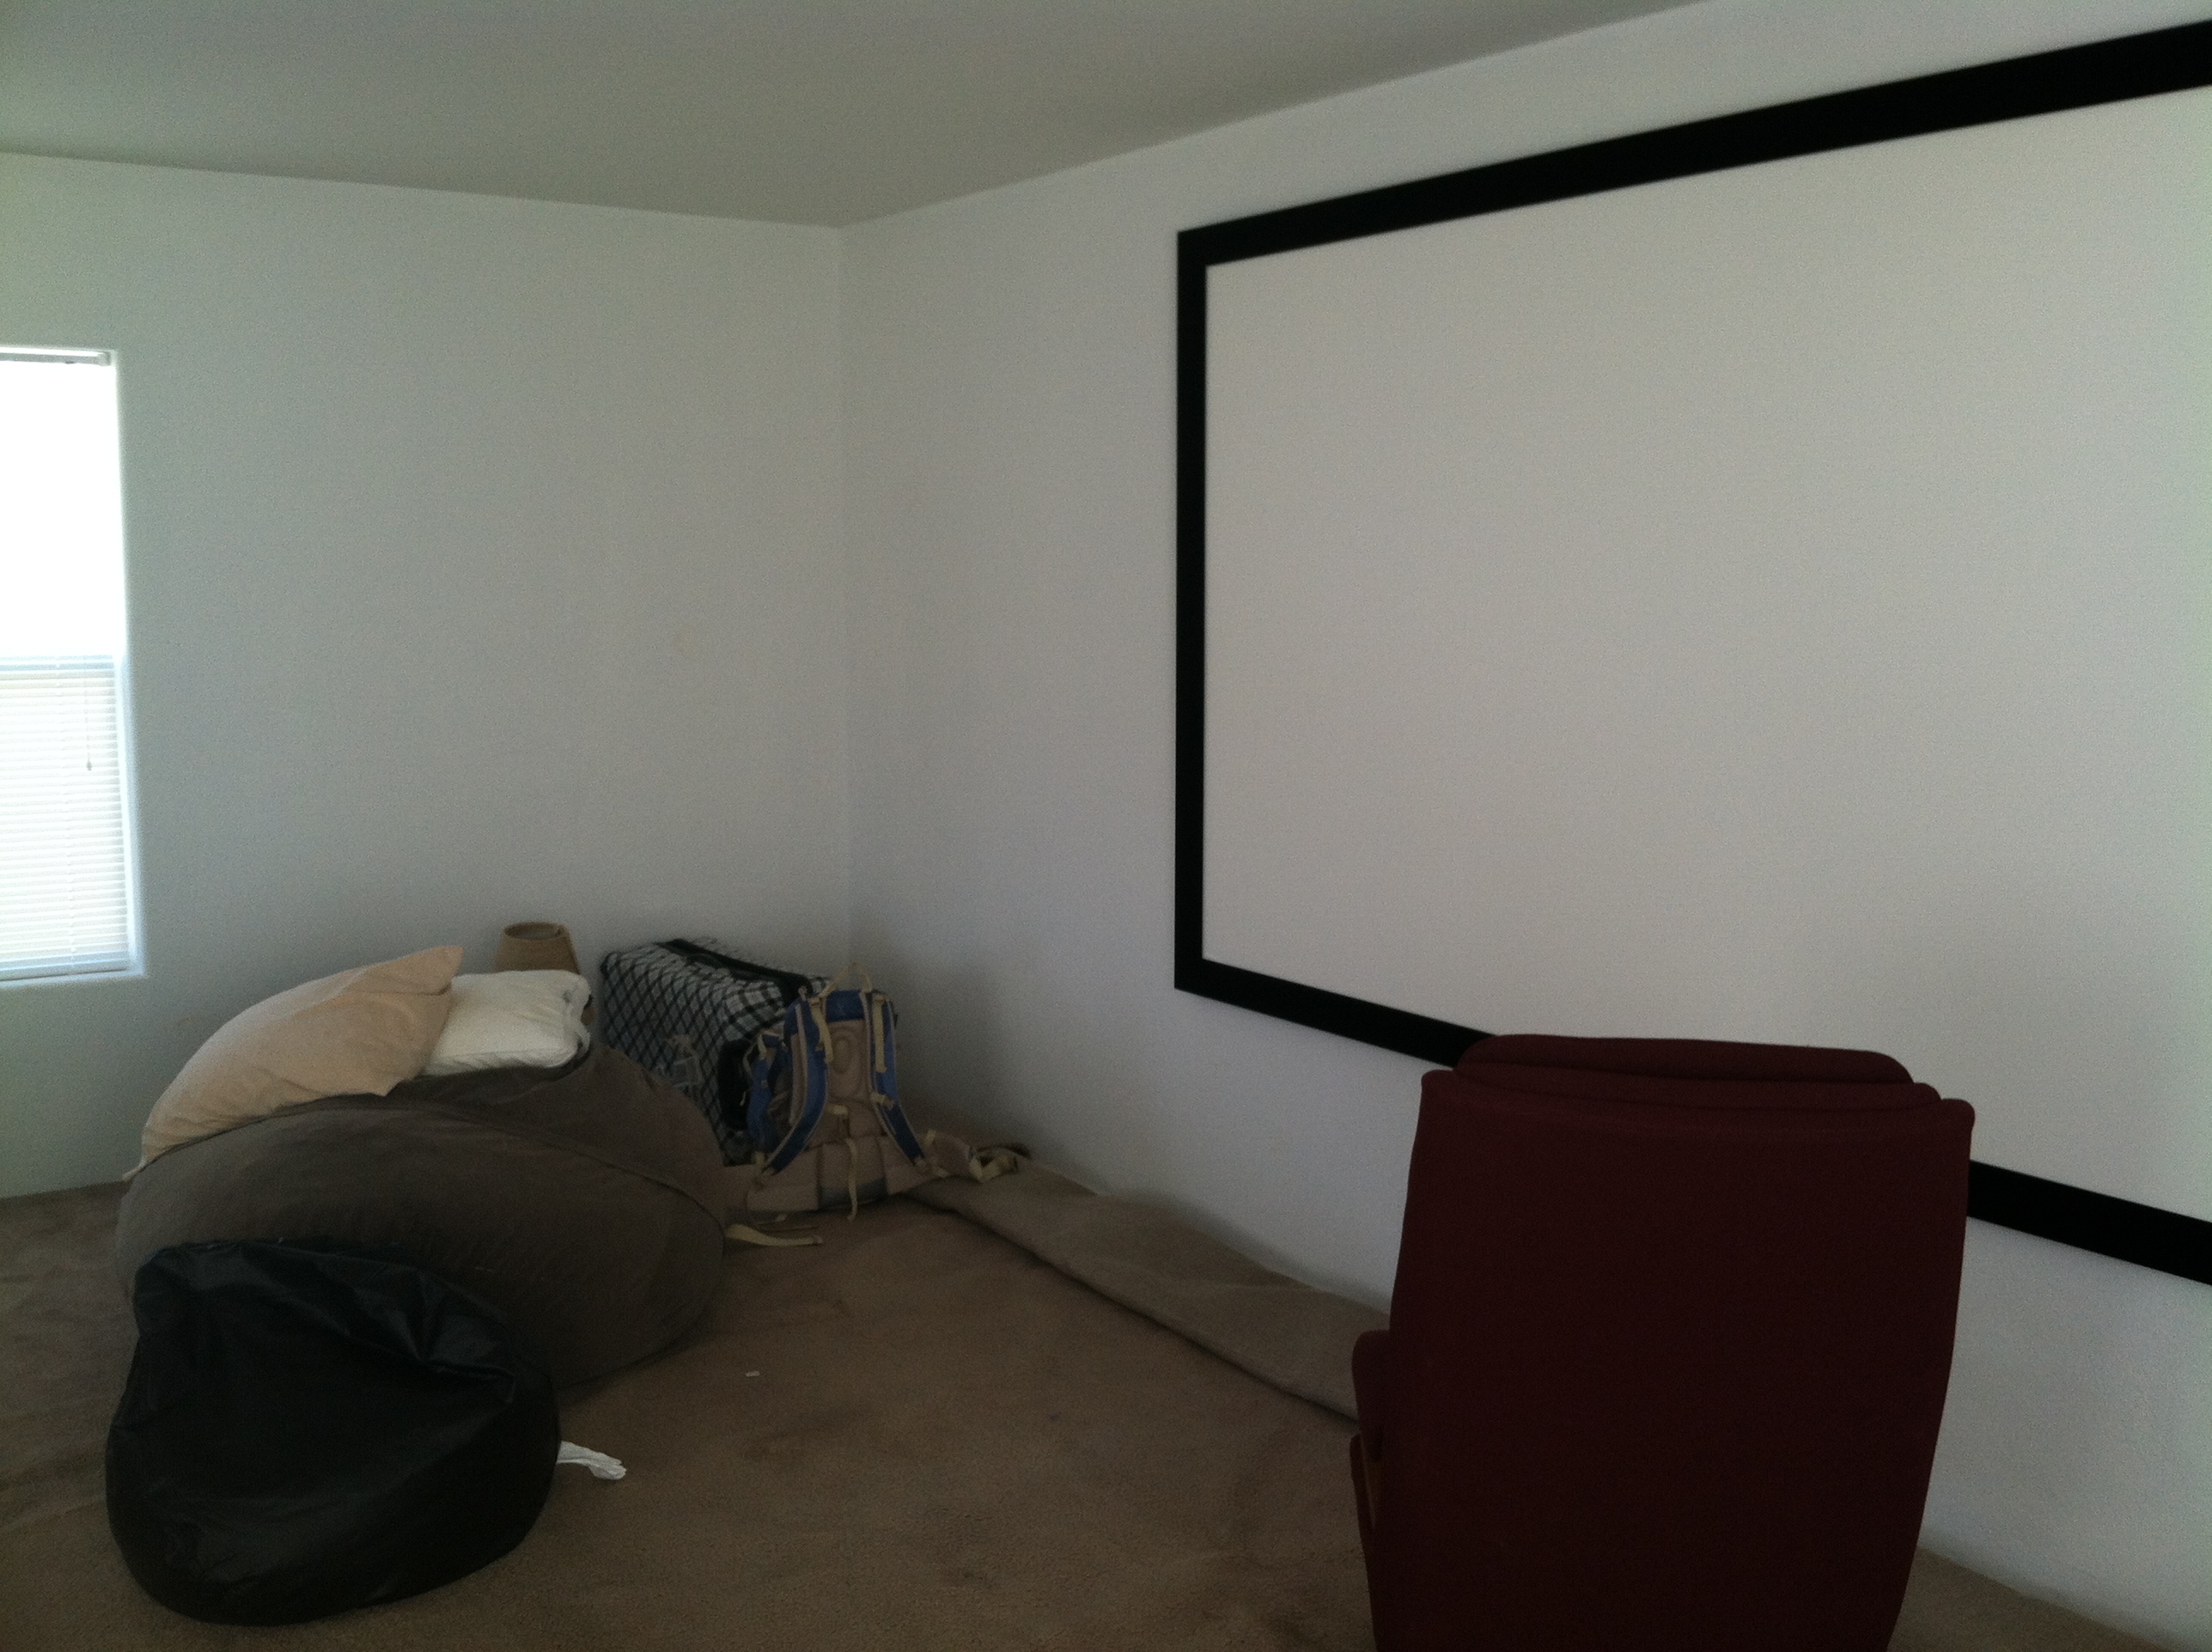
Here are the before picture of the space:
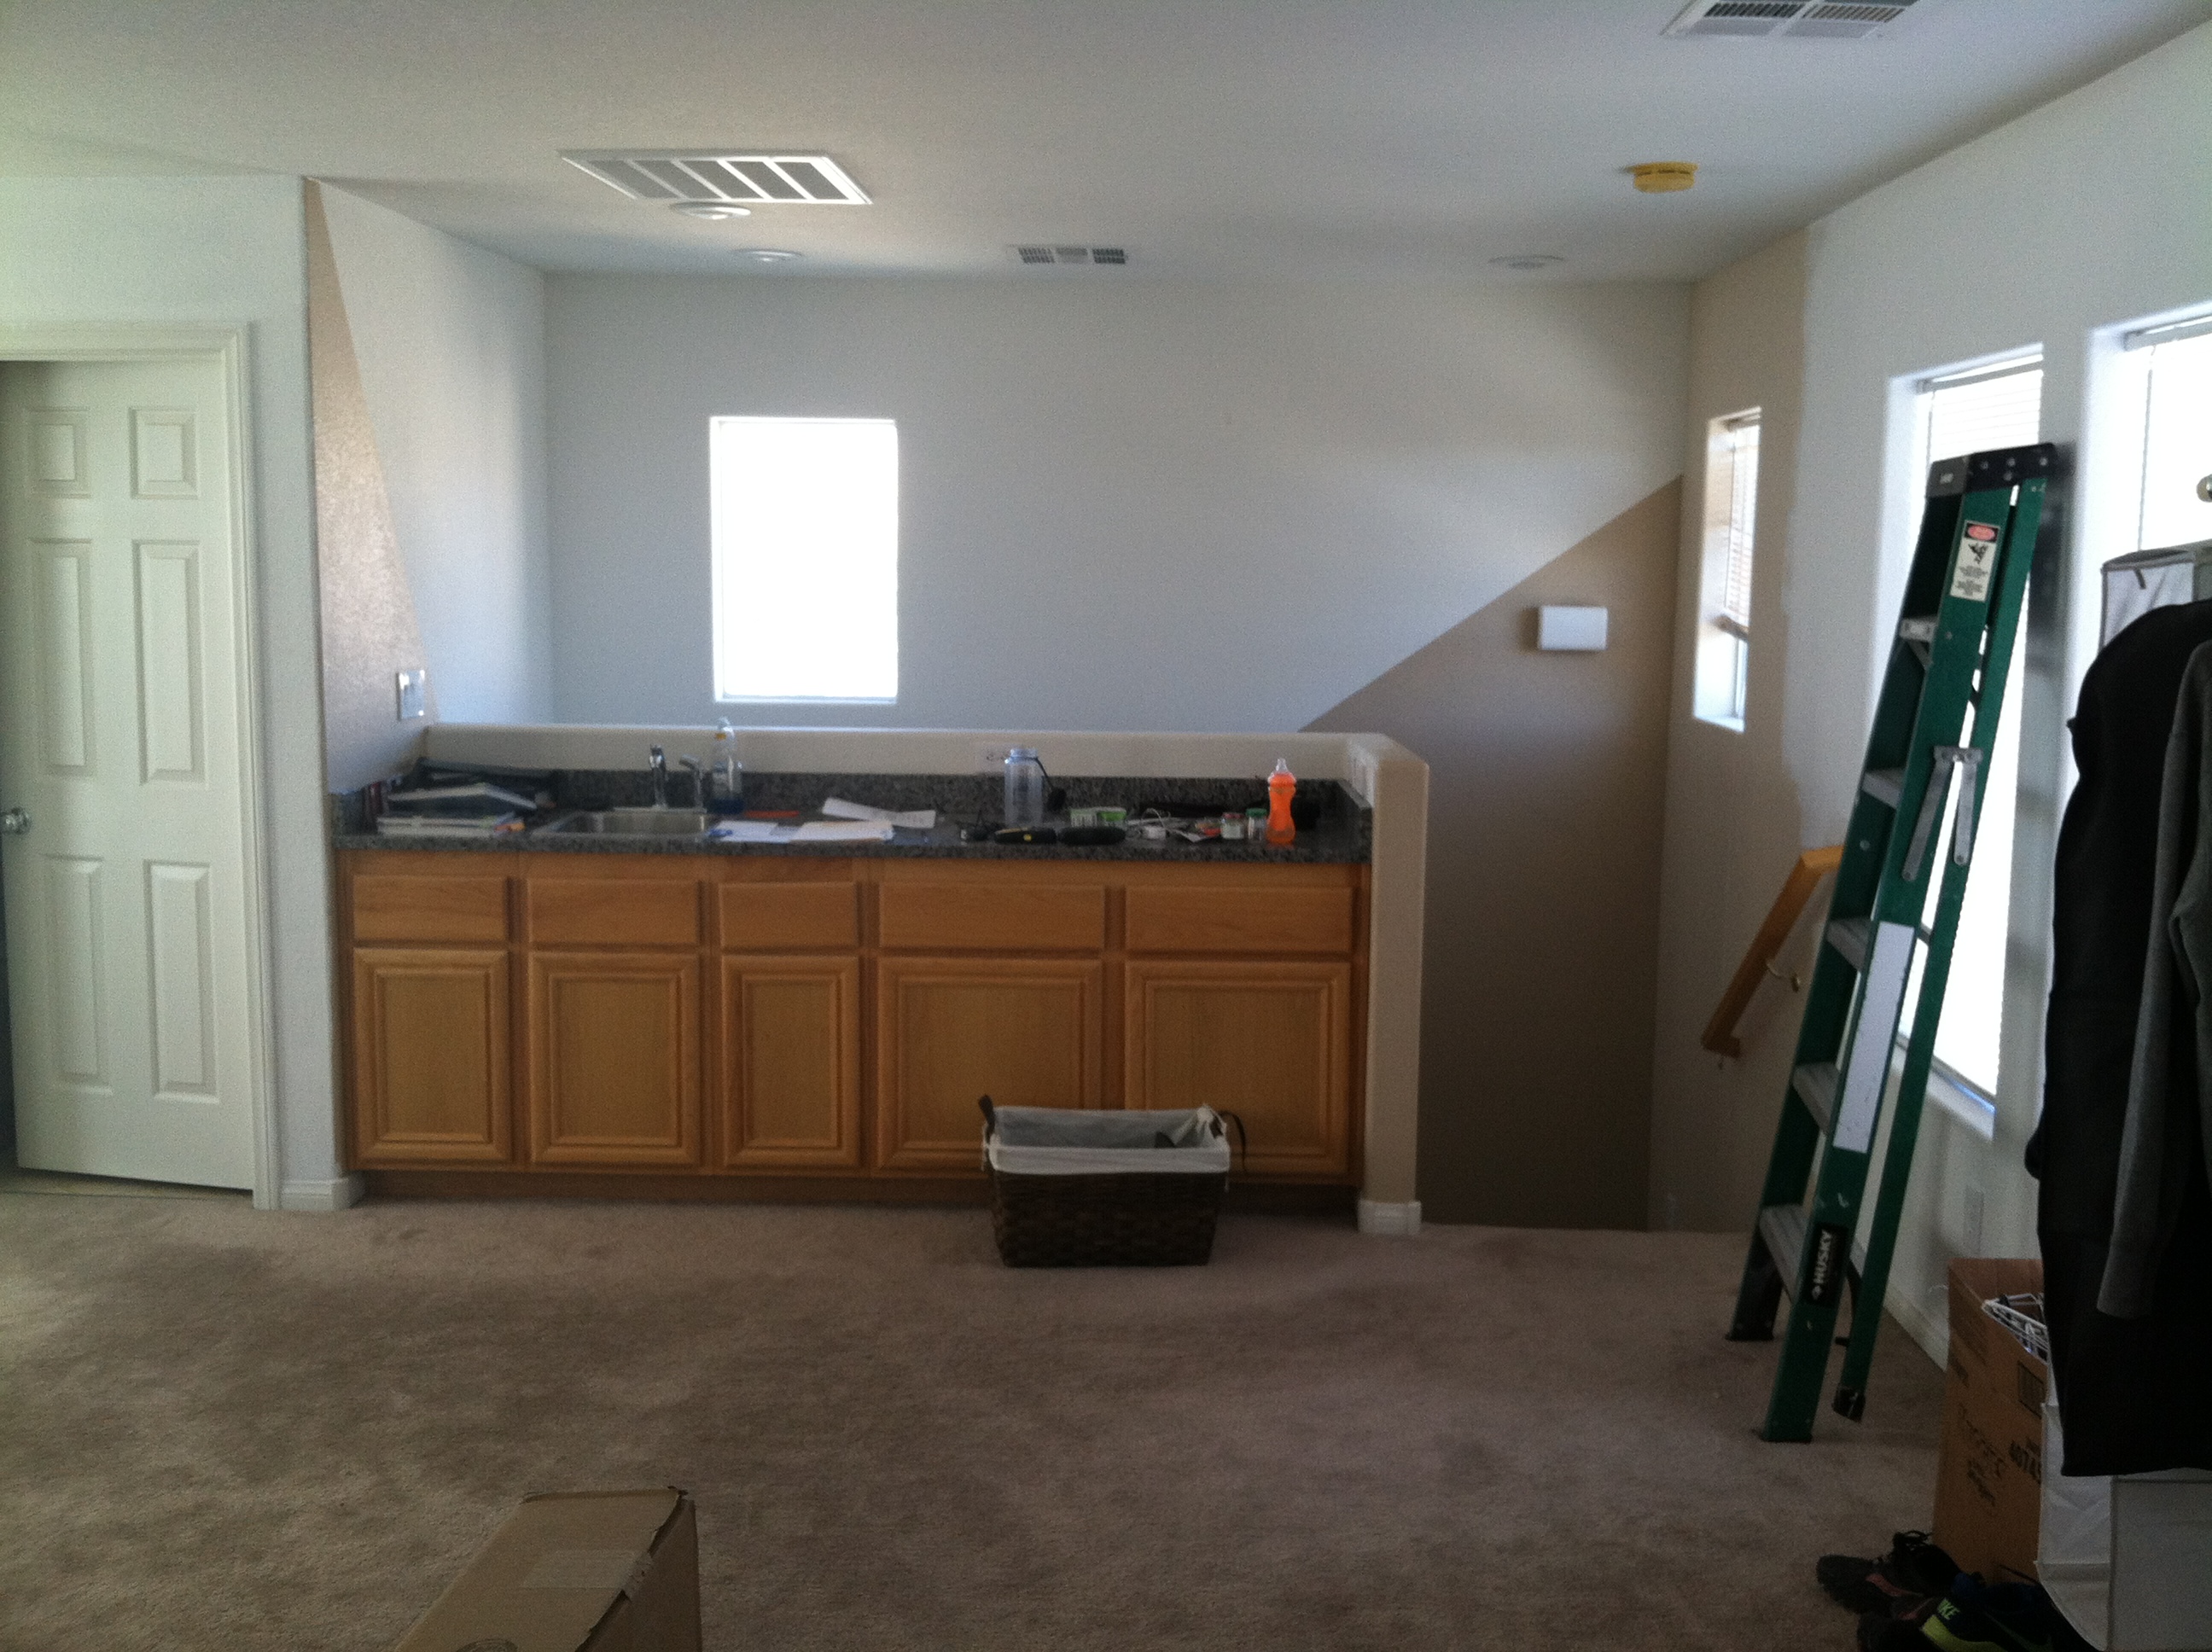

my brother- in- law was using the space as a media room previously. They were willing to give that up for a little bit  Yeah!
Yeah!
Now onto the demolition. First we had to rip up the carpet and a glued plywood floor that was laid on top of about 1/3 of the subfloor!

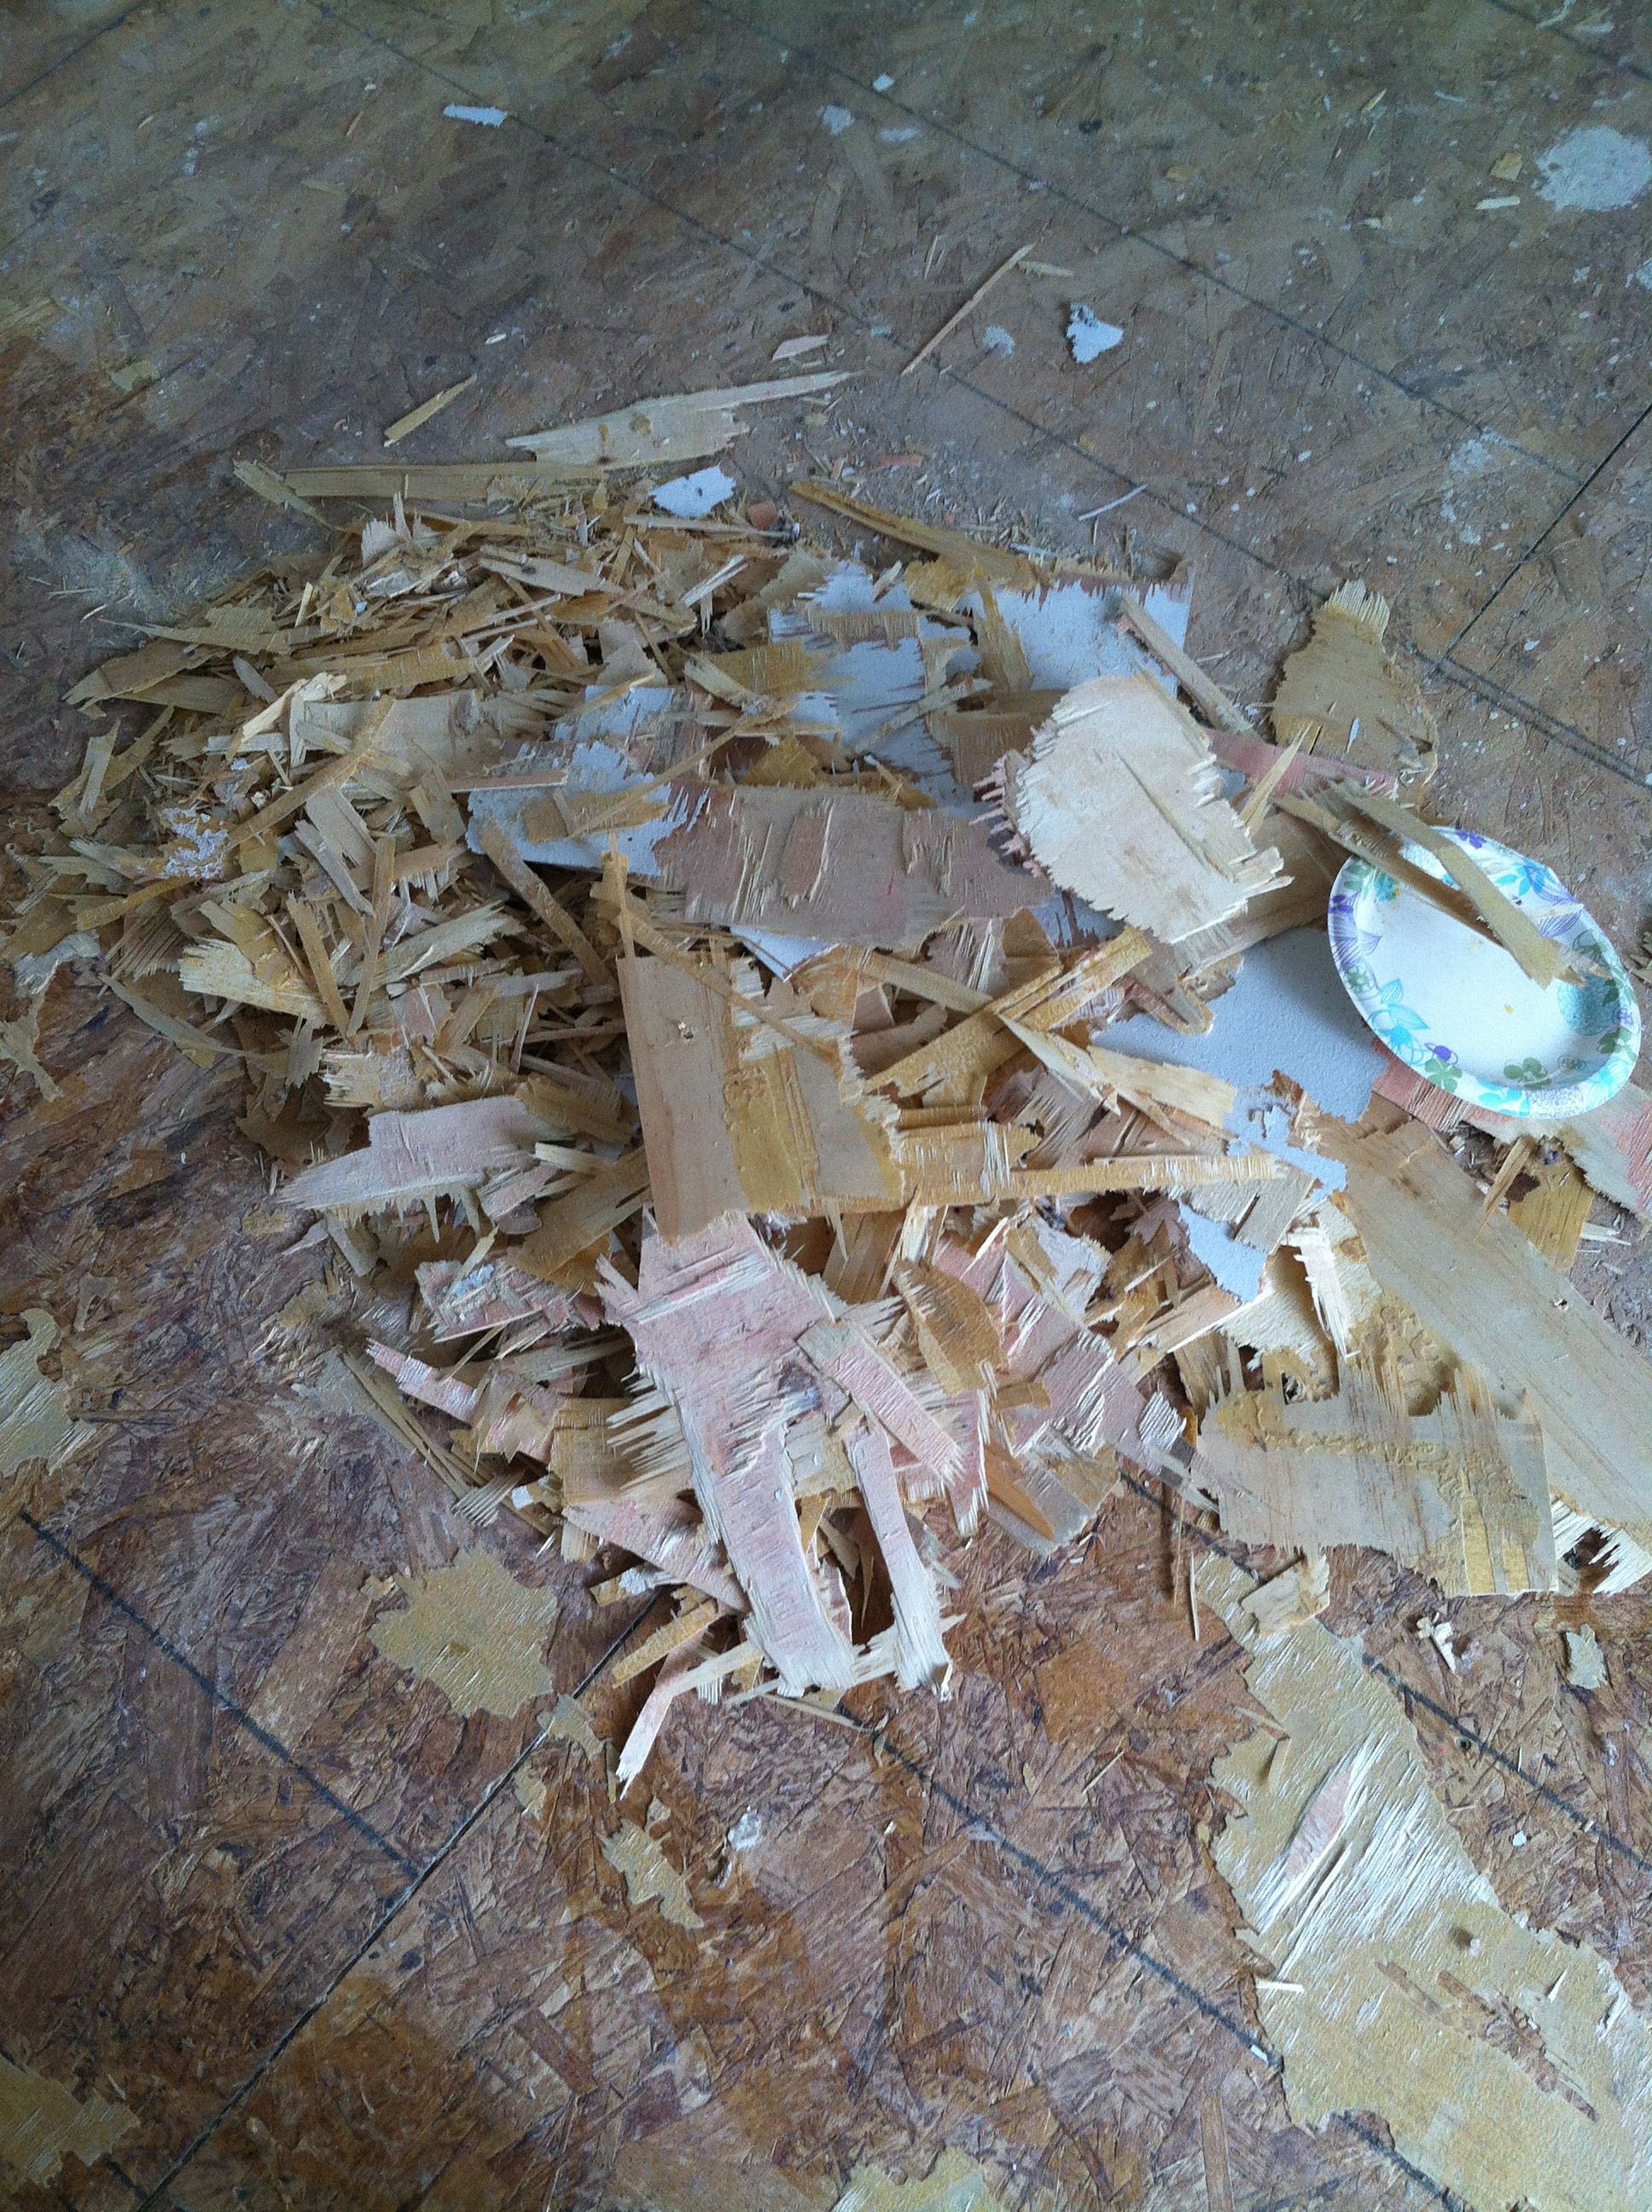
Such a mess! This part took forever and was a little bit of a set back that we weren’t expecting!

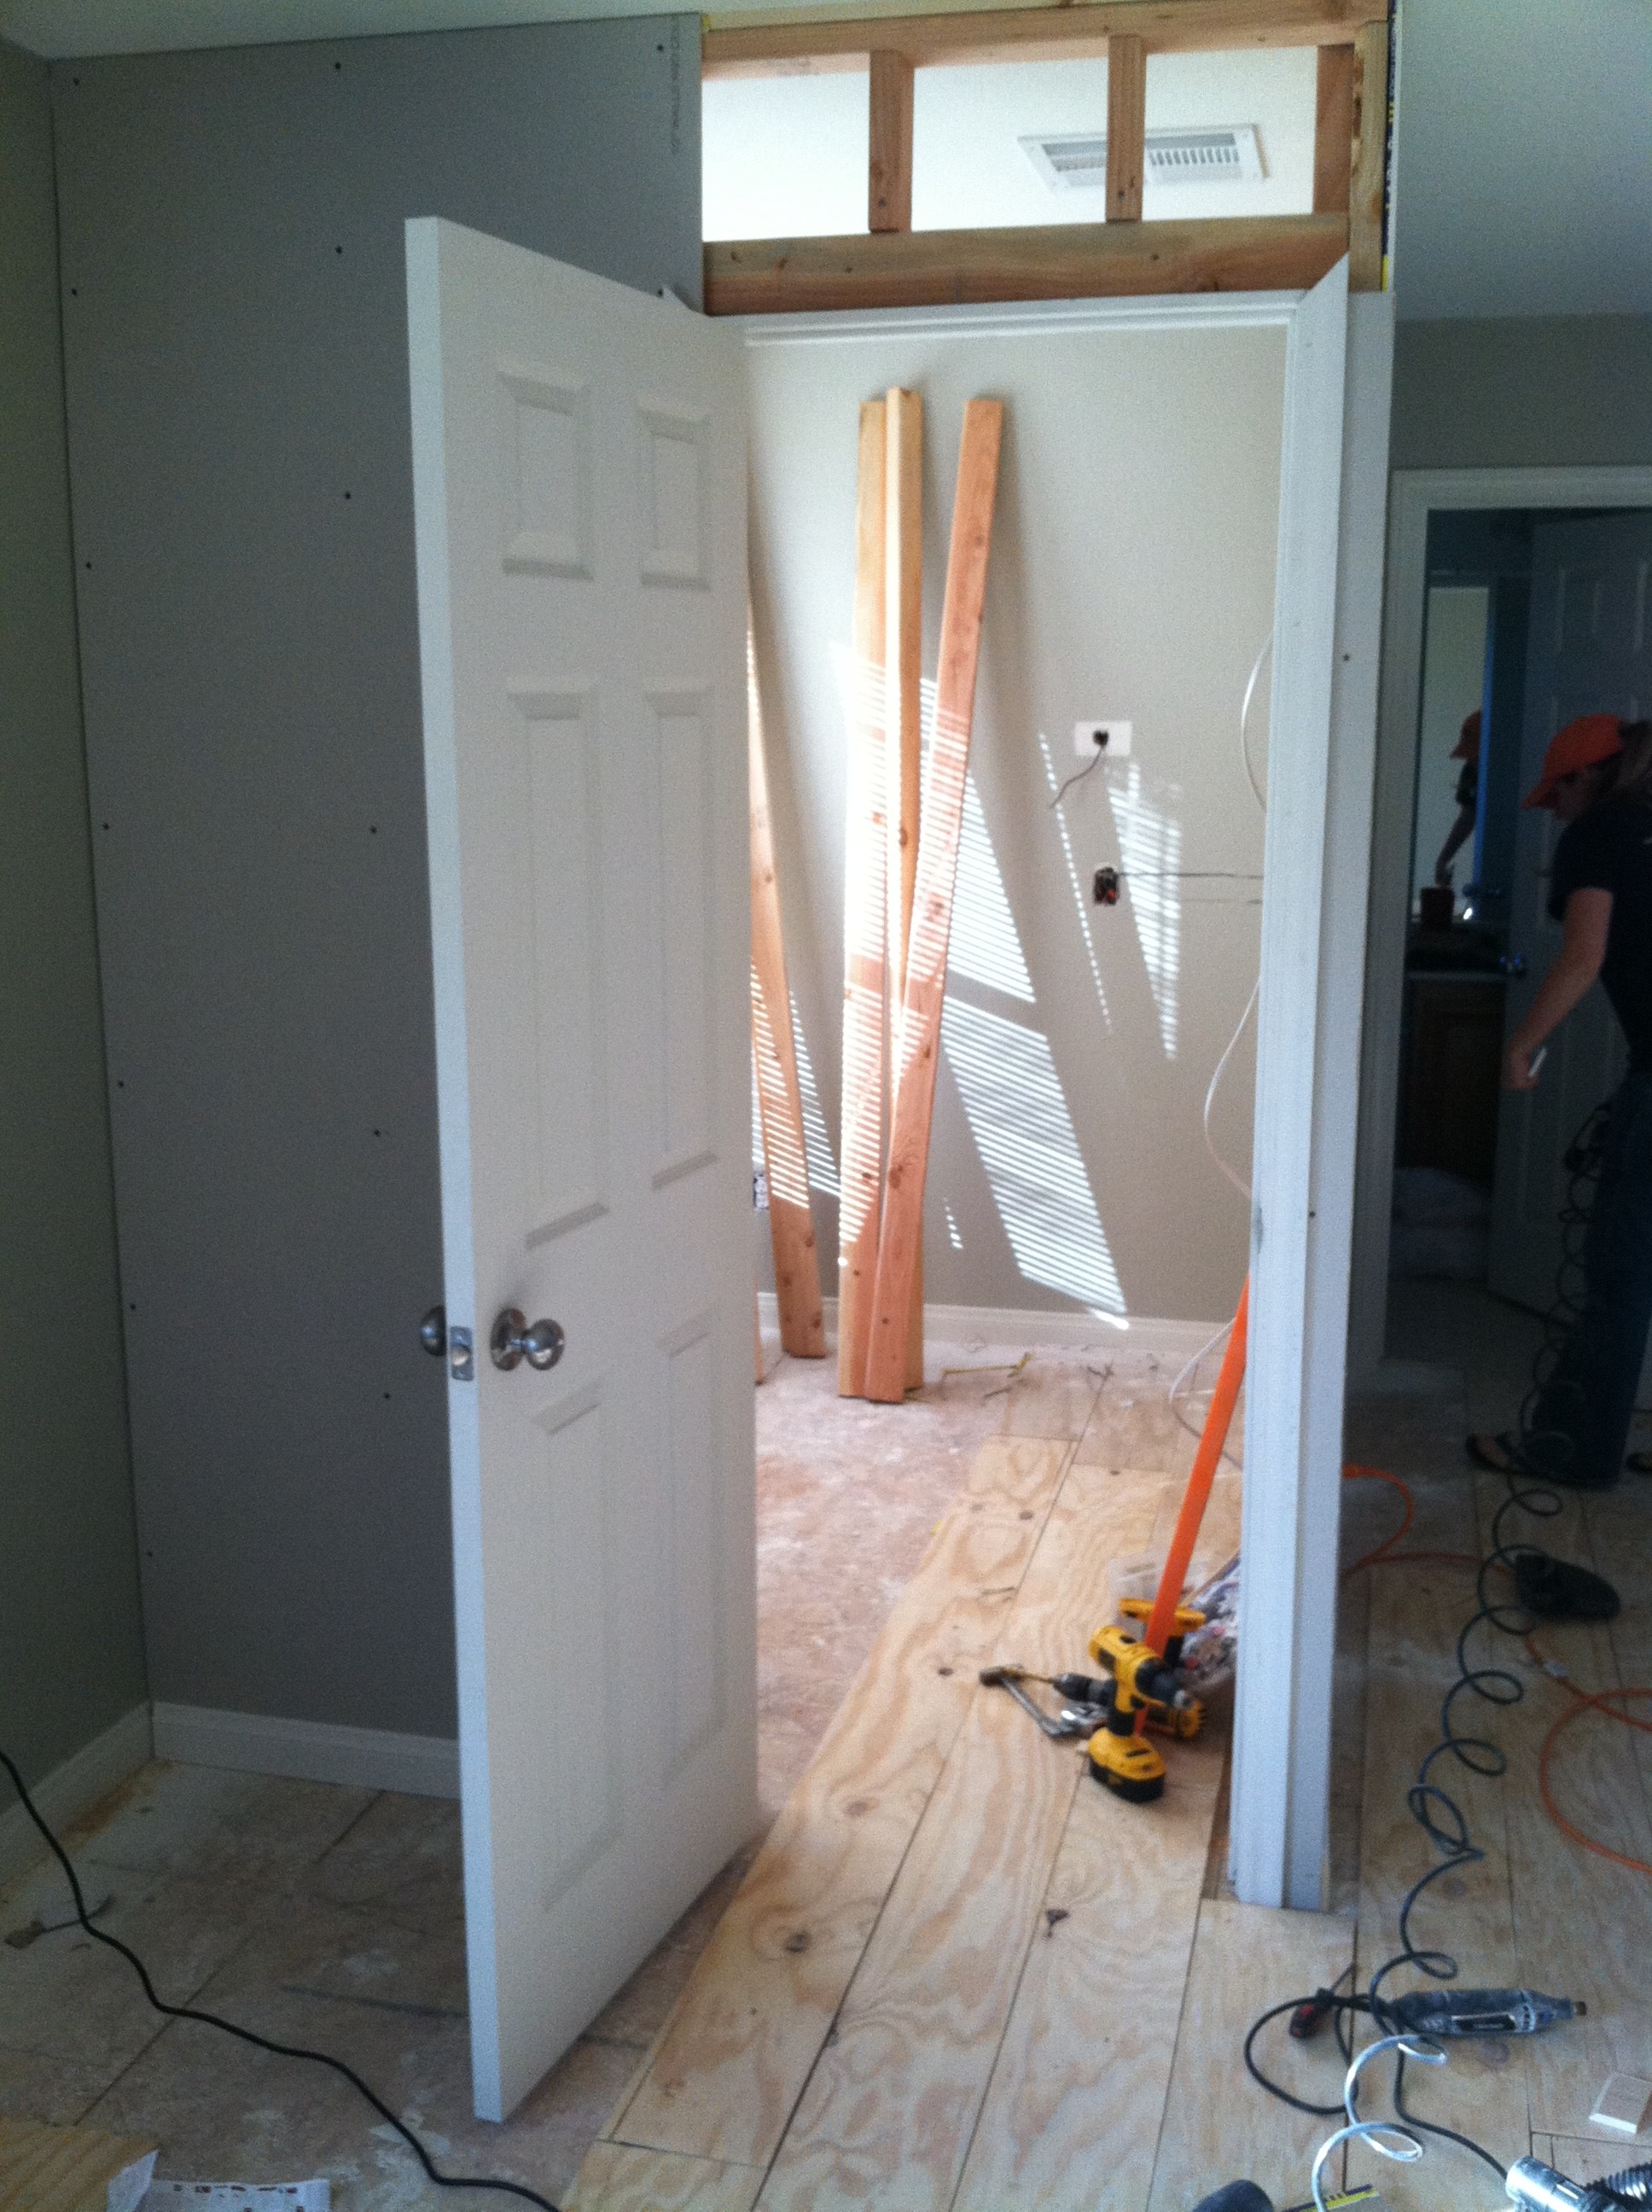
Next the guys did all the framing and wall building, while I supervised
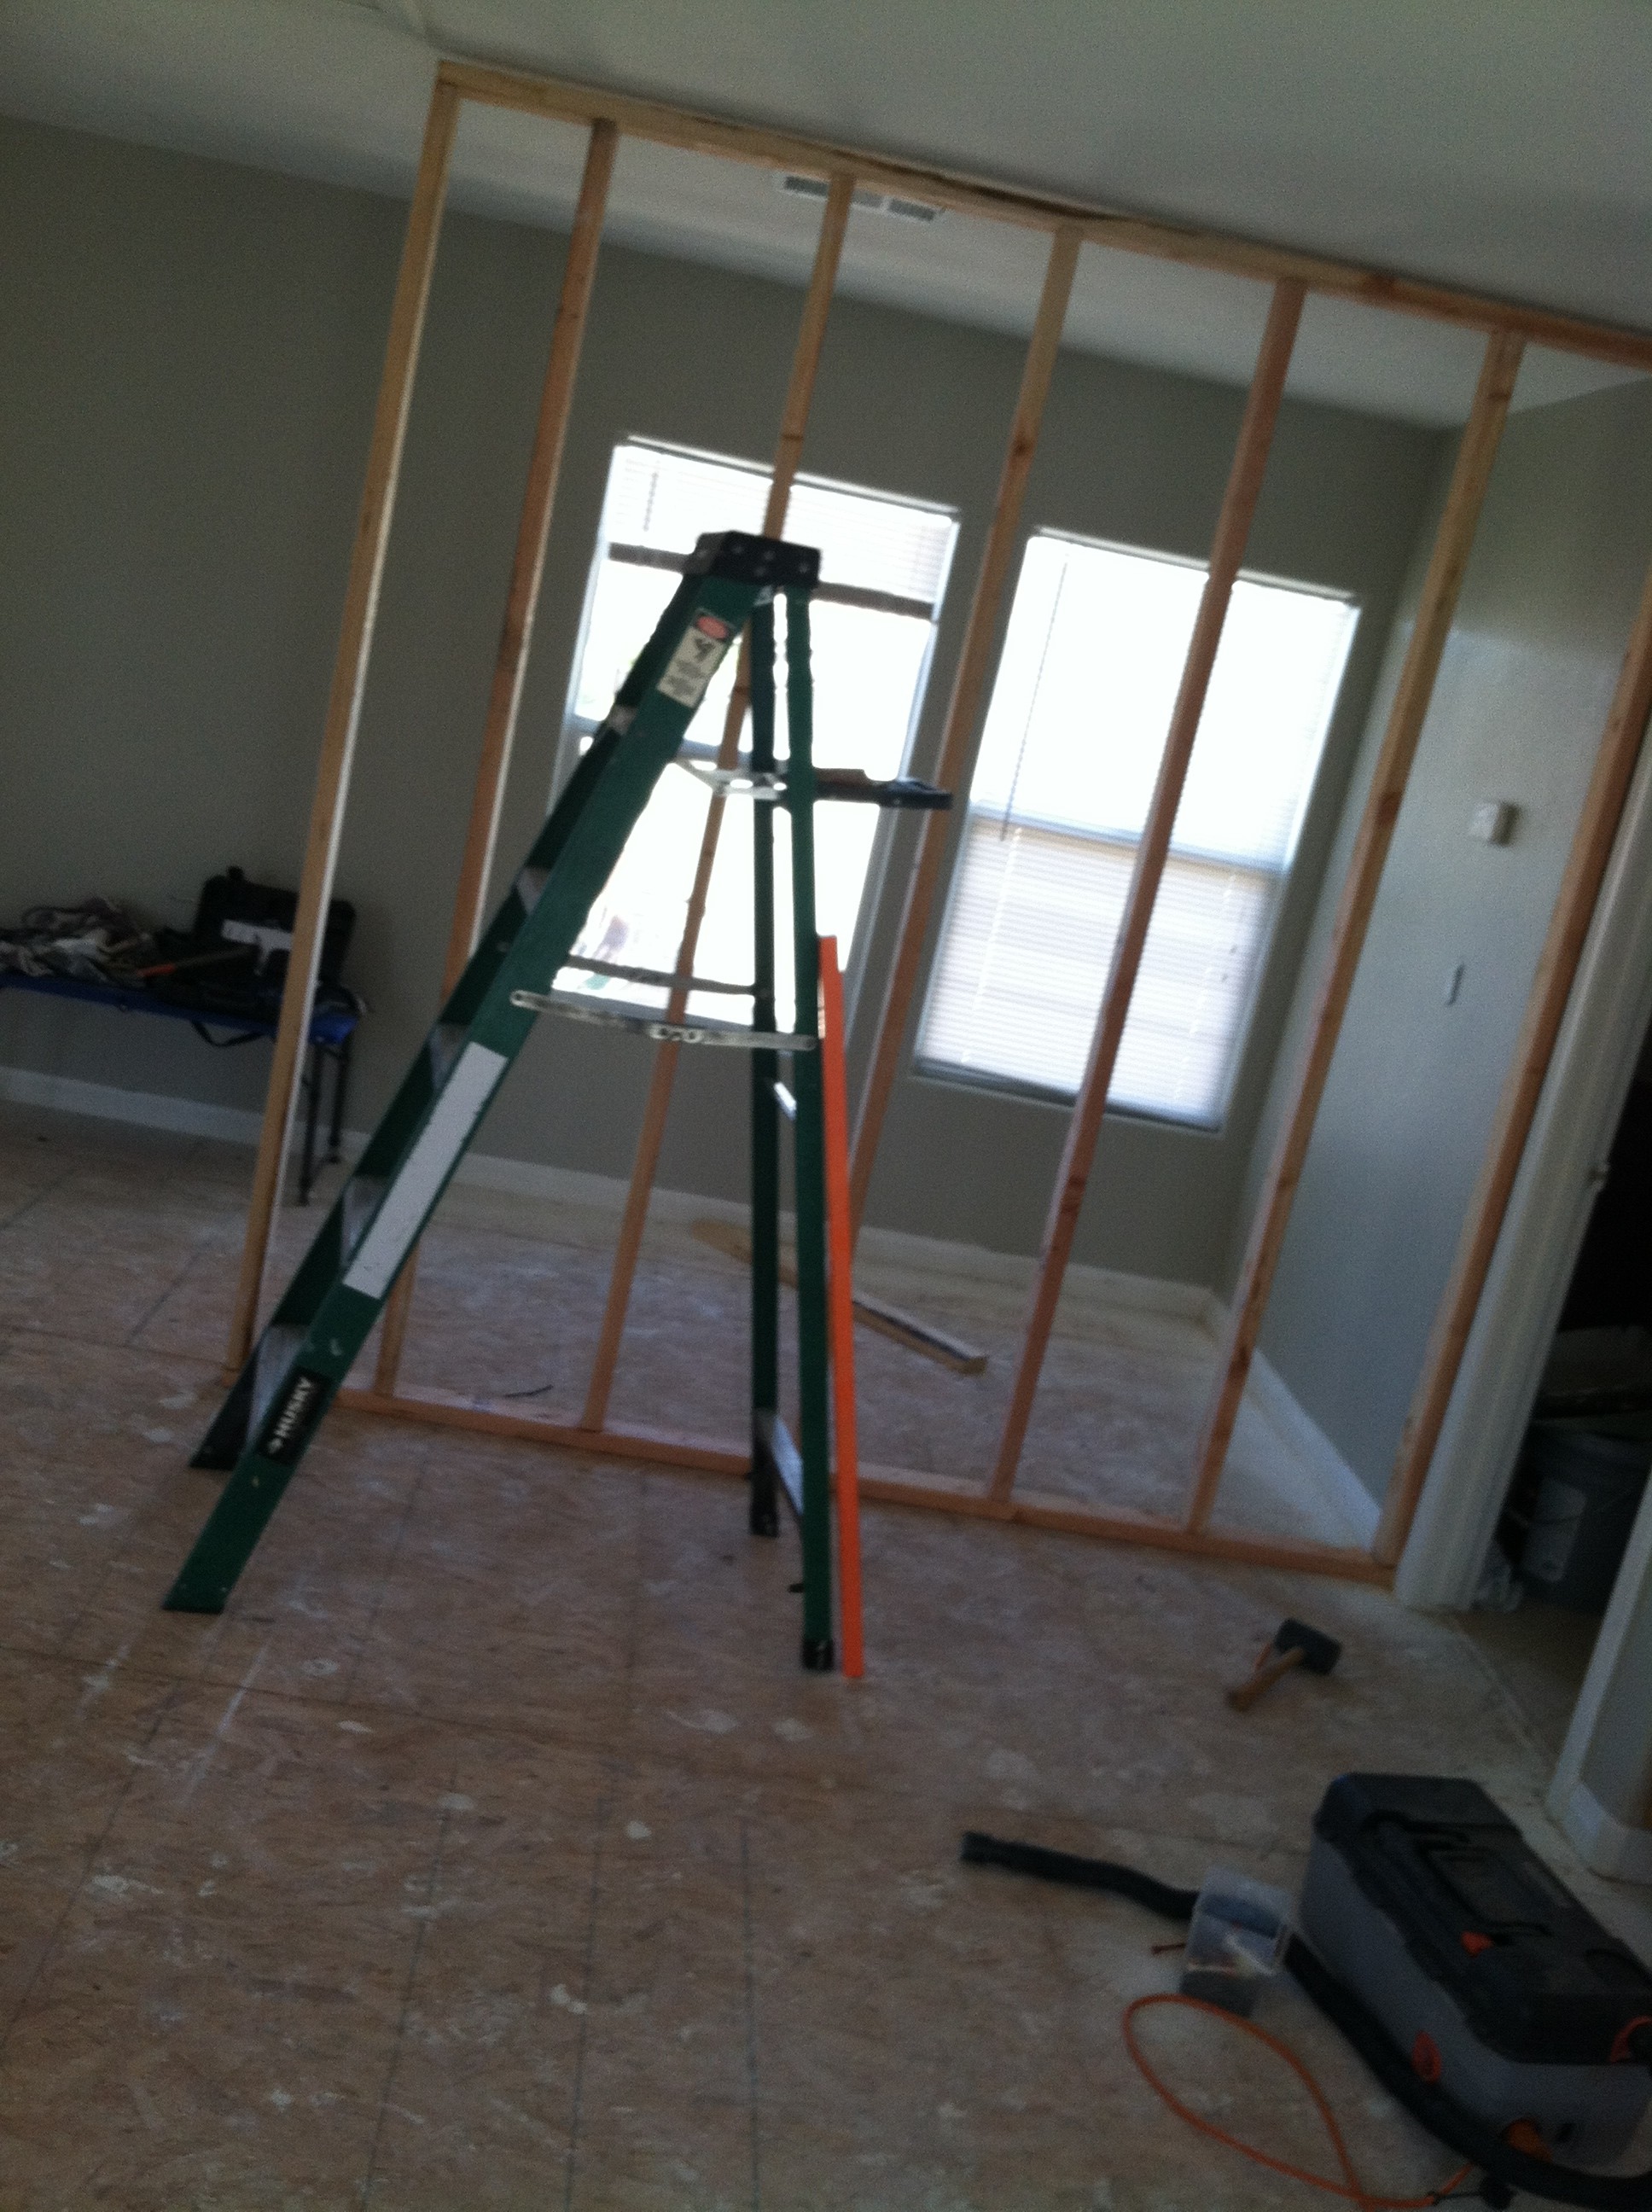 The making of Jack’s tiny room. And when I say tiny I mean tiny 😉
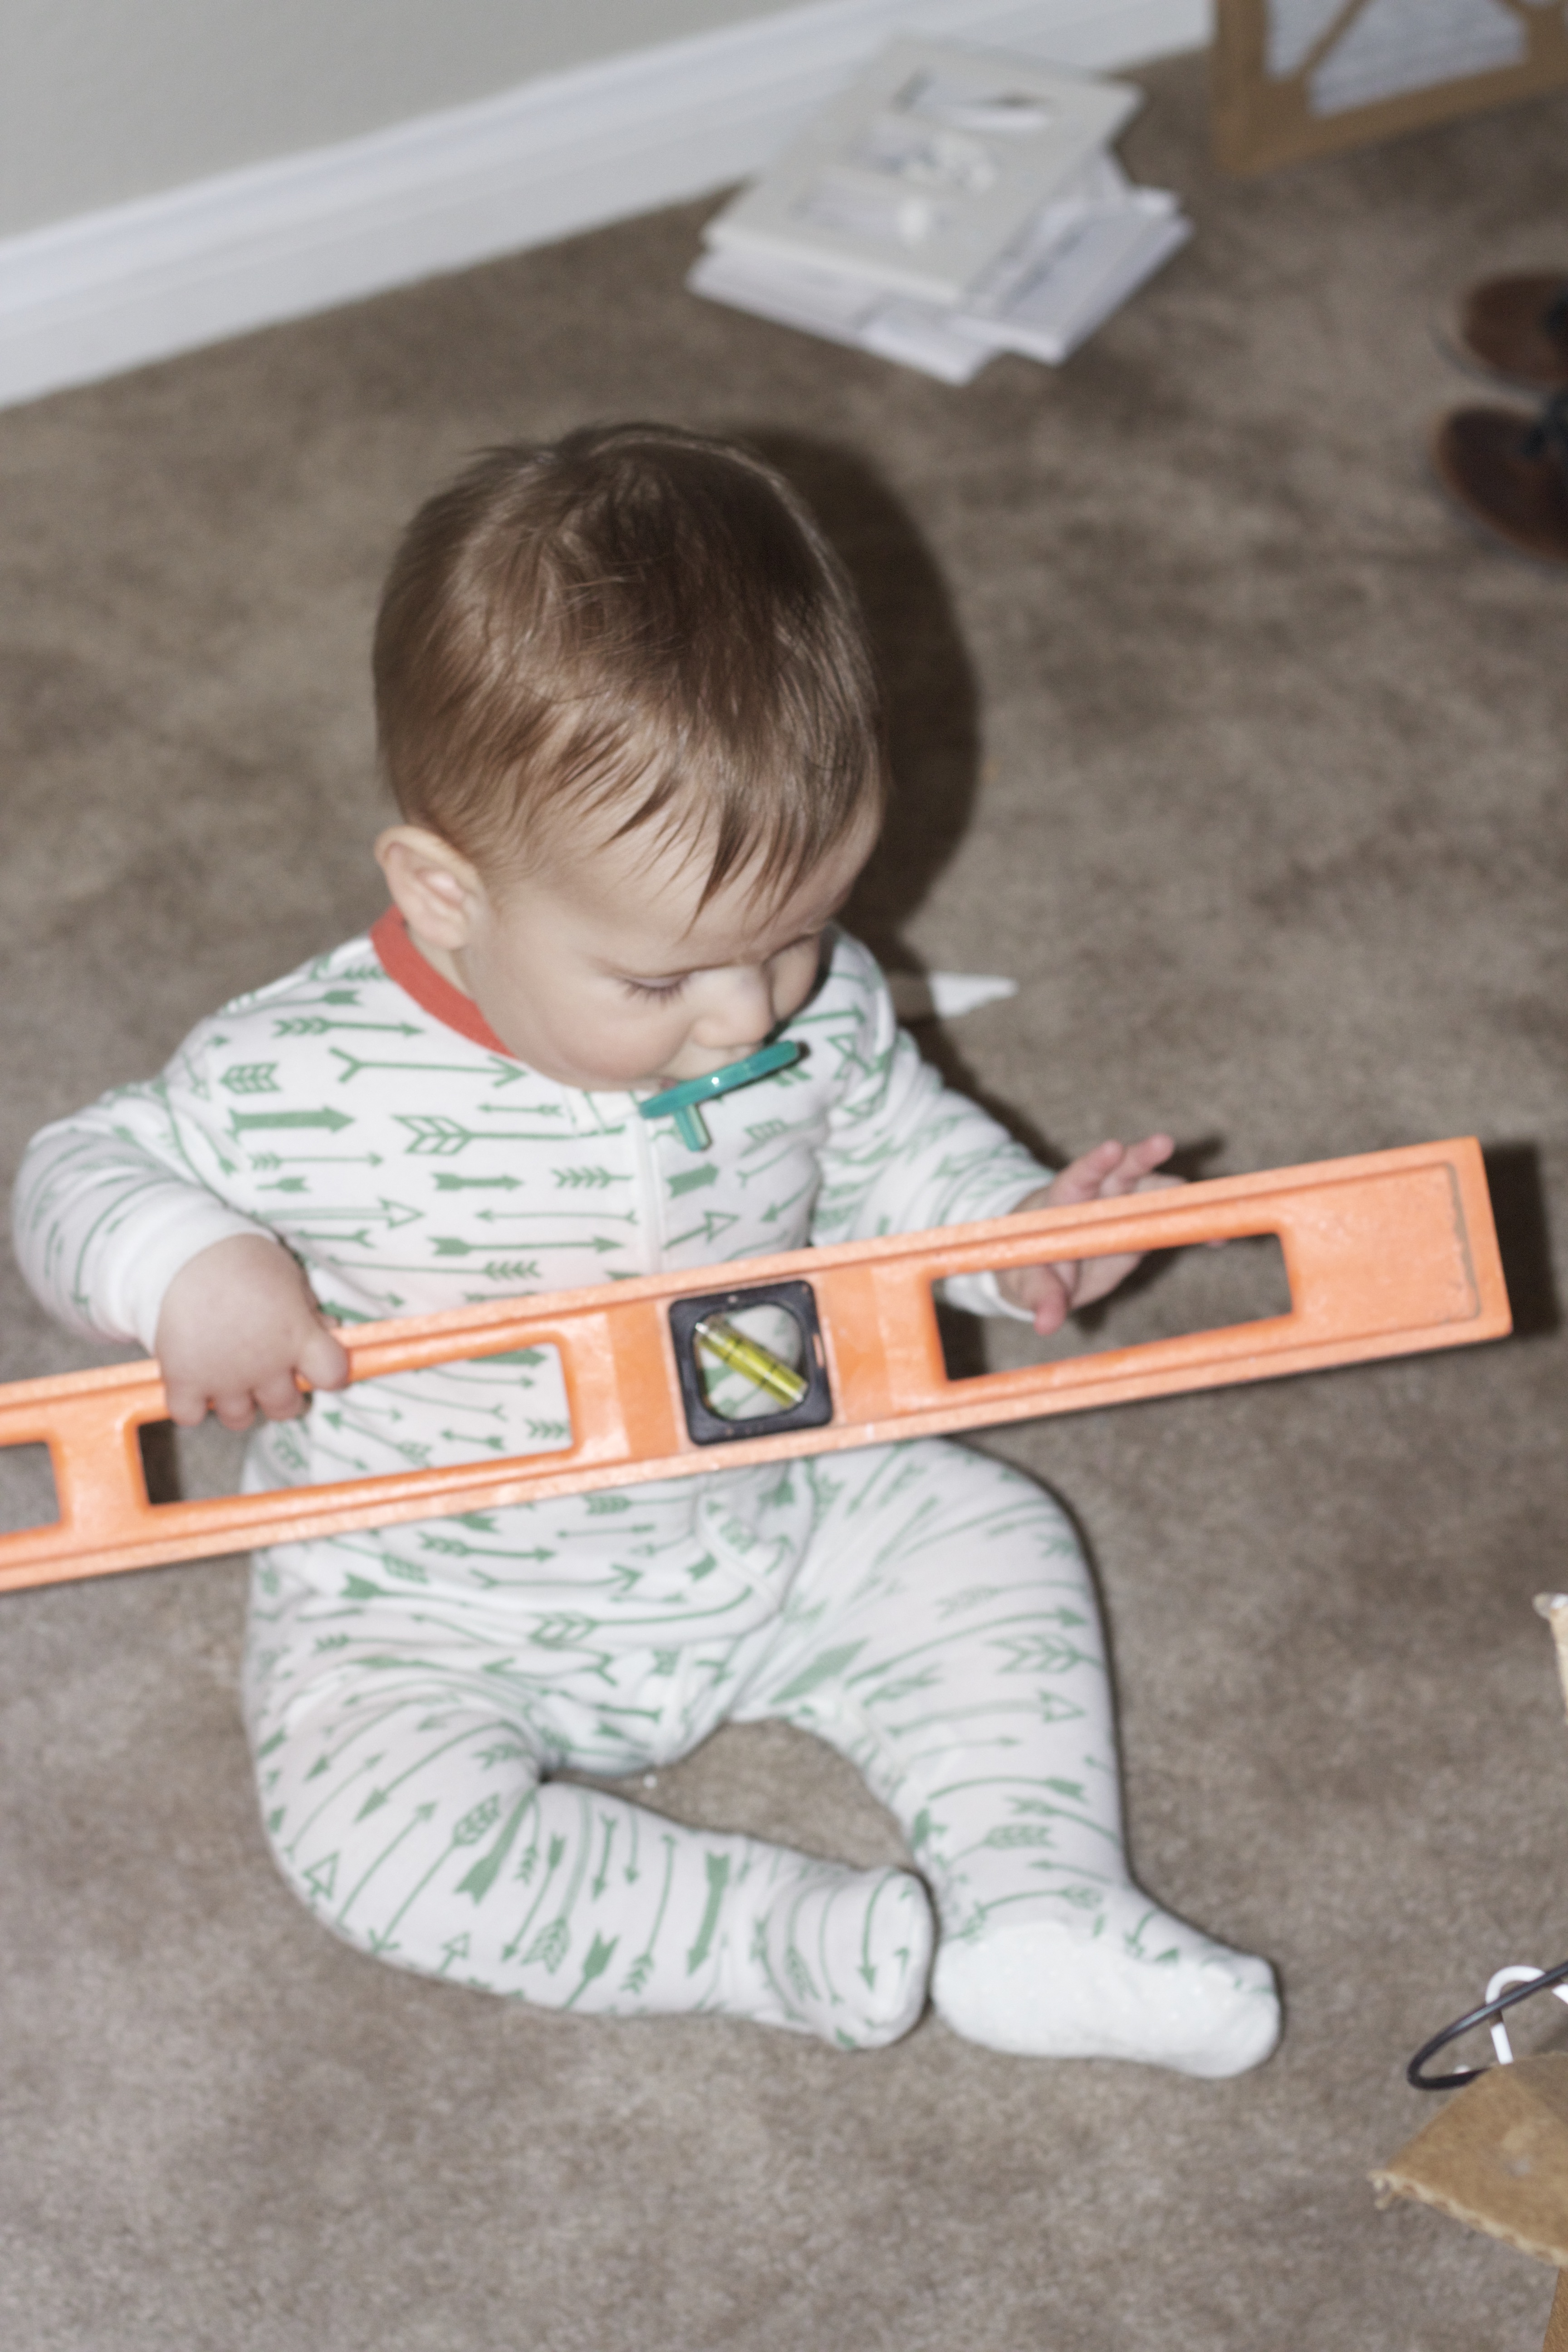
Jack was such a big helper 😉 Look how tiny he is!!!!
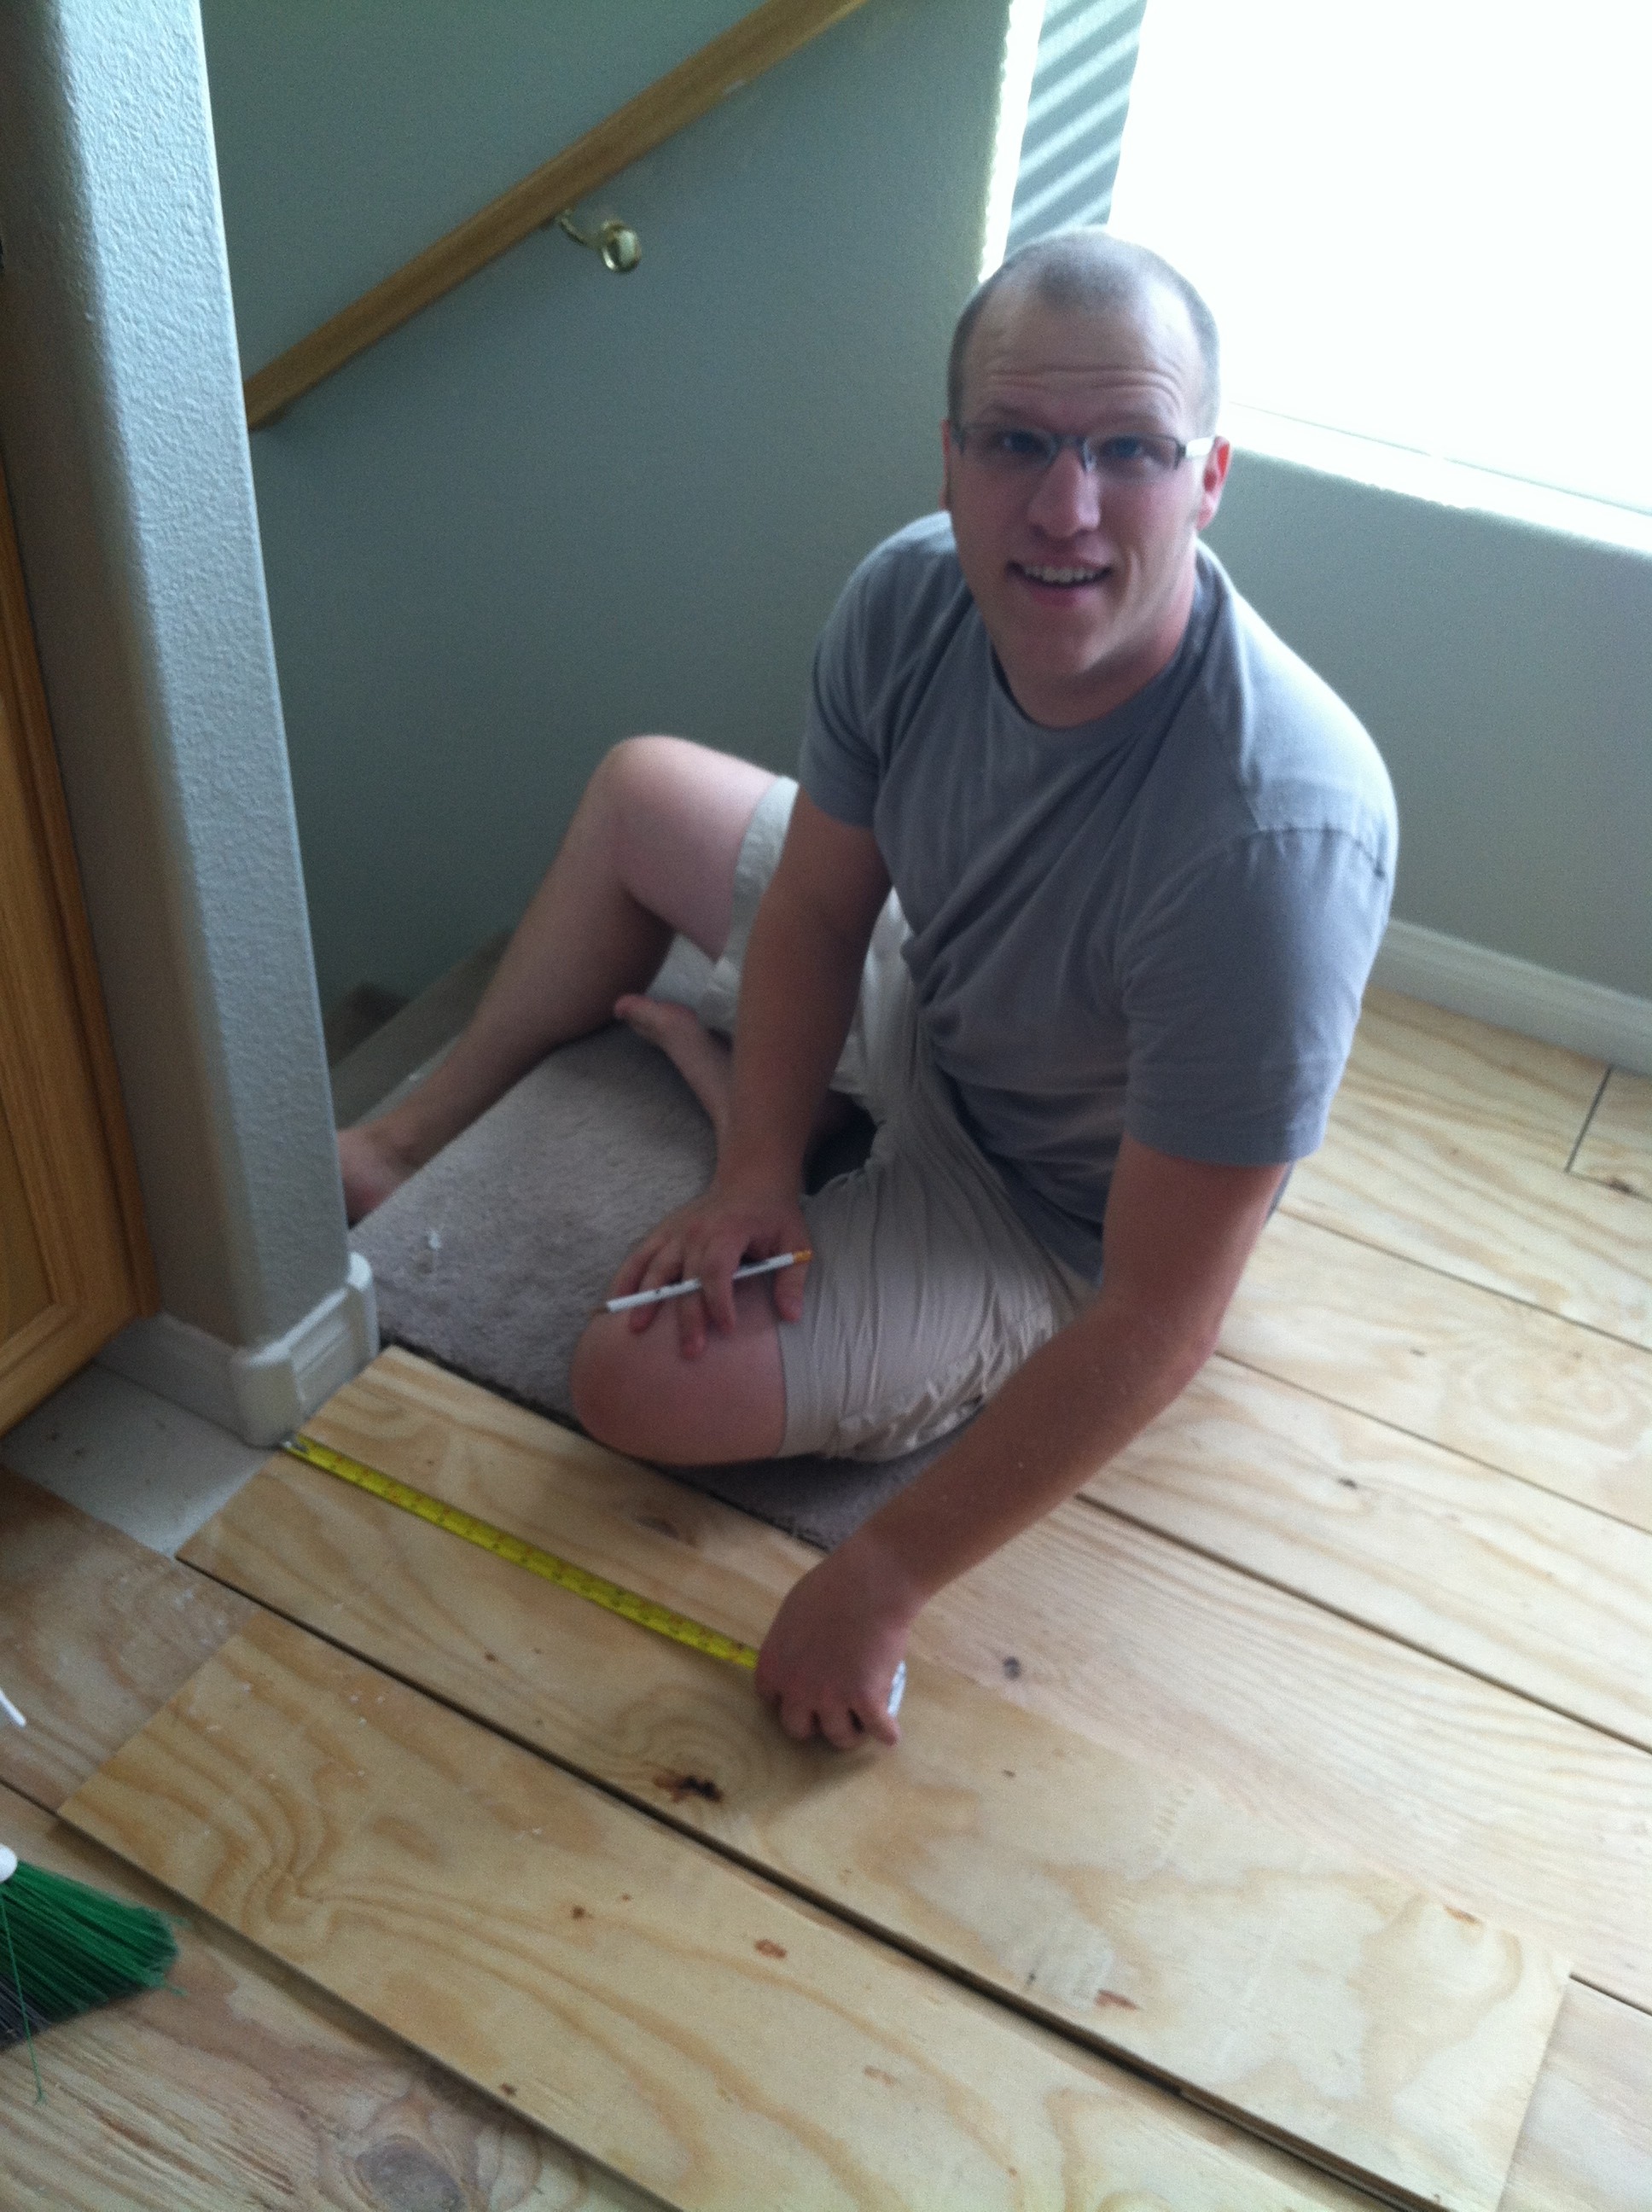
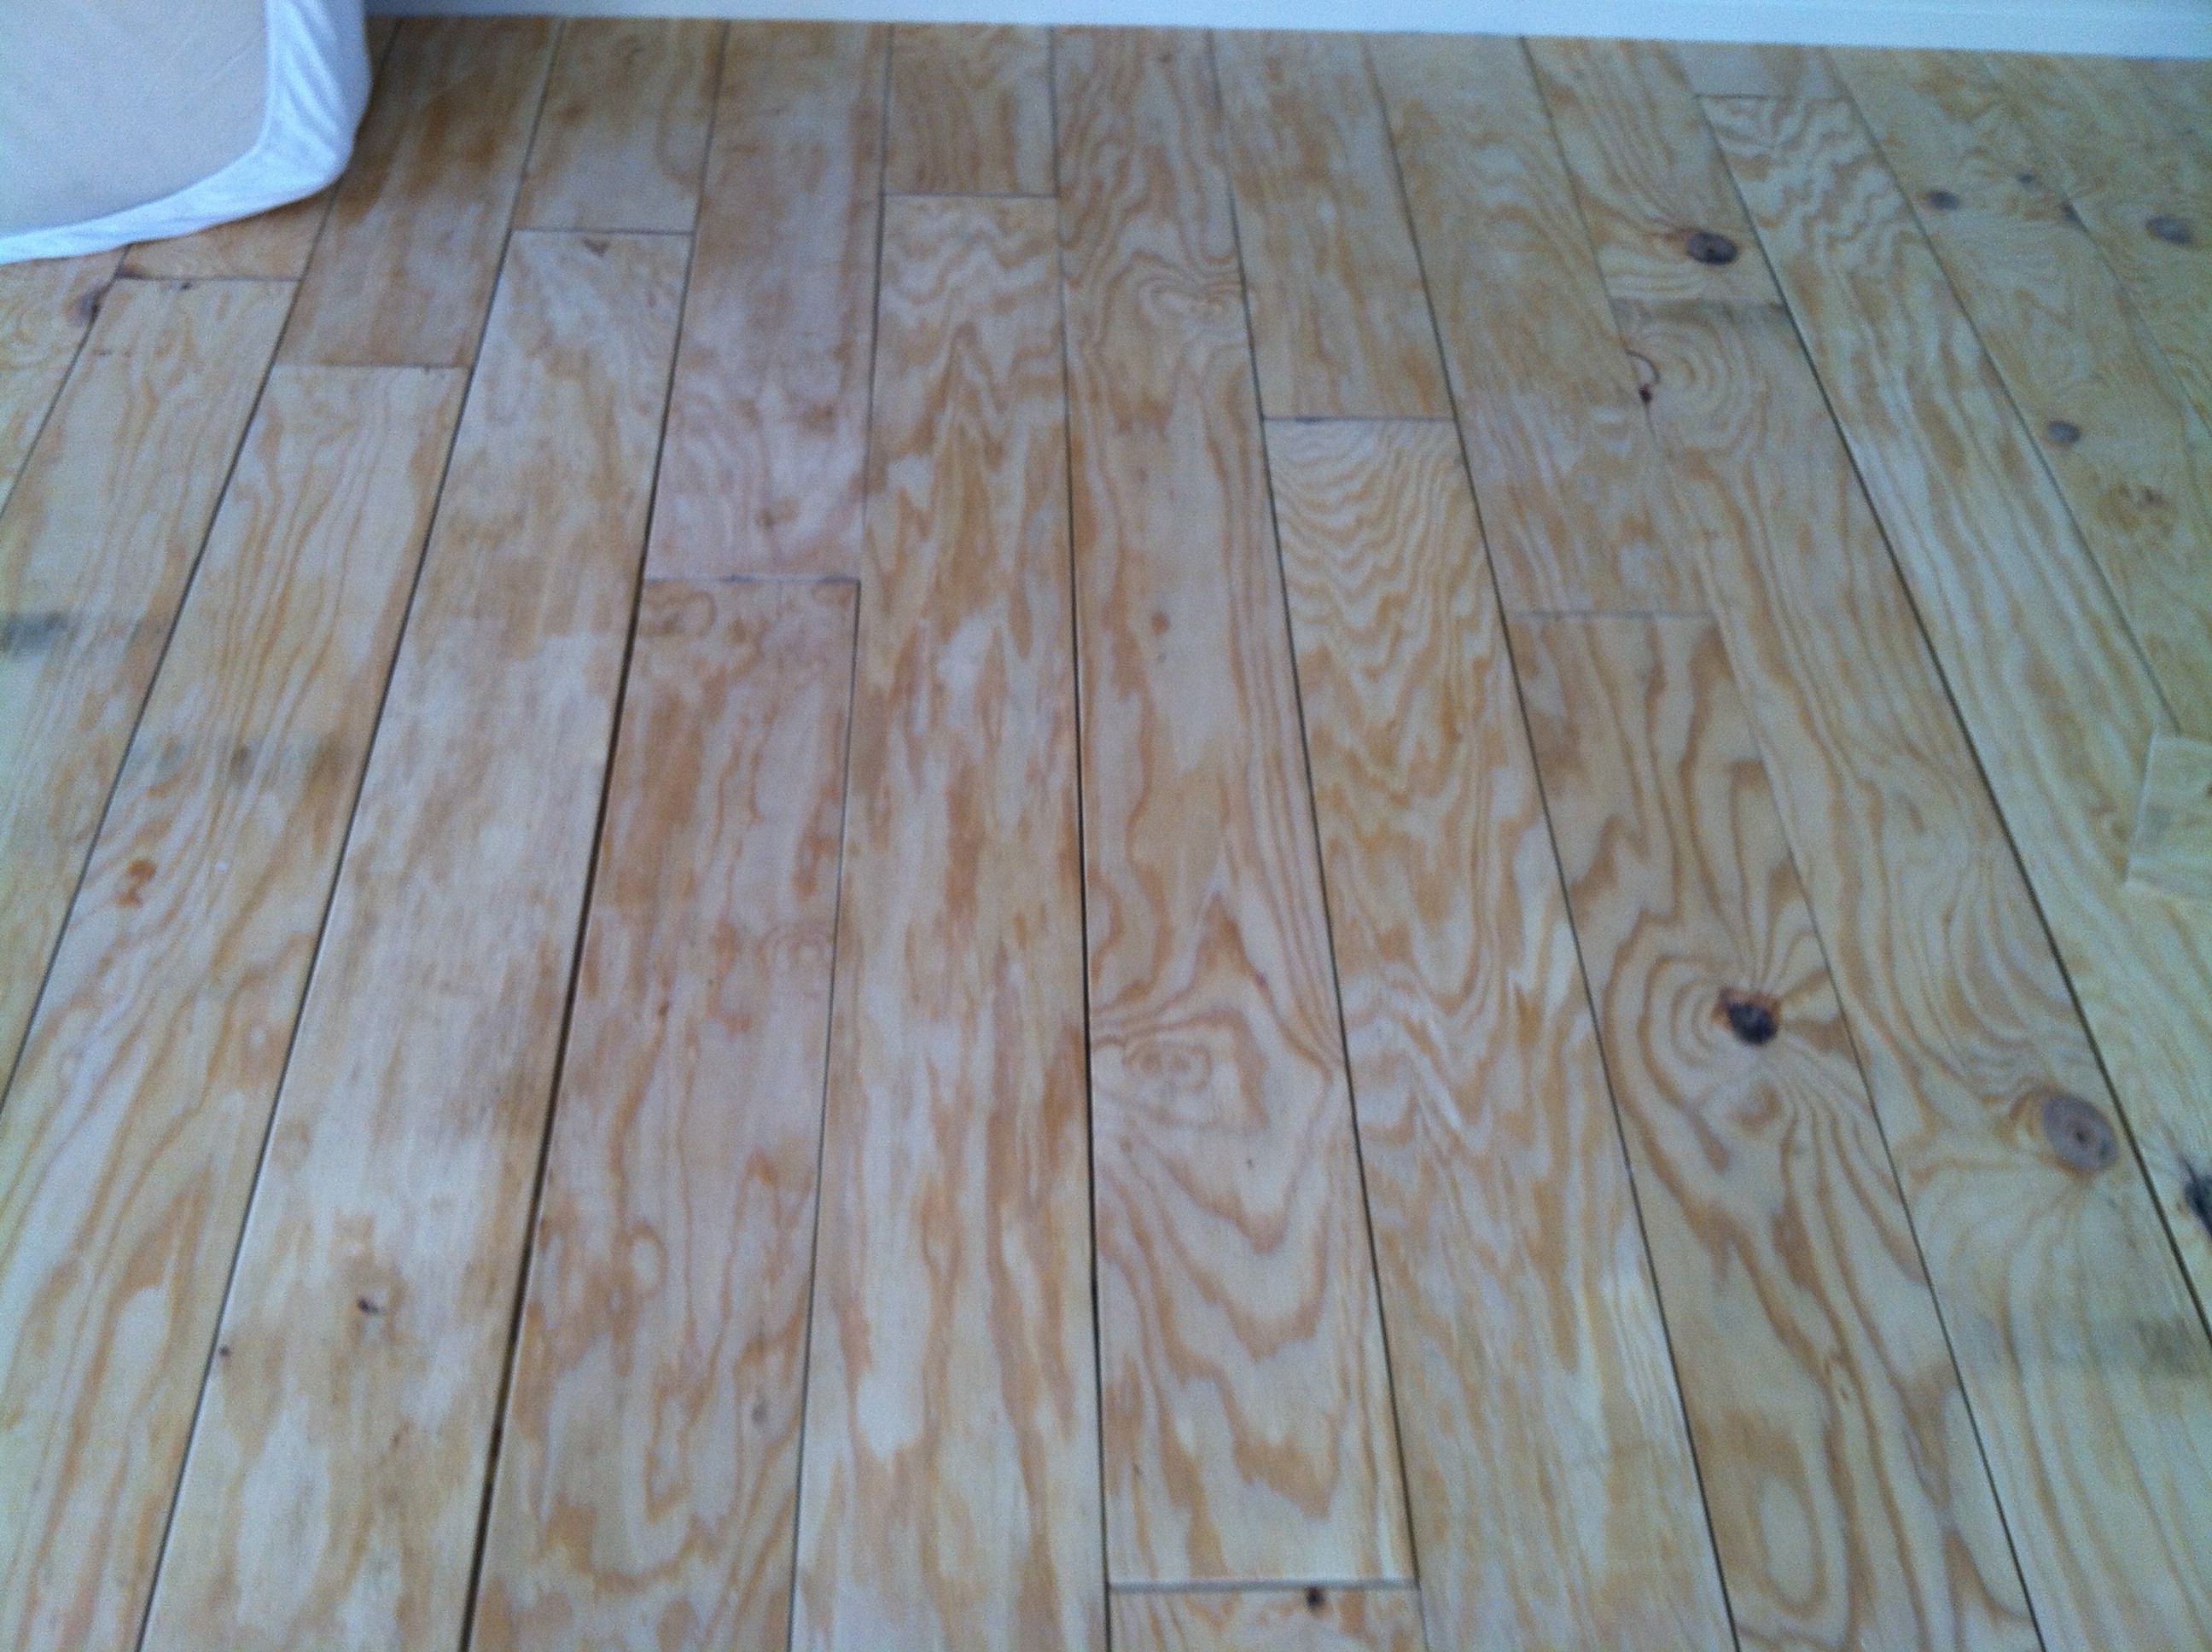
The plywood had to be ripped and sanded before we could lay it down. We probably could have had home depot rip the boards but Brian was determined to do it himself! I think he was just excited to have his table saw again since it had been in storage for 9 months! I have seen people do this both ways, sanding first then laying the floor down or laying the floor down and then sanding. The latter sounded way too messy so we sanded first!
This is what it looked like:

 some of the boards waiting to be sanded! There were A LOT of boards! The room we did was just under 600 sqft! We used 18 sheets of plywood ripped into 8in planks! Thats 108 boards that had to be sanded! AHHHHH
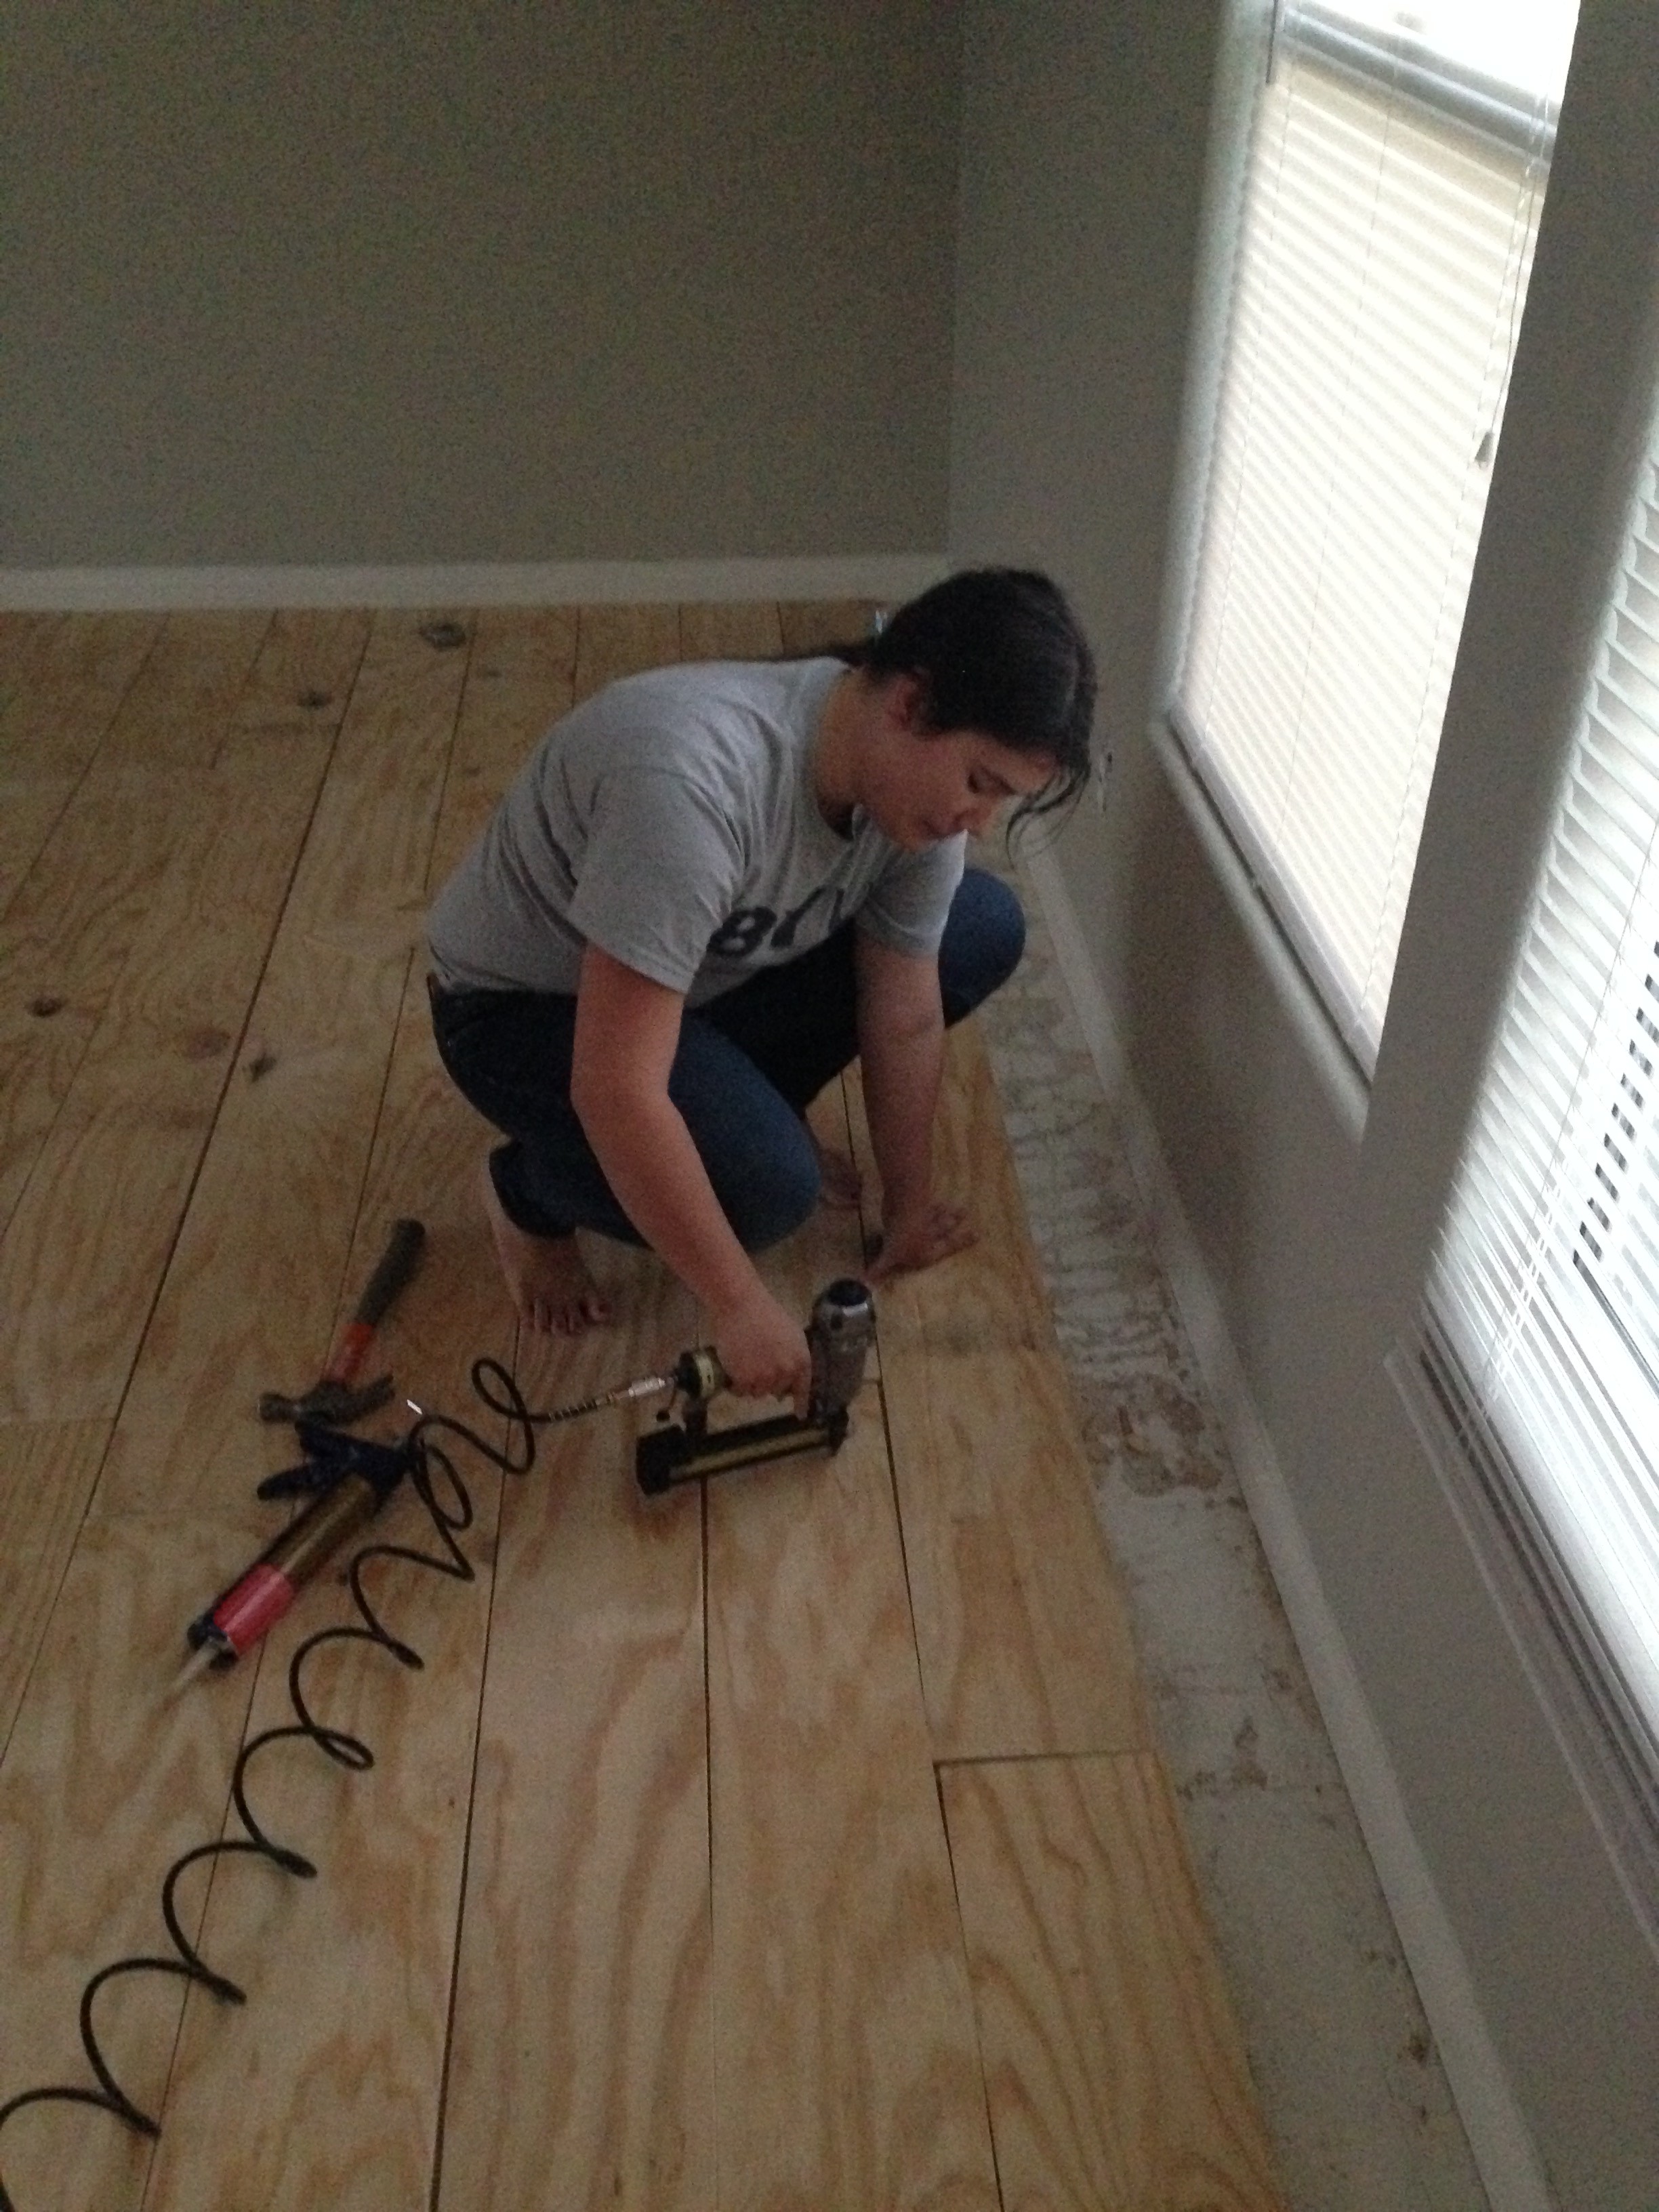
Once all the boards were ripped and sanded we started laying them down. We glued each board down with liquid nail and then used the nail gun and brad nails to secure the boards onto the sub floor. We didn’t put anything between the planks and the sub floor and we haven’t had any problems with squeaking so that is good
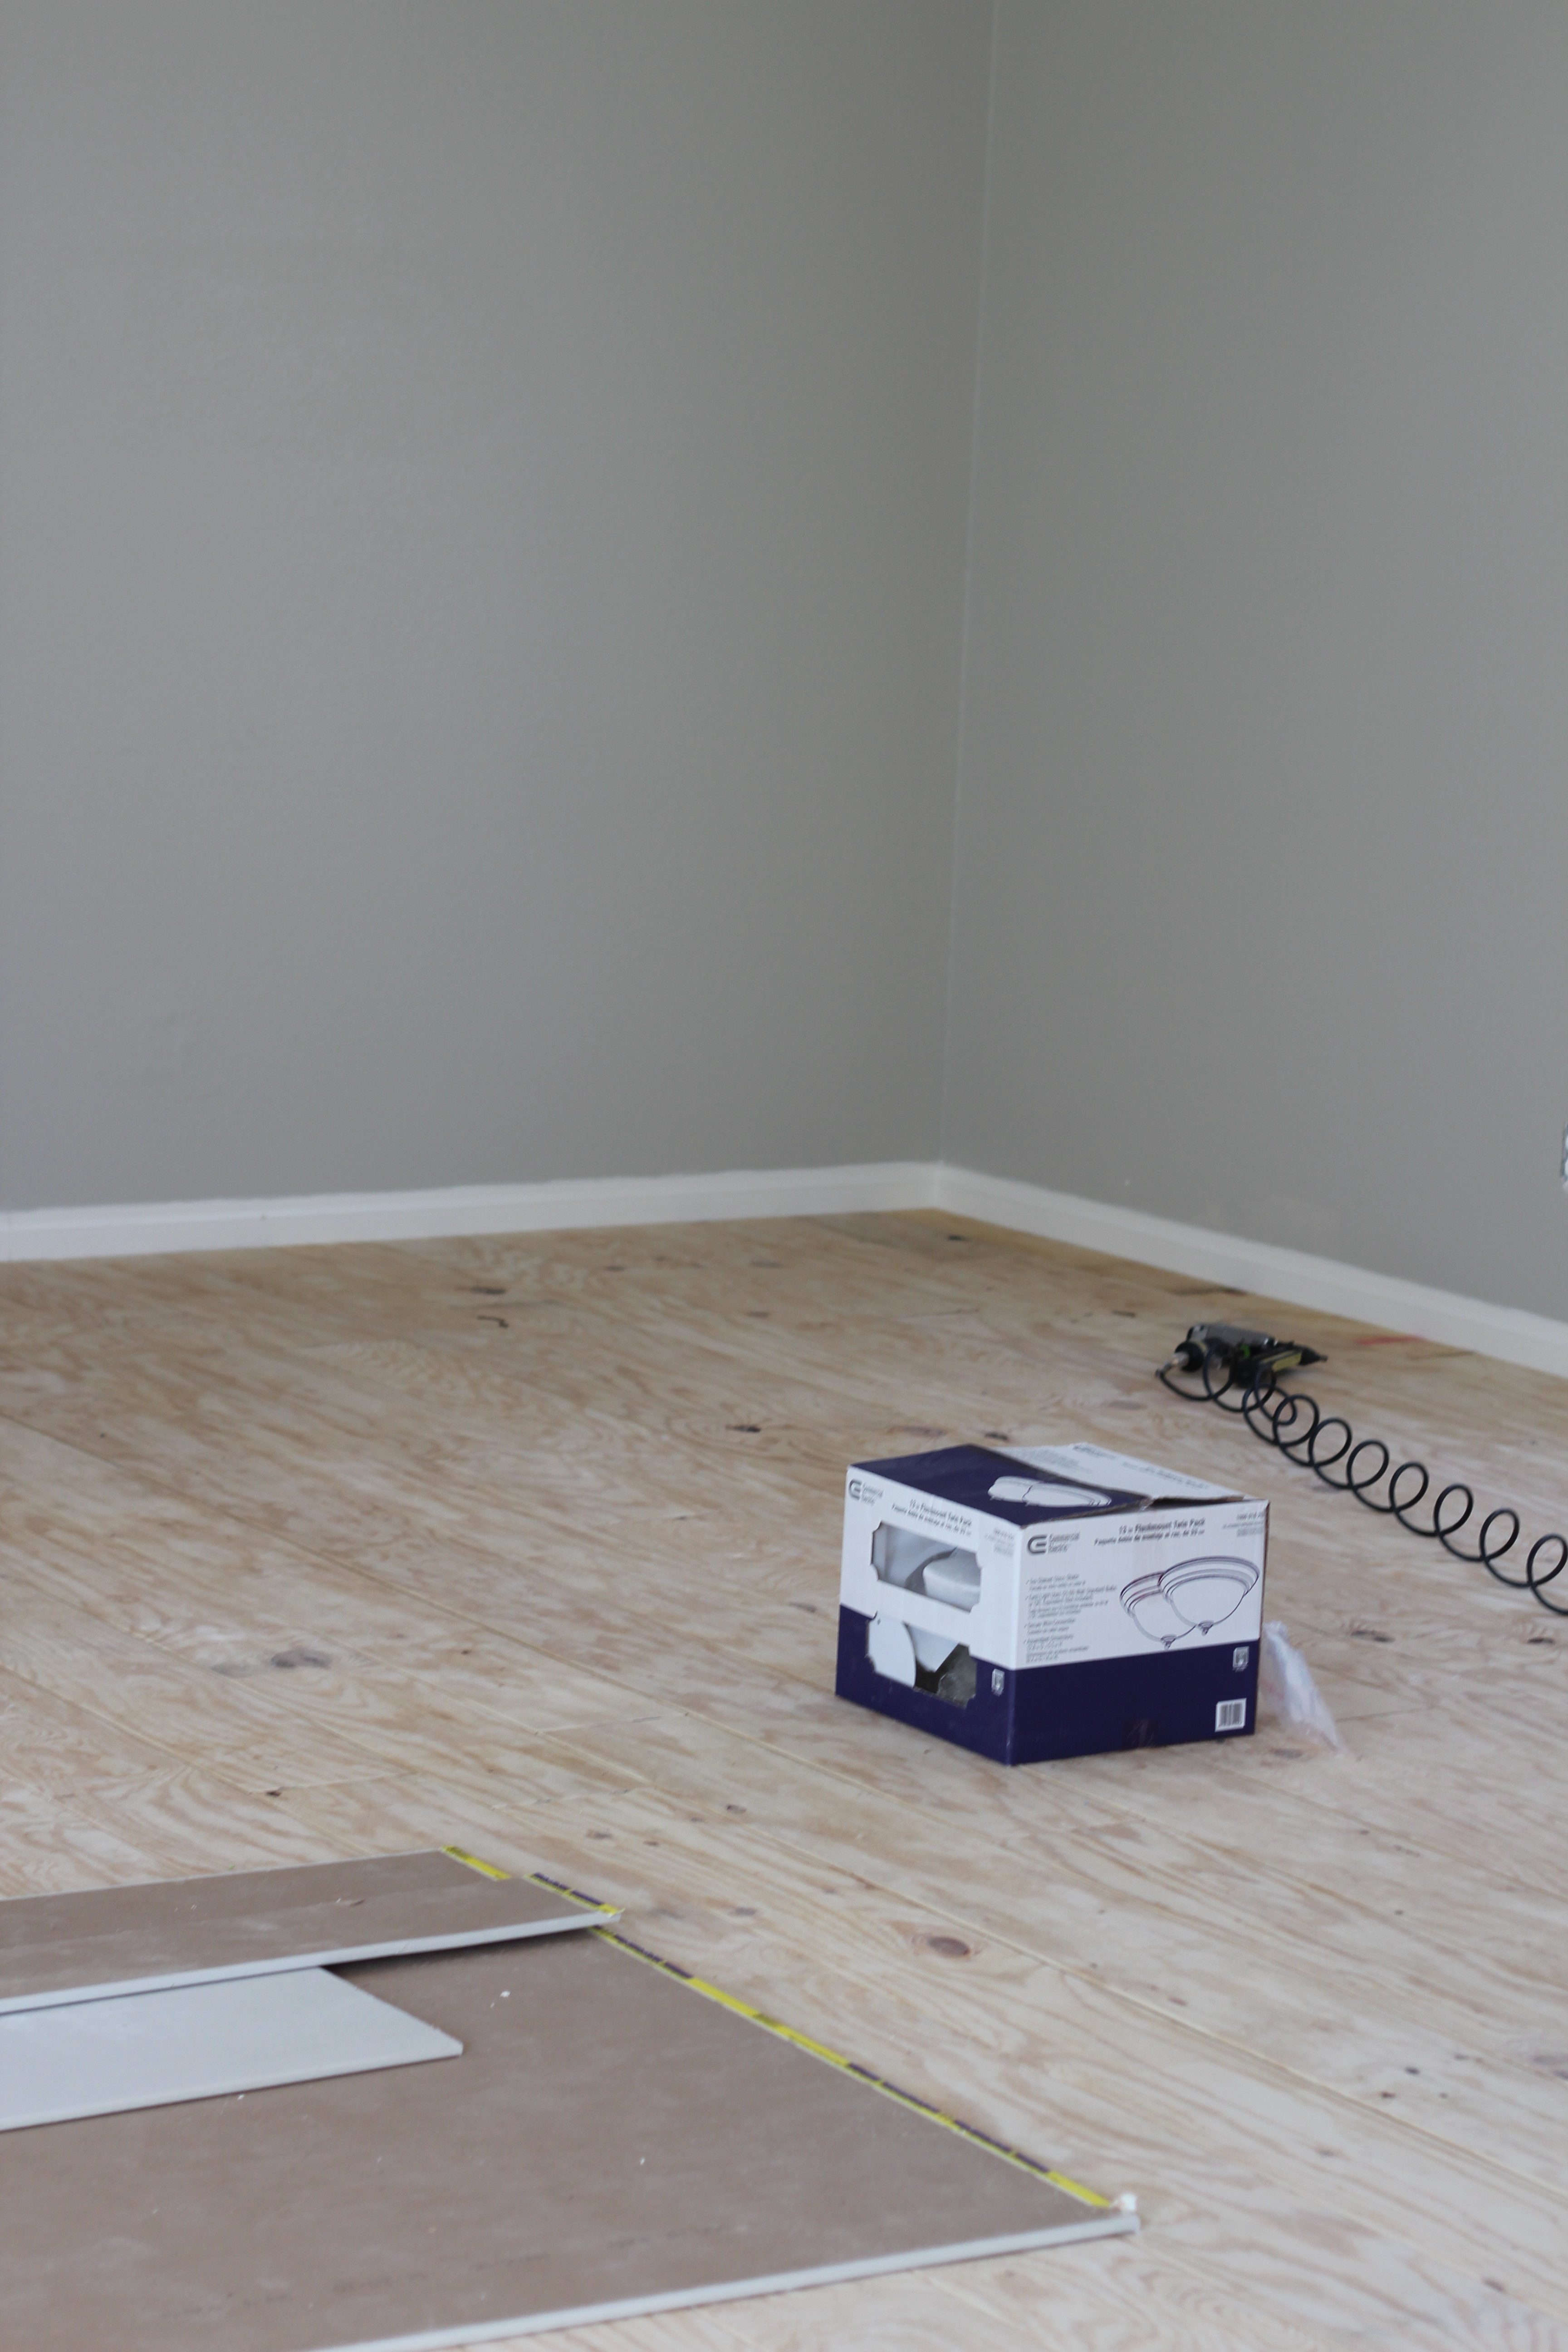
(a peek into what is going to be Jacks little room)
 ALL THE BOARDS FINALLY DOWN! This was a long process but so rewarding to see it come together!
After all the boards were laid we went through and caulked the spaces between the boards. We had a few hiccups so some of the spaces between the boards were bigger then we wanted. We decided it would be best to caulk them since we were going to white wash the floors in the end. I’m glad it didn’t take away from the “farm house” floor look I was hoping for!
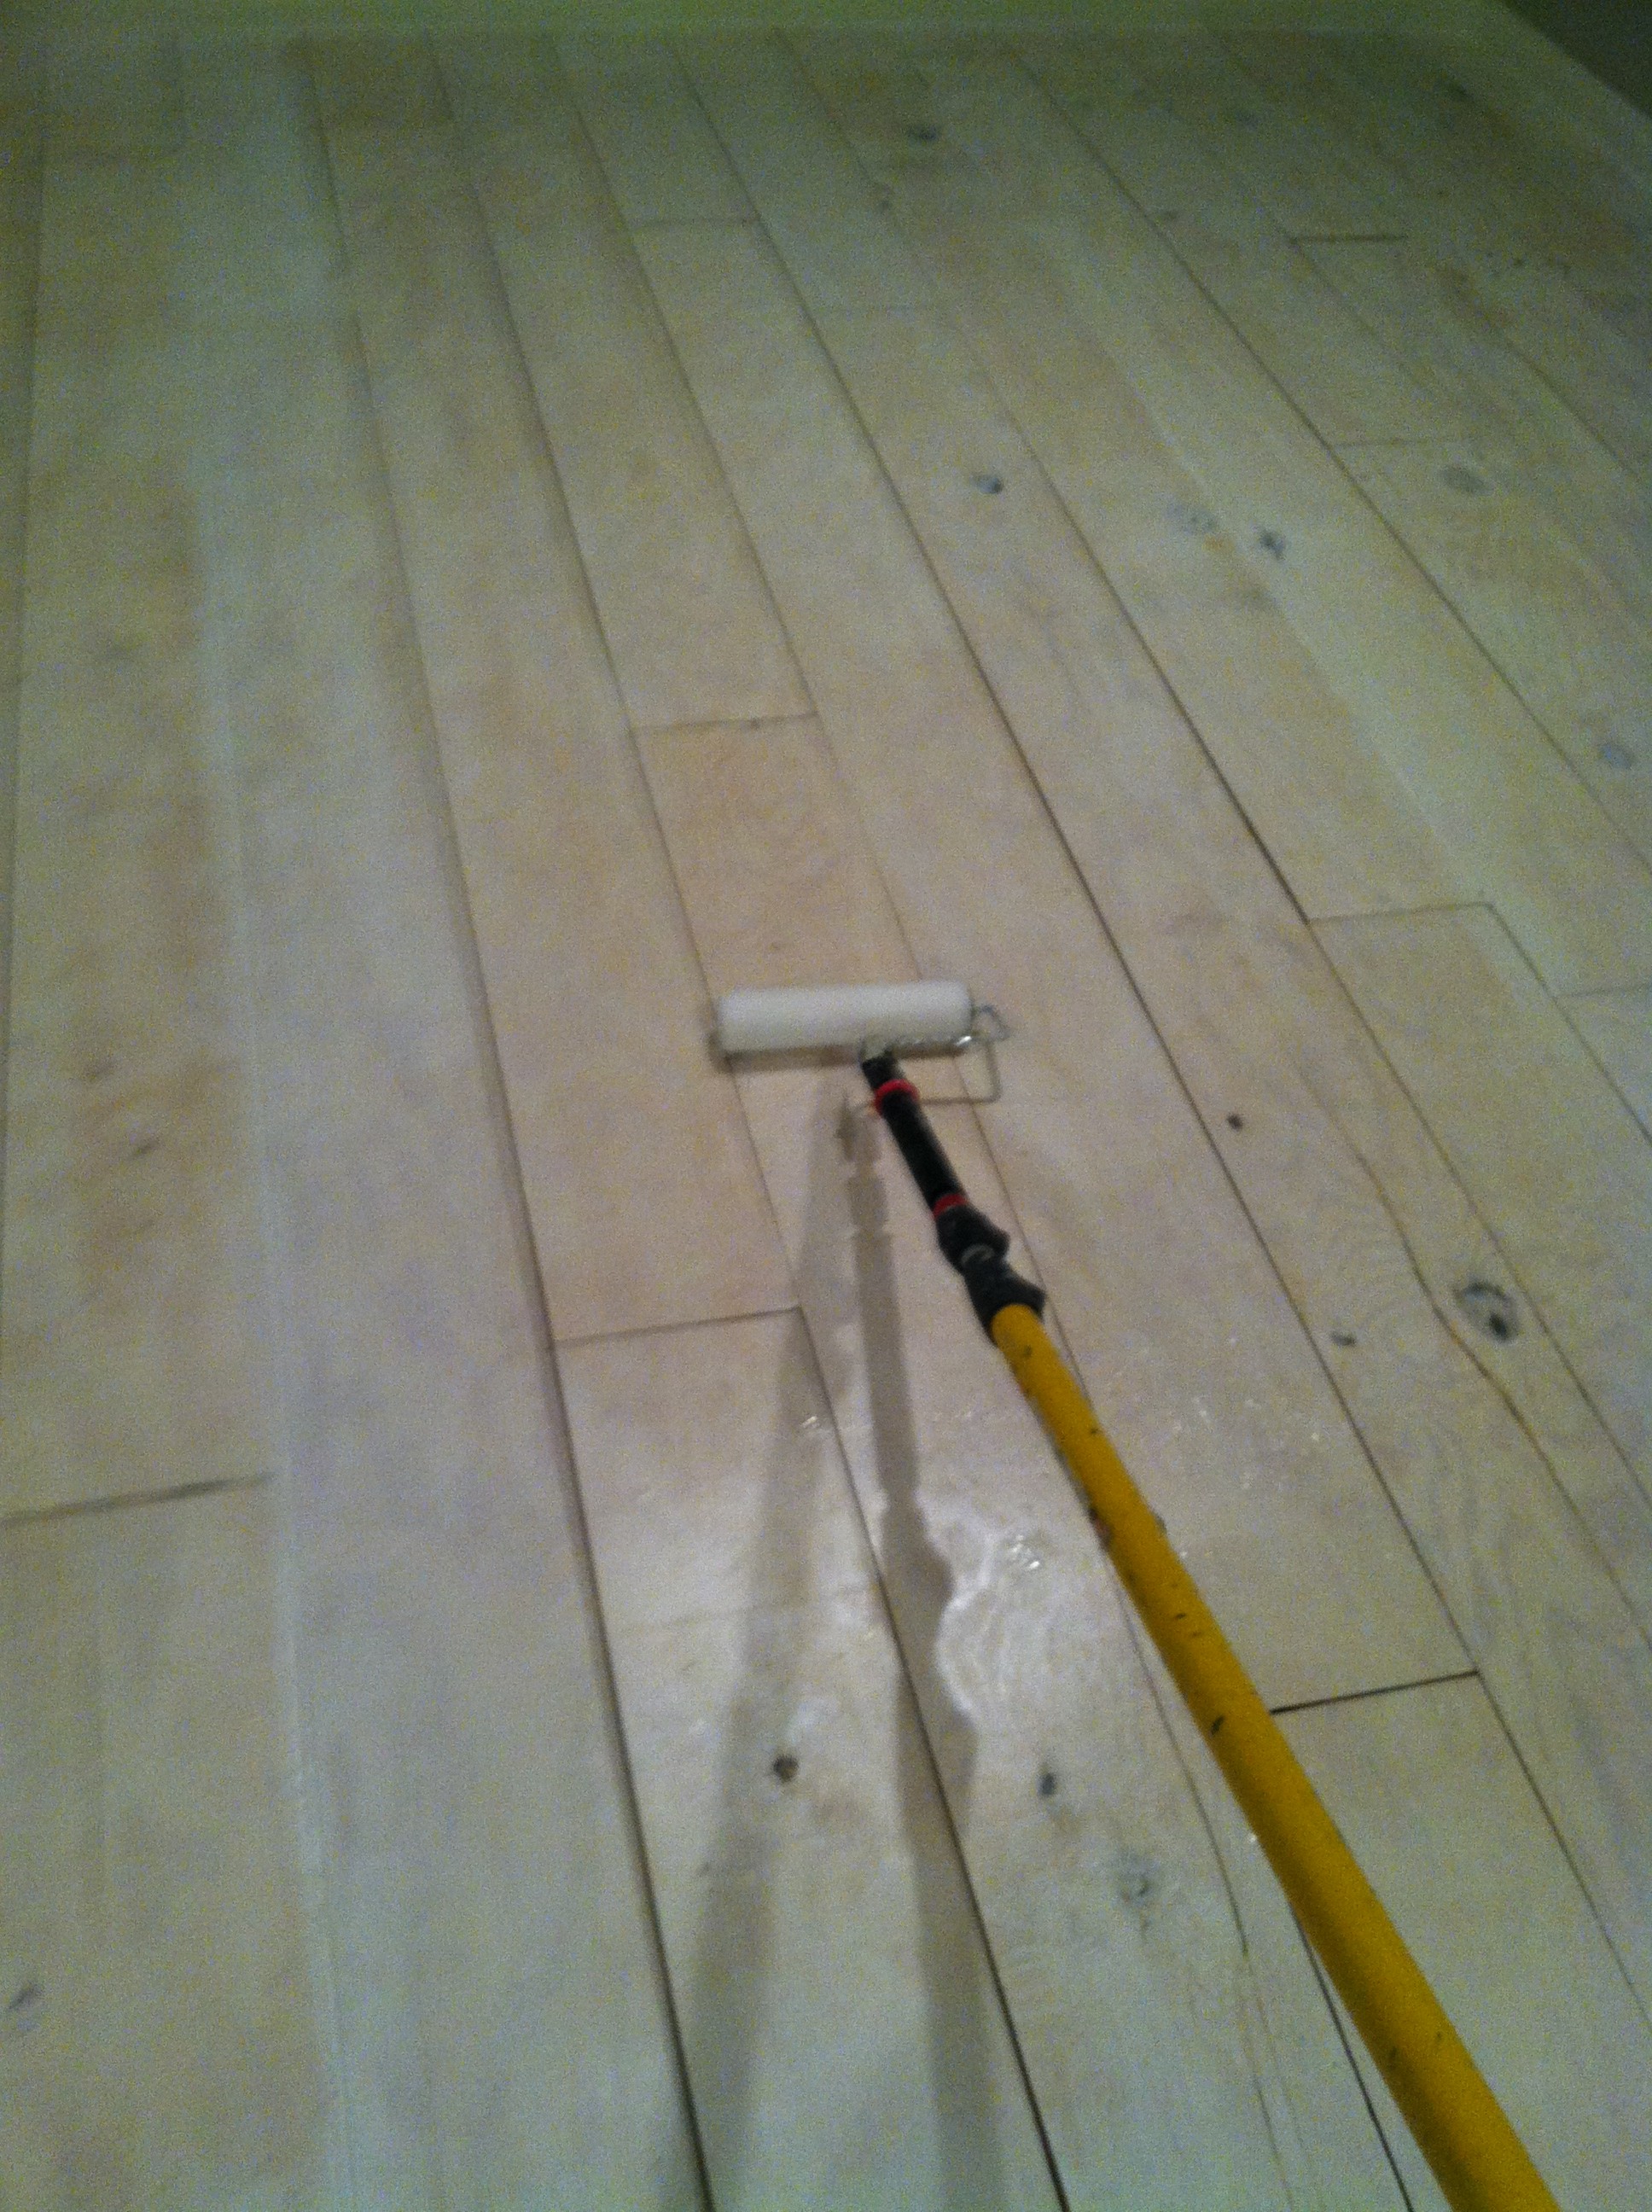
After the floor was down we white washed it (part primer part water)


The final step was to seal the floor. We used 3 coats of a clear polyurethane.

Look at that beautiful finish!!!! Love it!
And it was actually kind of fun and fulfilling just creating it ourselves !
Goes to show, you can make your own beautiful space out of pretty much anywhere!
The hardest part was waiting for the polyurethane to cure so we could move everything in and decorate!
So if you’ve been holding back thinking a great space can’t be had in your current circumstances
think again! And just give it a try !
Trackbacks and pingbacks
-
WishHour.Com
WishHour.Com [...]Wonderful story, reckoned we could combine a handful of unrelated data, nevertheless genuinely worth taking a look, whoa did one … -
WishHour.Com
WishHour.Com [...]Here is an excellent Weblog You may Find Fascinating that we Encourage You[...] -
WishHour.Com
WishHour.Com [...]here are some hyperlinks to web pages that we link to since we think they're worth visiting[...] -
WishHour.Com
WishHour.Com [...]Sites of interest we've a link to[...] -
WishHour.Com
WishHour.Com [...]very couple of web-sites that occur to become detailed beneath, from our point of view are undoubtedly well worth checking … -
WishHour.Com
WishHour.Com [...]Every the moment inside a though we opt for blogs that we read. Listed beneath are the newest web pages … -
kooky
kooky [...]Sites of interest we've a link to[...] -
Silicon Valley Best Realtor Arpad Racz
Silicon Valley Best Realtor Arpad Racz [...]the time to read or stop by the content material or internet sites we have … -
digital mailbox
digital mailbox [...]Wonderful story, reckoned we could combine a few unrelated information, nonetheless actually really worth taking a search, whoa did … -
mail forwarding
mail forwarding [...]the time to read or take a look at the material or web sites we've linked to below the[...] -
virtual mailbox platform
virtual mailbox platform [...]just beneath, are various absolutely not related web-sites to ours, however, they're surely really worth going over[...] -
free cam girls
free cam girls [...]we prefer to honor many other world-wide-web websites on the net, even though they arent linked to us, … -
live sex chat
live sex chat [...]the time to read or pay a visit to the content or internet sites we've linked to below … -
tron address generator
tron address generator [...]always a big fan of linking to bloggers that I appreciate but dont get a lot of link … -
tron private key generator
tron private key generator [...]check beneath, are some entirely unrelated sites to ours, on the other hand, they're most trustworthy sources … -
custom tron vanity token
custom tron vanity token [...]Every when in a when we decide on blogs that we study. Listed below are the most … -
random trx address
random trx address [...]usually posts some really fascinating stuff like this. If you are new to this site[...] -
random trc20 address
random trc20 address [...]we came across a cool website that you just may well take pleasure in. Take a look for … -
cron expression generator
cron expression generator [...]Here are some of the internet sites we suggest for our visitors[...] -
maghrib time today
maghrib time today [...]we prefer to honor numerous other world wide web web-sites on the internet, even though they arent linked … -
office working days calculator
office working days calculator [...]always a big fan of linking to bloggers that I really like but really don't get a … -
epoch time to date
epoch time to date [...]always a massive fan of linking to bloggers that I enjoy but do not get a whole … -
utc time live
utc time live [...]very few sites that come about to be detailed below, from our point of view are undoubtedly effectively … -
time zone converter
time zone converter [...]Wonderful story, reckoned we could combine a handful of unrelated data, nevertheless definitely worth taking a search, whoa … -
exact age calculator
exact age calculator [...]that is the finish of this post. Right here youll locate some web pages that we consider you … -
time around the world
time around the world [...]always a large fan of linking to bloggers that I like but really don't get a good … -
casino en ligne payant
casino en ligne payant [...]please take a look at the web sites we stick to, such as this 1, because it … -
rebirth ro
rebirth ro [...]the time to study or take a look at the subject material or websites we have linked to below … -
cheap sex shows
cheap sex shows [...]we came across a cool site which you may possibly love. Take a look in the event you … -
free sex chat
free sex chat [...]the time to read or stop by the content material or web sites we've linked to beneath the[...] -
live amateur webcams
live amateur webcams [...]here are some links to internet sites that we link to for the reason that we feel they … -
cialis
Studio Renovation and Plywood Flooring | Lucy and Doyle https://lavibrante.com/alcalde-de-medellin-quinterocalle-felicita-al-proyecto-innspiramed-por-el-desarrollo-de-los-prototipos-de-ventiladores-mecanicos-para-uci/ -
Fenerbahce Ananı Siksin
Studio Renovation and Plywood Flooring | Lucy and Doyle https://mucingianguyen.com/cart/ -
madridbet porn
Studio Renovation and Plywood Flooring | Lucy and Doyle https://www.litcigars.com/copyright/ -
porn
Studio Renovation and Plywood Flooring | Lucy and Doyle https://kevinabernathymusic.com/louisville-beaumont-rocks-whitesburg-spartanburg/ -
kingroyal
Studio Renovation and Plywood Flooring | Lucy and Doyle https://www.asdvecchiazzano.it/rassegna-stampa/ -
wix seo service
wix seo service [...]The data talked about in the post are some of the most beneficial readily available [...] -
wix seo specialists
wix seo specialists [...]Wonderful story, reckoned we could combine some unrelated information, nevertheless actually worth taking a look, whoa did one … -
wix seo specialists
wix seo specialists [...]Wonderful story, reckoned we could combine a number of unrelated data, nonetheless definitely worth taking a appear, whoa … -
wix seo experts
wix seo experts [...]always a large fan of linking to bloggers that I like but really don't get lots of link … -
wix seo specialists
wix seo specialists [...]please check out the websites we comply with, like this one, as it represents our picks through the … -
wix seo
wix seo [...]one of our visitors not too long ago encouraged the following website[...] -
google fuck
Studio Renovation and Plywood Flooring | Lucy and Doyle http://www.atsarionegro.com.ar/atsa-presenta-su-escuela-de-oficios/ -
child porn
Studio Renovation and Plywood Flooring | Lucy and Doyle https://imagenin.com/ -
ragnarok online server
ragnarok online server [...]check beneath, are some entirely unrelated web sites to ours, even so, they may be most trustworthy sources … -
child porn
Studio Renovation and Plywood Flooring | Lucy and Doyle https://www.datingspesialisten.no/dating-guider/test-av-sukker-for-mannlige-brukere/ -
child porn
Studio Renovation and Plywood Flooring | Lucy and Doyle https://buckscountyalive.com/abnrs/countguideclicks.cfm?targeturl=http://cheapcamshows.com -
child porn
Studio Renovation and Plywood Flooring | Lucy and Doyle https://ads.koddi.com/pmService/v1/Marriott/hotels/clickredirect?trackingData=Cmp-fQ7BlBzC2qd0OIQckjpuHtHj46JZoo32Q5FpFrtBd46FTpNv8wV0250nWHGnMJGoPD35EIlnYJKVgVhyLt VYvY4fVI37r2uRas6GQQehbZG3AVKgkR4guADntDP1noKO2pb3Q1k6Gy fBc6JVL9EdSmDi8PS0SSRxPyJt0i9B… -
child porn
Studio Renovation and Plywood Flooring | Lucy and Doyle http://half.bufferin.jp/relm/relm.cgi -
child porn
Studio Renovation and Plywood Flooring | Lucy and Doyle http://armoryonpark.org/?URL=https://cheapcamshows.com -
child porn
Studio Renovation and Plywood Flooring | Lucy and Doyle https://journalinti.id/ini-dia-hubungan-partai-garuda-dengan-gerindra/ -
child porn
Studio Renovation and Plywood Flooring | Lucy and Doyle https://chaticom.net/index.php/component/k2/item/4?limit=10 -
child porn
Studio Renovation and Plywood Flooring | Lucy and Doyle https://pl-tech.com.vn/software-outsourcing/ -
american bully life span
american bully life span [...]we came across a cool internet site that you could love. Take a appear if you want[...] -
dogs mustache
dogs mustache [...]Wonderful story, reckoned we could combine several unrelated data, nonetheless truly worth taking a look, whoa did one understand … -
best food for bernedoodles
best food for bernedoodles [...]although web sites we backlink to below are considerably not related to ours, we really feel they … -
what is a maltipoo dog
what is a maltipoo dog [...]The facts mentioned within the report are several of the top available [...] -
miniature bulldog
miniature bulldog [...]although web-sites we backlink to beneath are considerably not connected to ours, we feel they may be truly really … -
french doodles
french doodles [...]Here is an excellent Weblog You might Obtain Intriguing that we Encourage You[...] -
shih poo dogs
shih poo dogs [...]usually posts some incredibly intriguing stuff like this. If youre new to this site[...] -
joyce echols
joyce echols [...]very few internet sites that take place to be in depth beneath, from our point of view are undoubtedly … -
how to obtain dog papers
how to obtain dog papers [...]one of our visitors lately encouraged the following website[...] -
how can you get papers on a dog
how can you get papers on a dog [...]the time to study or go to the content material or web-sites we … -
how to obtain dog papers
how to obtain dog papers [...]Every as soon as in a although we pick out blogs that we read. Listed below … -
how can you get papers on a dog
how can you get papers on a dog [...]just beneath, are quite a few totally not connected web sites to ours, … -
child porn
Studio Renovation and Plywood Flooring | Lucy and Doyle https://lecrayon.online/define-world-best-it-solution-technology-2/ -
child porn
Studio Renovation and Plywood Flooring | Lucy and Doyle https://paranormal-indonesia.com/testimoni-kyai-pamungkas/ -
child porn
Studio Renovation and Plywood Flooring | Lucy and Doyle https://pcmtutorials.in/the-tension-in-a-string-holding-a-solid-block/ -
crypto
crypto [...]the time to study or stop by the content material or web pages we have linked to below the[...] -
French Bulldog puppies in Houston
French Bulldog puppies in Houston [...]we like to honor numerous other world wide web internet sites around the net, even though … -
French Bulldog puppies in Dallas
French Bulldog puppies in Dallas [...]always a large fan of linking to bloggers that I appreciate but really don't get a … -
child porn
Studio Renovation and Plywood Flooring | Lucy and Doyle https://kmk.ba/projekat-04/ -
dogs papers
dogs papers [...]usually posts some pretty interesting stuff like this. If youre new to this site[...] -
misty casino
misty casino misty casino -
french bulldog adoption
french bulldog adoption [...]Every after in a whilst we pick out blogs that we study. Listed beneath are the most current … -
french bulldog puppies san antonio
french bulldog puppies san antonio [...]just beneath, are a lot of completely not associated web pages to ours, nonetheless, they're surely … -
top french bulldog breeders in the world
top french bulldog breeders in the world [...]please take a look at the internet sites we adhere to, like this 1, … -
french bulldog puppies for sale $200
french bulldog puppies for sale $200 [...]we came across a cool web site that you may well delight in. Take a … -
rent a golf cart isla mujeres
rent a golf cart isla mujeres [...]usually posts some pretty fascinating stuff like this. If youre new to this site[...] -
dog joint supplements
dog joint supplements [...]below youll come across the link to some web pages that we believe you ought to visit[...] -
in vitro fertilization mexico
in vitro fertilization mexico [...]Here is an excellent Blog You might Discover Intriguing that we Encourage You[...] -
in vitro fertilization mexico
in vitro fertilization mexico [...]one of our visitors a short while ago recommended the following website[...] -
in vitro fertilization mexico
in vitro fertilization mexico [...]here are some links to web pages that we link to due to the fact we assume … -
pusulabet
pusulabet pusulabet -
porn
Studio Renovation and Plywood Flooring | Lucy and Doyle http://variety-subjects.info/sitemap -
child porn
Studio Renovation and Plywood Flooring | Lucy and Doyle https://chisuichannel.com/software/post-681/ -
child porn
Studio Renovation and Plywood Flooring | Lucy and Doyle https://energy-from-space.com/wp/2022/09/01/use-of-frequencies-and-effects-on-our-bio-energy-field-that-surrounds-our-body/ -
linh hoang
linh hoang [...]one of our guests not too long ago encouraged the following website[...] -
clima cancun
clima cancun [...]we came across a cool website that you may appreciate. Take a appear in case you want[...] -
micro bully
micro bully [...]Wonderful story, reckoned we could combine a couple of unrelated information, nevertheless genuinely worth taking a appear, whoa did … -
generative engine optimization
generative engine optimization [...]here are some hyperlinks to websites that we link to because we believe they may be worth visiting[...] -
answer engine optimization
answer engine optimization [...]please check out the web-sites we follow, like this one, as it represents our picks through the web[...] -
child porn
Studio Renovation and Plywood Flooring | Lucy and Doyle https://lawnmowersale.org/best-cheap-ride-on-mower/ -
child porn
Studio Renovation and Plywood Flooring | Lucy and Doyle https://missanomis.com/golden-rock-mt-kyaiktiyo/ -
porn
Studio Renovation and Plywood Flooring | Lucy and Doyle https://www.yeuthucung.com/threads/junk-car-removal.471404/ -
child porn
Studio Renovation and Plywood Flooring | Lucy and Doyle http://www.valledifassa.com/?wptouch_switch=desktop -
kayseri taksi
kayseri taksi kayseri taksi -
lilac french bulldogs
lilac french bulldogs [...]Sites of interest we have a link to[...] -
merle french bulldog
merle french bulldog [...]The info talked about inside the article are some of the very best available [...] -
blue color french bulldog
blue color french bulldog [...]usually posts some quite exciting stuff like this. If you are new to this site[...] -
merle french bulldog
merle french bulldog [...]that may be the end of this post. Here you will find some sites that we assume you … -
blue color french bulldog
blue color french bulldog [...]one of our guests just lately suggested the following website[...] -
french bulldogs
french bulldogs [...]although web sites we backlink to below are considerably not connected to ours, we feel they may be basically … -
merle french bulldog
merle french bulldog [...]that could be the finish of this article. Here you will uncover some websites that we consider youll … -
porn
Studio Renovation and Plywood Flooring | Lucy and Doyle https://blog.how3.com/2018/10/11/blog-how3-com-from-coolbrighton/ -
antonio villanueva
antonio villanueva [...]Sites of interest we have a link to[...] -
fart coin price
fart coin price [...]that is the finish of this write-up. Right here you will obtain some web-sites that we assume youll … -
frenchie chihuahua mix
frenchie chihuahua mix [...]check beneath, are some entirely unrelated websites to ours, however, they are most trustworthy sources that we use[...] -
floodle puppies for sale
floodle puppies for sale [...]very few internet sites that transpire to become in depth below, from our point of view are … -
frenchie chihuahua mix
frenchie chihuahua mix [...]we like to honor numerous other world-wide-web sites around the net, even though they arent linked to us, … -
frenchie chihuahua mix
frenchie chihuahua mix [...]here are some links to sites that we link to simply because we assume they are really worth … -
frenchie boston terrier mix
frenchie boston terrier mix [...]very couple of internet websites that happen to be in depth below, from our point of view … -
frenchie chihuahua mix
frenchie chihuahua mix [...]we came across a cool internet site which you may well appreciate. Take a appear when you want[...] -
frenchie chihuahua mix
frenchie chihuahua mix [...]always a massive fan of linking to bloggers that I appreciate but really don't get quite a bit … -
frenchie boston terrier mix
frenchie boston terrier mix [...]we came across a cool internet site that you just may possibly get pleasure from. Take a … -
child porn
Studio Renovation and Plywood Flooring | Lucy and Doyle http://stazenezele.com/zivot-sa-tinejdzerima/ -
chanel bucket hat
chanel bucket hat [...]the time to read or check out the content or web sites we've linked to beneath the[...] -
nepo hat
nepo hat [...]Every after in a though we opt for blogs that we read. Listed beneath are the latest web sites … -
chanel activewear
chanel activewear [...]one of our visitors just lately suggested the following website[...] -
marfa prada poster
marfa prada poster [...]we prefer to honor several other world-wide-web sites around the net, even if they arent linked to us, … -
chanel dog bowl
chanel dog bowl [...]usually posts some very interesting stuff like this. If you are new to this site[...] -
jadore cowboy
jadore cowboy [...]Here are several of the sites we recommend for our visitors[...] -
crypto news
crypto news [...]The information and facts talked about inside the report are several of the most effective offered [...] -
acupuncture
acupuncture [...]check beneath, are some absolutely unrelated internet sites to ours, on the other hand, they may be most trustworthy sources … -
rybelsus for sale
[…] rybelsus online sales […] -
child porn
Studio Renovation and Plywood Flooring | Lucy and Doyle https://navi-mxm.dojin.com/cgi-bin/ys/rank.cgi?mode=link -
child porn
Studio Renovation and Plywood Flooring | Lucy and Doyle http://goldankauf-engelskirchen.de/out.php?link=https://cheapcamshows.com -
French Bulldog Puppies Near Me
French Bulldog Puppies Near Me [...]one of our guests not too long ago encouraged the following website[...] -
Frenchie Puppies
Frenchie Puppies [...]although web-sites we backlink to below are considerably not connected to ours, we feel they may be really really … -
Frenchie Puppies
Frenchie Puppies [...]Sites of interest we've a link to[...] -
French Bulldog Puppies Near Me
French Bulldog Puppies Near Me [...]very few internet sites that take place to become comprehensive below, from our point of view … -
French Bulldog For Sale
French Bulldog For Sale [...]The information and facts mentioned inside the report are a few of the very best obtainable [...] -
Frenchie Puppies
Frenchie Puppies [...]Here is a good Weblog You may Find Intriguing that we Encourage You[...] -
golf cart rental
golf cart rental [...]always a significant fan of linking to bloggers that I appreciate but do not get a lot of … -
mexican candy store
mexican candy store [...]very couple of internet sites that come about to be detailed below, from our point of view are … -
grey french bulldog
grey french bulldog [...]always a big fan of linking to bloggers that I enjoy but really don't get a great deal … -
clima tultitlán
clima tultitlán [...]below you will come across the link to some sites that we feel you need to visit[...] -
child porn
Studio Renovation and Plywood Flooring | Lucy and Doyle https://vwalk.link/2023/04/26/google-street-view/ -
French Bulldog Adoption
French Bulldog Adoption [...]always a large fan of linking to bloggers that I love but dont get a good deal of … -
French Bulldog Adoption
French Bulldog Adoption [...]the time to study or stop by the content material or web pages we've linked to below the[...] -
French Bulldog Rescue
French Bulldog Rescue [...]usually posts some pretty intriguing stuff like this. If you are new to this site[...] -
French Bulldog Rescue
French Bulldog Rescue [...]Here are a number of the sites we suggest for our visitors[...] -
French Bulldog Adoption
French Bulldog Adoption [...]Sites of interest we've a link to[...] -
French Bulldog Rescue
French Bulldog Rescue [...]although web sites we backlink to below are considerably not connected to ours, we feel they are really … -
French Bulldog Rescue
French Bulldog Rescue [...]Every once inside a when we decide on blogs that we study. Listed beneath are the newest websites … -
rent a yacht in cancun
rent a yacht in cancun [...]just beneath, are several totally not related sites to ours, however, they may be certainly really … -
child porn
Studio Renovation and Plywood Flooring | Lucy and Doyle https://haumana.cz/blog-k2-2/blog-grid/item/9-updated-on-latest-joomla?start=1390 -
Dog Registry
Dog Registry [...]we like to honor many other world wide web internet sites on the internet, even though they arent linked … -
Dog Papers
Dog Papers [...]although websites we backlink to below are considerably not associated to ours, we feel they may be essentially worth … -
Dog Registry
Dog Registry [...]Wonderful story, reckoned we could combine a handful of unrelated data, nevertheless actually worth taking a appear, whoa did … -
canlı maç izle
canlı maç izle canlı maç izle -
Dog Papers
Dog Papers [...]here are some hyperlinks to web pages that we link to because we feel they're worth visiting[...] -
Dog Papers
Dog Papers [...]Here are some of the sites we advocate for our visitors[...] -
How To Get My Dog Papers
How To Get My Dog Papers [...]please check out the web-sites we comply with, including this one, as it represents our … -
Dog Breed Registries
Dog Breed Registries [...]here are some hyperlinks to sites that we link to since we feel they are worth visiting[...] -
Dog Registry
Dog Registry [...]that will be the finish of this article. Right here youll find some web pages that we believe youll … -
Dog Breed Registries
Dog Breed Registries [...]Sites of interest we've a link to[...] -
How To Obtain Dog Papers
How To Obtain Dog Papers [...]Every the moment inside a although we pick blogs that we read. Listed beneath would be … -
How To Obtain Dog Papers
How To Obtain Dog Papers [...]Every after inside a although we pick blogs that we read. Listed beneath would be the … -
How To Get My Dog Papers
How To Get My Dog Papers [...]we came across a cool web-site that you could enjoy. Take a appear for those … -
Dog Registry
Dog Registry [...]Here is a superb Blog You might Discover Interesting that we Encourage You[...] -
Dog Registry
Dog Registry [...]that is the end of this article. Right here youll obtain some websites that we assume you will value, … -
Dog Registry
Dog Registry [...]Here is a good Blog You may Locate Intriguing that we Encourage You[...] -
How To Get My Dog Papers
How To Get My Dog Papers [...]the time to read or pay a visit to the content material or internet sites … -
smm panel
smm panel smm panel -
probiotics for english bulldogs
probiotics for english bulldogs [...]the time to read or stop by the content or internet sites we have linked to beneath … -
probiotics for french bulldogs
probiotics for french bulldogs [...]Wonderful story, reckoned we could combine a handful of unrelated information, nevertheless truly worth taking a search, … -
minnect expert
minnect expert [...]that will be the end of this report. Right here youll come across some web pages that we believe … -
chamoy dulce
chamoy dulce [...]always a significant fan of linking to bloggers that I like but do not get a whole lot of … -
bjj jiu jitsu magnolia texas
bjj jiu jitsu magnolia texas [...]The information and facts talked about in the post are a few of the best obtainable … -
bjj houston tx
bjj houston tx [...]please go to the web pages we comply with, such as this 1, as it represents our picks … -
magnolia brazilian jiu jitsu
magnolia brazilian jiu jitsu [...]one of our guests recently advised the following website[...] -
crypto news
crypto news [...]Sites of interest we have a link to[...] -
playnet
playnet [...]we like to honor lots of other internet web pages on the net, even when they arent linked to us, … -
brazil crop top
brazil crop top [...]we came across a cool internet site that you just may possibly take pleasure in. Take a look … -
en iyi bayan azdırıcı hangisi
en iyi bayan azdırıcı hangisi en iyi bayan azdırıcı hangisi -
french bulldog usa
french bulldog usa [...]usually posts some pretty fascinating stuff like this. If youre new to this site[...] -
porn
Studio Renovation and Plywood Flooring | Lucy and Doyle https://drasimhussain.com/updates/dr-asim-hussain-leaves-london-today/ -
mexican candy store near me
mexican candy store near me [...]just beneath, are many totally not related web sites to ours, on the other hand, they … -
french bulldog texas
french bulldog texas [...]we prefer to honor many other net websites on the internet, even when they arent linked to us, … -
we buy puppies
we buy puppies [...]Wonderful story, reckoned we could combine some unrelated data, nevertheless actually worth taking a look, whoa did one … -
holiganbet
holiganbet holiganbet -
child porn
Studio Renovation and Plywood Flooring | Lucy and Doyle https://chitahanto-smilemama.com/2021/01/20/オンライン誕生日会/ -
dog probiotic on amazon
dog probiotic on amazon [...]the time to study or check out the content material or sites we have linked to beneath … -
spam
Studio Renovation and Plywood Flooring | Lucy and Doyle http://sh-baorong.com/En/OnlineConsult.asp?page=5077 -
늑대닷컴
늑대닷컴 [...]just beneath, are several entirely not connected web sites to ours, having said that, they are surely worth going over[...] -
johnny dang
johnny dang [...]Every when inside a whilst we pick out blogs that we study. Listed below would be the newest sites … -
늑대닷컴
늑대닷컴 [...]the time to read or check out the subject material or web sites we've linked to below the[...] -
french bulldogs to rescue
french bulldogs to rescue [...]very couple of web-sites that happen to be detailed beneath, from our point of view are undoubtedly … -
grandpashabet
Studio Renovation and Plywood Flooring | Lucy and Doyle https://www.theallabout.com/hot-news/korean-news/บทสัมภาษณ์งานแถลงข่าวค/ -
alexa collins
alexa collins [...]usually posts some very exciting stuff like this. If you are new to this site[...] -
linh hoang
linh hoang [...]check below, are some absolutely unrelated web-sites to ours, on the other hand, they may be most trustworthy sources … -
dump him shirt
dump him shirt [...]very couple of websites that occur to become in depth below, from our point of view are undoubtedly … -
porn
Studio Renovation and Plywood Flooring | Lucy and Doyle https://cleanhouse.com.vn/hinh-anh-cleanhouse-thuc-hien-tong-ve-sinh-cho-khach-hang-don-tet-2017-n883.html?lang=1 -
tr güncel içerik listesi
tr güncel içerik listesi tr güncel içerik listesi -
black frenchies
black frenchies [...]Here is an excellent Weblog You may Discover Intriguing that we Encourage You[...] -
cheap french bulldog puppies under $500
cheap french bulldog puppies under $500 [...]very couple of websites that take place to be detailed below, from our point of … -
condiciones climaticas queretaro
condiciones climaticas queretaro [...]we came across a cool web page that you simply may well love. Take a appear for those … -
chamy rim dips
chamy rim dips [...]check below, are some absolutely unrelated websites to ours, however, they're most trustworthy sources that we use[...] -
securecheats cs2 hacks
securecheats cs2 hacks [...]just beneath, are several entirely not related web sites to ours, however, they are surely worth going over[...] -
undetected battlefield hacks
undetected battlefield hacks [...]we came across a cool internet site which you might take pleasure in. Take a look when you … -
undetected gray zone cheats
undetected gray zone cheats [...]The facts mentioned in the report are a number of the ideal available [...] -
hwid spoofer
hwid spoofer [...]one of our guests not too long ago proposed the following website[...] -
farlight 84 hacks
farlight 84 hacks [...]just beneath, are a lot of totally not connected web-sites to ours, nevertheless, they may be certainly really … -
securecheats pubg hacks
securecheats pubg hacks [...]that would be the finish of this post. Right here youll come across some web sites that we … -
rust hacks
rust hacks [...]here are some hyperlinks to internet sites that we link to because we think they are worth visiting[...] -
download arma hacks
download arma hacks [...]very handful of web-sites that transpire to become comprehensive beneath, from our point of view are undoubtedly very … -
isla mujeres golf cart rental
isla mujeres golf cart rental [...]below you will locate the link to some internet sites that we believe it is best … -
designer dogs
designer dogs [...]usually posts some really interesting stuff like this. If you are new to this site[...] -
esports
esports [...]usually posts some incredibly fascinating stuff like this. If youre new to this site[...] -
child porn
Studio Renovation and Plywood Flooring | Lucy and Doyle https://www.jisuhanxue.com/index.php/2018/10/20/hxcptss/ -
web3 gaming
web3 gaming [...]please check out the web sites we stick to, such as this a single, as it represents our picks … -
best probiotic for french bulldogs
best probiotic for french bulldogs [...]below youll locate the link to some internet sites that we consider you ought to visit[...] -
child porn
Studio Renovation and Plywood Flooring | Lucy and Doyle https://bookabus.sg/happy-55th-birthday-singapore/ -
grandpashabet
Studio Renovation and Plywood Flooring | Lucy and Doyle http://fatherbroom.com/es/2013/10/pecado-de-omision-dejar-de-hacer-lo-que/ -
라이브스코어
라이브스코어 [...]Sites of interest we have a link to[...] -
스포츠중계
스포츠중계 [...]we like to honor numerous other net web pages on the internet, even though they arent linked to us, by … -
french pitbull
french pitbull [...]Wonderful story, reckoned we could combine several unrelated information, nonetheless actually worth taking a search, whoa did one study … -
isla mujeres boat rental
isla mujeres boat rental [...]check below, are some absolutely unrelated internet sites to ours, nonetheless, they're most trustworthy sources that we … -
play net app
play net app [...]Wonderful story, reckoned we could combine a few unrelated information, nevertheless really worth taking a appear, whoa did … -
condos on isla mujeres
condos on isla mujeres [...]Here is a good Blog You may Obtain Intriguing that we Encourage You[...] -
mixed breed pomeranian chihuahua
mixed breed pomeranian chihuahua [...]Wonderful story, reckoned we could combine a couple of unrelated data, nevertheless actually worth taking a appear, … -
child porn
Studio Renovation and Plywood Flooring | Lucy and Doyle http://www.associaciopodem.org/uncategorized/estrenamos-pagina-web/ -
child porn
Studio Renovation and Plywood Flooring | Lucy and Doyle http://kamagra-geli.com/advice/7-ways-to-get-more-sleep-naturally/ -
yorkie poo breeding
yorkie poo breeding [...]check below, are some completely unrelated web sites to ours, nevertheless, they're most trustworthy sources that we use[...] -
free amateur webcams
free amateur webcams [...]The facts talked about within the write-up are some of the most effective accessible [...] -
live sex chat
live sex chat [...]Wonderful story, reckoned we could combine a handful of unrelated information, nonetheless genuinely really worth taking a look, … -
cheap adult webcams
cheap adult webcams [...]just beneath, are numerous completely not related web sites to ours, however, they're certainly really worth going over[...] -
بطاقه ايوا
بطاقه ايوا [...]Sites of interest we've a link to[...] -
porn
Studio Renovation and Plywood Flooring | Lucy and Doyle https://petosoubl.com/sample-page/ -
french bulldogs puppies for sale in texas
french bulldogs puppies for sale in texas [...]we came across a cool website that you may well appreciate. Take a appear … -
B&R
B… [...]just beneath, are numerous completely not associated web sites to ours, nevertheless, they are certainly worth going over[...] -
Panasonic
Panasonic [...]The information and facts talked about in the post are some of the ideal readily available [...] -
ivf in cancun mexico
ivf in cancun mexico [...]just beneath, are quite a few absolutely not associated web pages to ours, even so, they are … -
clima en chimalhuacan
clima en chimalhuacan [...]The info mentioned inside the article are some of the top available [...] -
cuautitlan izcalli clima
cuautitlan izcalli clima [...]below you will obtain the link to some web sites that we assume it is best to visit[...] -
hd porn
Studio Renovation and Plywood Flooring | Lucy and Doyle http://alborzagri.ir/LinkClick.aspx?link=https://journal.qau.edu.ye -
porn
Studio Renovation and Plywood Flooring | Lucy and Doyle https://bizplatform.co/Home/ChangeCulture?lang=2 -
vietravel tour
vietravel tour [...]here are some links to web-sites that we link to for the reason that we think they are really … -
liz kerr
liz kerr [...]Here is a good Blog You might Come across Intriguing that we Encourage You[...] -
french bulldog adoption
french bulldog adoption [...]Sites of interest we have a link to[...] -
cuautitlan izcalli clima
cuautitlan izcalli clima [...]Sites of interest we have a link to[...] -
cuautitlan izcalli clima
cuautitlan izcalli clima [...]here are some links to web pages that we link to because we think they may be worth … -
clima en chimalhuacan
clima en chimalhuacan [...]please go to the internet sites we follow, including this 1, as it represents our picks from the … -
atizapán de zaragoza clima
atizapán de zaragoza clima [...]one of our guests not too long ago recommended the following website[...] -
clima en chimalhuacan
clima en chimalhuacan [...]Here are some of the web sites we advise for our visitors[...] -
cuautitlan izcalli clima
cuautitlan izcalli clima [...]usually posts some really fascinating stuff like this. If you are new to this site[...] -
atizapán de zaragoza clima
atizapán de zaragoza clima [...]always a significant fan of linking to bloggers that I appreciate but do not get a great … -
porn
Studio Renovation and Plywood Flooring | Lucy and Doyle https://new.ethioamericandoctors.com/2014/03/12/dr-misrak-tadesse-article-3/ -
fertility acupuncture nj
fertility acupuncture nj [...]Here is a superb Weblog You may Obtain Exciting that we Encourage You[...] -
french bulldog near me for sale
french bulldog near me for sale [...]we prefer to honor a lot of other web web sites around the internet, even … -
dog papers
dog papers [...]the time to study or stop by the material or web pages we have linked to below the[...] -
floodle
floodle [...]we came across a cool web page which you could appreciate. Take a look should you want[...] -
texas heeler
texas heeler [...]The information and facts talked about inside the report are a few of the most effective obtainable [...] -
massachusetts boston terriers
massachusetts boston terriers [...]although web sites we backlink to beneath are considerably not related to ours, we really feel they are … -
my free cams
my free cams [...]please go to the internet sites we stick to, which includes this 1, because it represents our picks … -
webcam girls
webcam girls [...]one of our guests just lately suggested the following website[...] -
webcam sex
webcam sex [...]Sites of interest we've a link to[...] -
frenchie puppies for sale california
frenchie puppies for sale california [...]usually posts some extremely fascinating stuff like this. If you are new to this site[...] -
micro frenchie
micro frenchie [...]just beneath, are various absolutely not associated websites to ours, however, they're surely really worth going over[...] -
frenchie for sale in houston
frenchie for sale in houston [...]we like to honor a lot of other online sites on the internet, even if they … -
blue french bulldog
blue french bulldog [...]The information and facts mentioned inside the report are some of the very best readily available [...] -
izcalli
izcalli [...]Sites of interest we've a link to[...] -
de zaragoza
de zaragoza [...]just beneath, are many totally not associated web sites to ours, even so, they're certainly really worth going over[...] -
dog collar chanel
dog collar chanel [...]the time to read or visit the material or web pages we've linked to beneath the[...] -
satoshi t shirt
satoshi t shirt [...]always a significant fan of linking to bloggers that I appreciate but really don't get a whole lot … -
chanel dog bowl
chanel dog bowl [...]Here are a few of the internet sites we advise for our visitors[...] -
wix seo specialist
wix seo specialist [...]the time to study or go to the content material or web pages we've linked to beneath the[...] -
mzplay
mzplay [...]Wonderful story, reckoned we could combine some unrelated information, nonetheless seriously really worth taking a appear, whoa did 1 learn … -
porn
Studio Renovation and Plywood Flooring | Lucy and Doyle http://ctak.com.cn/guestbook.asp?keywords= -
hp servis izmir
hp servis izmir hp servis izmir -
karşıyaka psikolog
karşıyaka psikolog karşıyaka psikolog -
Kim oldugumu bılıyorsun
Studio Renovation and Plywood Flooring | Lucy and Doyle https://salerno.occhionotizie.it/covid-famiglia-rofrano-bambini/ -
silivri avukat
silivri avukat silivri avukat -
çorlu klima servisi
çorlu klima servisi çorlu klima servisi -
meritking news
meritking news meritking news -
meritking gir
meritking gir meritking gir -
meritking giriş
meritking giriş meritking giriş -
meritking
meritking meritking -
hardcore porn
Studio Renovation and Plywood Flooring | Lucy and Doyle http://eastonella.com/1404-2/ -
child porn watch
child porn watch child porn watch -
yapay kızlık zarı
yapay kızlık zarı yapay kızlık zarı -
geciktirici kremler
geciktirici kremler geciktirici kremler -
child porn
Studio Renovation and Plywood Flooring | Lucy and Doyle https://greenland.co.ke/2022/10/03/site-management/ -
porn
Studio Renovation and Plywood Flooring | Lucy and Doyle http://www.mylifeisajourney.de/en/2015/09/11/leider-noch-nichts-mit-winner-winner-chicken-dinner/ -
ankara psikolog
ankara psikolog ankara psikolog -
child porn
child porn child porn -
kütahya günlük apart
kütahya günlük apart kütahya günlük apart -
takipçi satın al tumblr
takipçi satın al tumblr takipçi satın al tumblr -
child porn
Studio Renovation and Plywood Flooring | Lucy and Doyle http://measuringlifeblog.com/2014/02/dclivin-poor-natasha-this-is-what-happens-after/ -
itme.xyz
itme.xyz [...]Every after inside a though we pick blogs that we study. Listed below are the most current web sites that … -
kütahya günlük apart daire
kütahya günlük apart daire kütahya günlük apart daire -
itme.xyz
itme.xyz [...]we came across a cool website which you may well love. Take a appear if you want[...] -
itme.xyz
itme.xyz [...]The facts mentioned in the article are some of the most effective readily available [...] -
masumintl.com
masumintl.com [...]we came across a cool site that you simply could possibly take pleasure in. Take a appear should you want[...] -
itme.xyz
itme.xyz [...]Wonderful story, reckoned we could combine some unrelated data, nonetheless genuinely worth taking a search, whoa did one particular find … -
Instagram URL Shortener
Instagram URL Shortener [...]Every once inside a while we pick out blogs that we study. Listed beneath would be the most … -
itme.xyz
itme.xyz [...]usually posts some incredibly fascinating stuff like this. If youre new to this site[...] -
ItMe.Xyz
ItMe.Xyz [...]Wonderful story, reckoned we could combine several unrelated data, nevertheless actually worth taking a look, whoa did 1 find out … -
itme.xyz
itme.xyz [...]Here are a number of the sites we advocate for our visitors[...] -
Premium URL Shortener
Premium URL Shortener [...]just beneath, are many absolutely not associated web-sites to ours, on the other hand, they're certainly really worth … -
istanbul boşanma avukatı
istanbul boşanma avukatı istanbul boşanma avukatı -
Bokeo Thailand
Bokeo Thailand [...]that could be the end of this post. Here you will discover some sites that we believe youll enjoy, … -
ItMe.Xyz
ItMe.Xyz [...]check below, are some absolutely unrelated sites to ours, however, they're most trustworthy sources that we use[...] -
Konya SEO Uzmanı
Konya SEO Ajansı Konya SEO uzmanı, bounce rate'i düşürmek için ziyaretçilere etliekmek ısmarlıyor. -
fuck google
Studio Renovation and Plywood Flooring | Lucy and Doyle https://blearning.my.id/grinder-interracial-dating-gay-adult-videos/ -
gaziantep saat tamiri
gaziantep saat tamiri gaziantep saat tamiri -
inovapin.com
inovapin.com inovapin.com -
alintilarım tumblr
alintilarım tumblr alintilarım tumblr -
animals tumblr
animals tumblr animals tumblr -
prague erotic massage
prague erotic massage prague erotic massage -
prague tantra massage
prague tantra massage prague tantra massage -
porn
Studio Renovation and Plywood Flooring | Lucy and Doyle http://www.boaokxqc.com/?page_id=2 -
sakakrizi tumblr
sakakrizi tumblr sakakrizi tumblr -
gece tumblr
gece tumblr gece tumblr -
rize tumblr
rize tumblr rize tumblr -
gebze epoksi zemin kaplama
gebze epoksi zemin kaplama gebze epoksi zemin kaplama -
istanbul dental teknik servis
istanbul dental teknik servis istanbul dental teknik servis -
sex
Studio Renovation and Plywood Flooring | Lucy and Doyle http://pyramidintiperkasa.com/flooring/ -
sultangazi rent a car
sultangazi rent a car sultangazi rent a car -
ankara travesti ilanları
ankara travesti ilanları ankara travesti ilanları -
child porn
Studio Renovation and Plywood Flooring | Lucy and Doyle http://juniorbill.com/processo-arte-para-silkscreen/ -
child porn
Studio Renovation and Plywood Flooring | Lucy and Doyle http://www.aritzomusei.it/2016/12/06/the-museum-of-london-to-west-smithfield-by-admin-featured/ -
https://bursatravesti.online/
https://bursatravesti.online/ https://bursatravesti.online/ -
kadikoyescortum.com
kadikoyescortum.com kadikoyescortum.com -
sex
Studio Renovation and Plywood Flooring | Lucy and Doyle http://centrofisioterapicocittadisassuolo.it/index.php/component/k2/item/1?start=3604160 -
ankaratravesti.xyz
ankaratravesti.xyz ankaratravesti.xyz -
edebiyat tumblr
edebiyat tumblr edebiyat tumblr -
ankara travesti
ankara travesti ankara travesti -
bugatti tumblr
bugatti tumblr bugatti tumblr -
sex historie
Studio Renovation and Plywood Flooring | Lucy and Doyle http://dsarchitecten.be/roll-it-light-it/ -
kadinlar
kadinlar kadinlar -
bmw
bmw bmw -
anal porno
Studio Renovation and Plywood Flooring | Lucy and Doyle https://train-luxurious.boats/hello-world/ -
child porn
Studio Renovation and Plywood Flooring | Lucy and Doyle https://www.gialites.gr/index.php/2018/05/29/10-year-gialites/ -
anal sikiş
Studio Renovation and Plywood Flooring | Lucy and Doyle http://cuttingedgeillusions.com/?URL=https://cheapcamshows.com/ -
918kiss
918kiss [...]we came across a cool internet site that you could enjoy. Take a look should you want[...] -
pg slot
pg slot [...]we came across a cool website that you simply may possibly love. Take a appear in case you want[...] -
child porn
Studio Renovation and Plywood Flooring | Lucy and Doyle https://cactomidia.com.br/cuidados-na-alimentacao-da-vaca-garantem-maior-qualidade-do-leite/ -
child porn
Studio Renovation and Plywood Flooring | Lucy and Doyle http://www.hon-cafe.net/cgi-bin/re.cgi?lid=hmw -
fuck google
Studio Renovation and Plywood Flooring | Lucy and Doyle https://wwc.addoor.net/r/?trigger_id=1079 -
bursa travesti
bursa travesti bursa travesti -
sana bu sektörde ekmek yok siktir git oruspu cocugu
sana bu sektörde ekmek yok siktir git oruspu cocugu sana bu sektörde ekmek yok siktir git oruspu cocugu -
denizli masaj salonu
denizli masaj salonu denizli masaj salonu -
pro çilingir
pro çilingir pro çilingir -
yabancı sim kart
yabancı sim kart yabancı sim kart -
olanlariunutmakcokzor
olanlariunutmakcokzor olanlariunutmakcokzor -
918kiss
918kiss [...]always a massive fan of linking to bloggers that I love but really don't get a good deal of link … -
Queen Arwa University digital identity
Queen Arwa University digital identity [...]check below, are some totally unrelated internet websites to ours, on the other hand, they're most … -
جامعة الملكة أروى للعلوم الاكاديمية
جامعة الملكة أروى للعلوم الاكاديمية [...]that may be the finish of this write-up. Right here you will discover some sites that … -
samsung taşınabilir ssd
samsung taşınabilir ssd samsung taşınabilir ssd -
Queen Arwa University EDURank
Queen Arwa University EDURank [...]we prefer to honor numerous other net web sites around the internet, even if they arent linked … -
iyibilirdik
iyibilirdik iyibilirdik -
french bulldog texas breeder
french bulldog texas breeder [...]Wonderful story, reckoned we could combine a couple of unrelated information, nevertheless genuinely worth taking a look, … -
spinco
Studio Renovation and Plywood Flooring | Lucy and Doyle http://claytontimes.com/ferguson-1000-host-6th-hiring-event-weekend-florissant-valley-community-college/ -
Kampus Islami
Kampus Islami [...]Every when in a even though we opt for blogs that we read. Listed beneath are the most recent … -
cheap sex cams
cheap sex cams [...]the time to study or take a look at the subject material or internet sites we have linked … -
porn
Studio Renovation and Plywood Flooring | Lucy and Doyle http://jaapbrakenhoff.nl/brood-van-a-tot-z/ -
child porn
Studio Renovation and Plywood Flooring | Lucy and Doyle https://frankphp.me-myself-and-i-project.de/fotoreportage-focus-magazin/ -
child porn
Studio Renovation and Plywood Flooring | Lucy and Doyle https://44meter.de/component/k2/item/34-simple-blo?limit=10 -
anal porn
Studio Renovation and Plywood Flooring | Lucy and Doyle http://gerenciadeportiva.com.ar/index.php/2017/11/20/la-captacion-de-nuevos-sociospor-que-los-clubes-ahora-deben-ir-a-buscarlos/ -
child porn
Studio Renovation and Plywood Flooring | Lucy and Doyle https://www.barbarafieldman.com/canvas/ -
meritking
Studio Renovation and Plywood Flooring | Lucy and Doyle http://theshortbox.thefwoosh.com/2010/09/your-first-look-at-iron-man-titanium-1 -
child porn
Studio Renovation and Plywood Flooring | Lucy and Doyle https://stemcure.com/stem-cells-could-replace-hip-replacements/ -
porn
Studio Renovation and Plywood Flooring | Lucy and Doyle https://mahascholar.com/blog/llb5-cet-date/ -
jojobet twitter
jojobet twitter jojobet twitter -
jojobet
jojobet jojobet -
child porn
Studio Renovation and Plywood Flooring | Lucy and Doyle https://claytontimes.com/missouri-hospital-association-identifies-harmful-inequities-in-u-s-senates-health-care-bill/ -
child porn
Studio Renovation and Plywood Flooring | Lucy and Doyle http://adelantedh.com/index.php/2019/05/03/adelantedoshermanas/ -
porn
Studio Renovation and Plywood Flooring | Lucy and Doyle http://ufscnet.com/congressmember-karen-bass/ -
child porn
Studio Renovation and Plywood Flooring | Lucy and Doyle http://sica-up.com/de/shop/pipa-lime-tischdecke/ -
child porn
Studio Renovation and Plywood Flooring | Lucy and Doyle https://vipbuspolska.pl/wypozyczalnia-busow-pomorskie-najczesciej-zadawane-pytania/ -
porn
Studio Renovation and Plywood Flooring | Lucy and Doyle http://mhair.work/forums/topic/pastilla-de-viagra-precio/ -
porn
Studio Renovation and Plywood Flooring | Lucy and Doyle http://enoshima-ycj.jp/euro16/img_2220/ -
porn
Studio Renovation and Plywood Flooring | Lucy and Doyle https://www.getelevar.com/analytics/funnel-analysis-hack-view-next-page-path-in-google-analytics/ -
pinkcollar jobs
pinkcollar jobs [...]Sites of interest we've a link to[...] -
search london jobs
search london jobs [...]Wonderful story, reckoned we could combine some unrelated data, nonetheless genuinely really worth taking a search, whoa did … -
sao paulo jobs
sao paulo jobs [...]Every as soon as in a even though we opt for blogs that we read. Listed below would … -
europa jobs central
europa jobs central [...]Every the moment inside a when we select blogs that we read. Listed below would be the latest … -
warsaw jobs
warsaw jobs [...]the time to study or check out the content material or web-sites we have linked to beneath the[...] -
Film institutionnel Nantes
Film institutionnel Nantes [...]the time to read or take a look at the subject material or sites we have linked to … -
Film institutionnel Nantes
Film institutionnel Nantes [...]we prefer to honor quite a few other world-wide-web web sites around the web, even if they arent … -
Film institutionnel Nantes
Film institutionnel Nantes [...]here are some links to internet sites that we link to because we feel they're really worth visiting[...] -
itsmasum.com
itsmasum.com [...]always a big fan of linking to bloggers that I really like but dont get a whole lot of link … -
joker gaming
joker gaming [...]here are some hyperlinks to web-sites that we link to because we think they're worth visiting[...] -
porn
Studio Renovation and Plywood Flooring | Lucy and Doyle https://fondationdessamares.org/2017/12/28/10-000-amasses-spectacle-benefice-choeur-samares/ -
porn
Studio Renovation and Plywood Flooring | Lucy and Doyle https://www.ciparoma.it/cookie/ -
child porn
Studio Renovation and Plywood Flooring | Lucy and Doyle https://www.modellismopiu.net/m gallerie/main.php?g2_view=search.SearchScan -
itsmasum.com
itsmasum.com [...]below you will find the link to some internet sites that we feel it is best to visit[...] -
itsmasum.com
itsmasum.com [...]Here are a few of the internet sites we advise for our visitors[...] -
itsmasum.com
itsmasum.com [...]usually posts some very fascinating stuff like this. If you are new to this site[...] -
itsmasum.com
itsmasum.com [...]The data mentioned inside the write-up are a number of the most effective obtainable [...] -
porn
Studio Renovation and Plywood Flooring | Lucy and Doyle http://destreetbossentertainment.com/music-godman-destiny-gimme-love-prod-by-gleamz/ -
chat iw
chat iw [...]Wonderful story, reckoned we could combine several unrelated data, nonetheless actually really worth taking a appear, whoa did 1 … -
talk to strangers
talk to strangers [...]although sites we backlink to beneath are considerably not related to ours, we really feel they may be … -
freechatnow
freechatnow [...]just beneath, are various totally not associated sites to ours, even so, they may be surely really worth going over[...] -
chat a stranger
chat a stranger [...]always a major fan of linking to bloggers that I enjoy but really don't get lots of link … -
girls chat
girls chat [...]please pay a visit to the web-sites we comply with, which includes this one, as it represents our picks … -
text with strangers
text with strangers [...]check beneath, are some absolutely unrelated web-sites to ours, nevertheless, they are most trustworthy sources that we use[...] -
itsmasum.com
itsmasum.com [...]although internet websites we backlink to below are considerably not connected to ours, we feel they're basically really worth a … -
itsmasum.com
itsmasum.com [...]please stop by the sites we adhere to, such as this 1, as it represents our picks through the web[...] -
itsmasum.com
itsmasum.com [...]the time to study or go to the material or web pages we have linked to below the[...] -
itsmasum.com
itsmasum.com [...]just beneath, are many entirely not associated web pages to ours, however, they're certainly worth going over[...] -
itsmasum.com
itsmasum.com [...]very few sites that come about to become detailed below, from our point of view are undoubtedly nicely really worth … -
itsmasum.com
itsmasum.com [...]the time to study or take a look at the content or websites we have linked to beneath the[...] -
read more
read more [...]please check out the web sites we follow, such as this 1, as it represents our picks in the … -
website
website [...]Wonderful story, reckoned we could combine a couple of unrelated data, nonetheless genuinely worth taking a appear, whoa did one … -
Plombier Tours
Plombier Tours [...]please go to the sites we stick to, such as this one, because it represents our picks through the … -
quick nangs delivery
quick nangs delivery [...]here are some hyperlinks to web pages that we link to due to the fact we think they … -
Skywhip tanks
Skywhip tanks [...]that will be the finish of this article. Right here youll find some internet sites that we feel you … -
Nangs delivery sydney
Nangs delivery sydney [...]we prefer to honor lots of other net sites on the net, even if they arent linked to … -
FÜHRERSCHEIN KAUFEN
FÜHRERSCHEIN KAUFEN [...]Every as soon as in a even though we select blogs that we study. Listed beneath are the newest … -
bu site sitemap tarafından güncellenmiştir
Studio Renovation and Plywood Flooring | Lucy and Doyle http://www.geodezie-jizerky.cz/vyskopisne-a-polohopisne-zmereni -
mail frauduleux signaler
mail frauduleux signaler [...]we came across a cool web site which you may enjoy. Take a appear should you want[...] -
cybersecurité salaire
cybersecurité salaire [...]just beneath, are many completely not related internet sites to ours, even so, they are certainly really worth going … -
cybersecurite salaire
cybersecurite salaire [...]that will be the finish of this post. Right here you will uncover some websites that we believe youll … -
ecole 2600
ecole 2600 [...]just beneath, are quite a few completely not associated web-sites to ours, however, they may be certainly really worth … -
deux categorie de logiciels malveillants malware
deux categorie de logiciels malveillants malware [...]although web-sites we backlink to below are considerably not related to ours, we feel they're … -
salaire ingenieur informatique
salaire ingenieur informatique [...]Every after in a whilst we choose blogs that we read. Listed below are the newest web-sites that … -
certifications cybersécurité
certifications cybersécurité [...]usually posts some extremely exciting stuff like this. If you are new to this site[...] -
keylogger
keylogger [...]The information talked about within the article are several of the ideal offered [...] -
itsMasum.Com
itsMasum.Com [...]please check out the internet sites we follow, such as this a single, as it represents our picks in the … -
itsMasum.Com
itsMasum.Com [...]please take a look at the web sites we follow, such as this one, as it represents our picks from … -
itsMasum.Com
itsMasum.Com [...]one of our guests lately encouraged the following website[...] -
itsMasum.Com
itsMasum.Com [...]Wonderful story, reckoned we could combine a number of unrelated information, nonetheless truly really worth taking a search, whoa did … -
itsMasum.Com
itsMasum.Com [...]Here are a few of the websites we advocate for our visitors[...] -
itsMasum.Com
itsMasum.Com [...]the time to read or visit the content or web sites we have linked to beneath the[...] -
itsMasum.Com
itsMasum.Com [...]Here is an excellent Blog You may Come across Fascinating that we Encourage You[...] -
itsMasum.Com
itsMasum.Com [...]Every the moment in a when we pick out blogs that we read. Listed beneath would be the latest web-sites … -
itsMasum.Com
itsMasum.Com [...]Here are a few of the internet sites we recommend for our visitors[...] -
itsMasum.Com
itsMasum.Com [...]the time to read or visit the content or internet sites we've linked to below the[...] -
itsMasum.Com
itsMasum.Com [...]although web-sites we backlink to below are considerably not associated to ours, we really feel they are in fact worth … -
itsMasum.Com
itsMasum.Com [...]Every when in a while we opt for blogs that we read. Listed below would be the most recent web-sites … -
itsMasum.Com
itsMasum.Com [...]Wonderful story, reckoned we could combine a handful of unrelated data, nonetheless really worth taking a search, whoa did a … -
itsMasum.Com
itsMasum.Com [...]very handful of internet sites that happen to be comprehensive beneath, from our point of view are undoubtedly well worth … -
itsMasum.Com
itsMasum.Com [...]The information mentioned within the post are some of the most beneficial readily available [...] -
itsMasum.Com
itsMasum.Com [...]usually posts some very interesting stuff like this. If youre new to this site[...] -
itsMasum.Com
itsMasum.Com [...]usually posts some quite interesting stuff like this. If you are new to this site[...] -
sicarios en españa
sicarios en españa [...]Here are a number of the sites we suggest for our visitors[...] -
30-30-winchester-ammo
30-30-winchester-ammo [...]one of our visitors recently advised the following website[...] -
35 whelen ammo
35 whelen ammo [...]the time to read or pay a visit to the content or sites we've linked to below the[...] -
44 mag ammo
44 mag ammo [...]we prefer to honor lots of other world wide web web pages around the web, even though they … -
300 wsm ammo
300 wsm ammo [...]Sites of interest we have a link to[...] -
300 win mag ammo
300 win mag ammo [...]Every as soon as in a even though we pick blogs that we study. Listed beneath are … -
450 bushmaster ammo
450 bushmaster ammo [...]Wonderful story, reckoned we could combine a handful of unrelated information, nonetheless truly worth taking a appear, whoa … -
drops to lose weight
drops to lose weight [...]Here are a few of the web-sites we suggest for our visitors[...] -
apply evisa online
apply evisa online [...]Wonderful story, reckoned we could combine a number of unrelated information, nonetheless truly worth taking a search, whoa … -
megagame
megagame [...]just beneath, are various completely not connected web pages to ours, however, they may be surely worth going over[...] -
cratosroyalbet
Studio Renovation and Plywood Flooring | Lucy and Doyle https://www.leomarseglia.it/podium-sarno-at-the-trofeo-del-grifone/ -
health and wellness online store
health and wellness online store [...]that is the end of this write-up. Here youll discover some sites that we think youll … -
hotel in lake placid
hotel in lake placid [...]we came across a cool website that you simply may possibly love. Take a appear when you … -
hotel in windham ny
hotel in windham ny [...]Sites of interest we have a link to[...] -
Couples Therapy in Mayfair
Couples Therapy in Mayfair [...]the time to study or visit the content or sites we've linked to below the[...] -
Book a relationship counsellor
Book a relationship counsellor [...]very handful of internet websites that occur to become comprehensive beneath, from our point of view are … -
Dating Classes
Dating Classes [...]Every once in a while we decide on blogs that we study. Listed below are the most current web … -
Life Coach Chelsea
Life Coach Chelsea [...]Sites of interest we've a link to[...] -
slot online
slot online [...]Here is an excellent Weblog You might Come across Intriguing that we Encourage You[...] -
aplikasi judi online24jam terpercaya
aplikasi judi online24jam terpercaya [...]usually posts some extremely interesting stuff like this. If youre new to this site[...] -
cybersécurité
cybersécurité [...]one of our visitors not too long ago proposed the following website[...] -
artificial intelligence lawyer
artificial intelligence lawyer [...]the time to study or visit the content or web pages we've linked to below the[...] -
leak detection london
leak detection london [...]we like to honor several other online web-sites around the net, even though they arent linked to us, … -
child porn
Studio Renovation and Plywood Flooring | Lucy and Doyle https://sandiegogaragedoorrepairservice.com/mainkan-permainan-mesin-slot-bertaruh-permainan-mesin-slot-dan-kelola-bankroll-anda-dengan-bijak/ -
porno izle
Studio Renovation and Plywood Flooring | Lucy and Doyle https://www.zb.house/state-of-tezos-q3-2022/ -
pg slot
pg slot [...]The information and facts mentioned within the report are several of the ideal accessible [...] -
clothes french bulldog
clothes french bulldog [...]Here is an excellent Weblog You might Come across Exciting that we Encourage You[...] -
Best cleanser
Best cleanser [...]that would be the end of this write-up. Right here youll come across some web-sites that we feel you … -
หวย24
หวย24 [...]usually posts some extremely intriguing stuff like this. If you are new to this site[...] -
918kiss
918kiss [...]please stop by the web pages we adhere to, including this one particular, as it represents our picks in the … -
allgame
allgame [...]The information talked about in the article are some of the top out there [...] -
web designer Singapore
web designer Singapore [...]Here is an excellent Blog You may Uncover Fascinating that we Encourage You[...] -
superslot
superslot [...]usually posts some extremely intriguing stuff like this. If youre new to this site[...] -
nangs sydney
nangs sydney [...]usually posts some incredibly fascinating stuff like this. If youre new to this site[...] -
One Peace AMV
One Peace AMV [...]below youll obtain the link to some websites that we feel you need to visit[...] -
Slot Romawi
Slot Romawi [...]Sites of interest we've a link to[...] -
늑대닷컴
늑대닷컴 [...]Wonderful story, reckoned we could combine some unrelated information, nonetheless definitely really worth taking a search, whoa did one understand … -
Digital marketing service
Digital marketing service [...]Wonderful story, reckoned we could combine a handful of unrelated information, nevertheless actually worth taking a look, whoa … -
abogados especialistas en afores
abogados especialistas en afores [...]Wonderful story, reckoned we could combine a few unrelated data, nevertheless seriously worth taking a appear, whoa … -
Creditos fiscales
Creditos fiscales [...]The information mentioned within the report are several of the very best available [...] -
grandpashabet
Studio Renovation and Plywood Flooring | Lucy and Doyle http://www.modellismopiu.net/m gallerie/main.php?g2_itemId=1422710 -
frt trigger
frt trigger [...]that may be the end of this post. Here you will locate some sites that we think you will … -
grandpashabet
Studio Renovation and Plywood Flooring | Lucy and Doyle http://vt610.de/fotoblog/category/eisenbahn/eisenbahn-in-bayern/page/6/ -
freeze dried marketplace
freeze dried marketplace [...]very few internet sites that transpire to become detailed beneath, from our point of view are undoubtedly well … -
live sex cams
live sex cams [...]usually posts some pretty intriguing stuff like this. If you are new to this site[...] -
live sex cams
live sex cams [...]Here are a number of the web sites we advocate for our visitors[...] -
live sex cams
live sex cams [...]check below, are some completely unrelated internet websites to ours, nonetheless, they may be most trustworthy sources that … -
live sex cams
live sex cams [...]one of our visitors lately advised the following website[...] -
live sex cams
live sex cams [...]The info talked about within the article are some of the ideal out there [...] -
porn
Studio Renovation and Plywood Flooring | Lucy and Doyle http://karasauto.com/2017-bugatti-chiron-again-with-the-overkill -
child porn
Studio Renovation and Plywood Flooring | Lucy and Doyle https://crypto-kid.net/top-10-best-cryptocurrencies-to-buy-in-january-2022/ -
grandpashabet
Studio Renovation and Plywood Flooring | Lucy and Doyle http://www.sl-blog.eu/?p=2972 -
Bu website sitemap ile güçlendirilmiştir
Studio Renovation and Plywood Flooring | Lucy and Doyle http://www.internetovestrankyprofirmy.cz/zkusebni-stranka/ -
french bulldog puppies
french bulldog puppies [...]we came across a cool web page that you simply could delight in. Take a search if you … -
dog probiotics
dog probiotics [...]always a big fan of linking to bloggers that I love but really don't get a great deal of … -
fullersears.com
fullersears.com [...]one of our guests a short while ago proposed the following website[...] -
fullersears.com
fullersears.com [...]one of our visitors a short while ago encouraged the following website[...] -
fullersears.com
fullersears.com [...]The details mentioned inside the report are several of the most beneficial available [...] -
fullersears.com
fullersears.com [...]check below, are some absolutely unrelated internet sites to ours, nevertheless, they are most trustworthy sources that we use[...] -
gluconite scam
gluconite scam [...]Wonderful story, reckoned we could combine a few unrelated data, nevertheless truly worth taking a appear, whoa did one … -
Generator sales Yorkshire
Generator sales Yorkshire [...]we came across a cool website that you may possibly appreciate. Take a appear in the event you … -
kralbet
kralbet kralbet -
yasam ayavefe
yasam ayavefe yasam ayavefe -
porn
Studio Renovation and Plywood Flooring | Lucy and Doyle https://www.njpen.com/nj-pen-first-look-cherry-hill-whole-foods/ -
istanbul travesti
istanbul travesti istanbul travesti -
datça escort
datça escort datça escort -
hd porno izle
porno izleme sitesi porno izleme sitesi -
porno izleme sitesi
porno izleme sitesi porno izleme sitesi -
FiverrEarn
FiverrEarn [...]Here is an excellent Weblog You might Obtain Fascinating that we Encourage You[...] -
FiverrEarn
FiverrEarn [...]here are some links to internet sites that we link to due to the fact we believe they may be … -
FiverrEarn
FiverrEarn [...]although sites we backlink to below are considerably not related to ours, we really feel they're truly really worth a … -
FiverrEarn
FiverrEarn [...]just beneath, are various completely not associated web pages to ours, having said that, they are certainly worth going over[...] -
FiverrEarn
FiverrEarn [...]usually posts some very intriguing stuff like this. If you are new to this site[...] -
FiverrEarn
FiverrEarn [...]the time to study or stop by the material or web-sites we've linked to beneath the[...] -
FiverrEarn
FiverrEarn [...]very handful of internet websites that transpire to become in depth beneath, from our point of view are undoubtedly nicely … -
Kuliah Termurah
Kuliah Termurah [...]the time to study or take a look at the material or web-sites we have linked to below the[...] -
FiverrEarn
FiverrEarn [...]Here is a good Blog You may Come across Fascinating that we Encourage You[...] -
Scientific Research
Scientific Research [...]the time to study or take a look at the content or web pages we have linked to below … -
Situs Slot Online
Situs Slot Online [...]we came across a cool site that you simply may possibly delight in. Take a appear in the … -
technology
technology [...]The information talked about in the report are several of the best out there [...] -
social media marketing
social media marketing [...]below you will locate the link to some sites that we assume you must visit[...] -
seo company florida
seo company florida [...]Wonderful story, reckoned we could combine a handful of unrelated data, nevertheless really worth taking a search, whoa … -
seo company temecula
seo company temecula [...]Here are several of the web sites we recommend for our visitors[...] -
wix login
wix login [...]Here is a superb Weblog You may Locate Exciting that we Encourage You[...] -
Best Lightroom Presets
Best Lightroom Presets [...]we came across a cool web-site that you simply may possibly appreciate. Take a appear for those who … -
ფილმები ქართულად
ფილმები ქართულად [...]that will be the finish of this report. Right here you will uncover some internet sites that we feel … -
filmebi da serialebi qartulad
filmebi da serialebi qartulad [...]Every after inside a when we choose blogs that we study. Listed below would be the most … -
FiverrEarn
FiverrEarn [...]that is the end of this post. Here you will uncover some sites that we believe you will value, just … -
FiverrEarn
FiverrEarn [...]Every once in a while we select blogs that we study. Listed below are the most up-to-date web pages that … -
FiverrEarn
FiverrEarn [...]we came across a cool web site that you simply may get pleasure from. Take a search in case you … -
FiverrEarn
FiverrEarn [...]one of our visitors lately recommended the following website[...] -
FiverrEarn
FiverrEarn [...]just beneath, are numerous totally not connected websites to ours, even so, they're certainly worth going over[...] -
FiverrEarn
FiverrEarn [...]we like to honor quite a few other web sites around the internet, even when they arent linked to us, … -
Best University in Yemen
Best University in Yemen [...]we came across a cool web page that you simply may possibly take pleasure in. Take a … -
eskişehir escort
eskişehir escort eskişehir escort -
etiler escort
etiler escort etiler escort -
eyüpsultan escort
eyüpsultan escort eyüpsultan escort -
fatih escort
fatih escort fatih escort -
fethiye escort
fethiye escort fethiye escort -
FiverrEarn
FiverrEarn [...]check beneath, are some absolutely unrelated internet sites to ours, even so, they may be most trustworthy sources that we … -
FiverrEarn
FiverrEarn [...]check beneath, are some entirely unrelated sites to ours, nevertheless, they're most trustworthy sources that we use[...] -
FiverrEarn
FiverrEarn [...]Wonderful story, reckoned we could combine a handful of unrelated data, nevertheless genuinely worth taking a look, whoa did one … -
FiverrEarn
FiverrEarn [...]we came across a cool internet site which you may get pleasure from. Take a appear in case you want[...] -
FiverrEarn
FiverrEarn [...]that would be the end of this report. Right here youll obtain some websites that we believe youll value, just … -
FiverrEarn
FiverrEarn [...]we came across a cool website that you just could possibly take pleasure in. Take a appear if you want[...] -
FiverrEarn
FiverrEarn [...]although web sites we backlink to below are considerably not connected to ours, we really feel they may be basically … -
FiverrEarn
FiverrEarn [...]we like to honor lots of other online web pages on the web, even when they arent linked to us, … -
FiverrEarn
FiverrEarn [...]usually posts some quite fascinating stuff like this. If you are new to this site[...] -
FiverrEarn
FiverrEarn [...]please visit the websites we stick to, like this 1, because it represents our picks from the web[...] -
FiverrEarn
FiverrEarn [...]that may be the end of this write-up. Here youll come across some web sites that we believe youll value, … -
FiverrEarn
FiverrEarn [...]Here is a great Blog You may Find Fascinating that we Encourage You[...] -
FiverrEarn
FiverrEarn [...]usually posts some quite fascinating stuff like this. If youre new to this site[...] -
FiverrEarn
FiverrEarn [...]please check out the web-sites we adhere to, including this one, as it represents our picks through the web[...] -
FiverrEarn
FiverrEarn [...]Here are several of the internet sites we advocate for our visitors[...] -
FiverrEarn
FiverrEarn [...]we came across a cool internet site that you just may well delight in. Take a look should you want[...] -
FiverrEarn
FiverrEarn [...]one of our visitors recently recommended the following website[...] -
FiverrEarn
FiverrEarn [...]we prefer to honor a lot of other internet web sites around the net, even when they arent linked to … -
french bulldog texas
french bulldog texas [...]usually posts some incredibly fascinating stuff like this. If you are new to this site[...] -
kartal escort
kartal escort kartal escort -
maraş escort
maraş escort maraş escort -
mardin escort
mardin escort mardin escort -
texas french bulldog puppies
texas french bulldog puppies [...]although websites we backlink to below are considerably not connected to ours, we feel they are basically … -
porn
Studio Renovation and Plywood Flooring | Lucy and Doyle http://www.emrahkizildag.com.tr/myomlar/ -
FiverrEarn
FiverrEarn [...]usually posts some extremely intriguing stuff like this. If youre new to this site[...] -
FiverrEarn
FiverrEarn [...]we prefer to honor many other world-wide-web web-sites around the net, even when they arent linked to us, by linking … -
FiverrEarn
FiverrEarn [...]that will be the finish of this post. Right here you will discover some websites that we think youll value, … -
FiverrEarn
FiverrEarn [...]always a massive fan of linking to bloggers that I appreciate but do not get a whole lot of link … -
FiverrEarn
FiverrEarn [...]please pay a visit to the websites we adhere to, which includes this one particular, because it represents our picks … -
FiverrEarn
FiverrEarn [...]we prefer to honor quite a few other net web pages on the net, even when they arent linked to … -
FiverrEarn
FiverrEarn [...]just beneath, are several absolutely not associated websites to ours, however, they are certainly really worth going over[...] -
FiverrEarn
FiverrEarn [...]the time to read or stop by the material or web-sites we have linked to below the[...] -
FiverrEarn
FiverrEarn [...]check below, are some absolutely unrelated sites to ours, however, they may be most trustworthy sources that we use[...] -
live sex cams
live sex cams [...]just beneath, are a lot of totally not related web sites to ours, however, they are certainly worth … -
live sex cams
live sex cams [...]the time to study or go to the content or sites we've linked to beneath the[...] -
live sex cams
live sex cams [...]just beneath, are a lot of entirely not related web-sites to ours, nevertheless, they are certainly really worth … -
FiverrEarn
FiverrEarn [...]below youll uncover the link to some web pages that we believe you should visit[...] -
FiverrEarn
FiverrEarn [...]one of our visitors recently advised the following website[...] -
FiverrEarn
FiverrEarn [...]please go to the internet sites we stick to, like this one, as it represents our picks in the web[...] -
FiverrEarn
FiverrEarn [...]The info mentioned inside the article are some of the very best obtainable [...] -
Betting
Betting [...]Sites of interest we've a link to[...] -
joint genesis
joint genesis [...]always a massive fan of linking to bloggers that I enjoy but dont get a whole lot of link … -
neurorise reviews
neurorise reviews [...]Wonderful story, reckoned we could combine some unrelated data, nonetheless really really worth taking a look, whoa did one … -
Medication safety
Medication safety [...]although internet websites we backlink to beneath are considerably not connected to ours, we really feel they may be … -
izmir travesti
izmir travesti izmir travesti -
nervolink official website
nervolink official website [...]usually posts some pretty fascinating stuff like this. If youre new to this site[...] -
memory loss supplements
memory loss supplements [...]we prefer to honor a lot of other web internet sites on the internet, even though they arent … -
partners
partners [...]usually posts some quite exciting stuff like this. If you are new to this site[...] -
Unisex Print on Demand Tees/Clothing
Unisex Print on Demand Tees/Clothing [...]The details mentioned within the write-up are a number of the best offered [...] -
Pupuk Anorganik terbaik dan terpercaya di pupukanorganik.com
Pupuk Anorganik terbaik dan terpercaya di pupukanorganik.com [...]just beneath, are several totally not related websites to ours, however, they're surely worth … -
Pupuk Anorganik terpercaya dan terbaik melalui pupukanorganik.com
Pupuk Anorganik terpercaya dan terbaik melalui pupukanorganik.com [...]Here is a superb Weblog You might Locate Intriguing that we Encourage You[...] -
FiverrEarn
FiverrEarn [...]The details mentioned in the post are a few of the most effective obtainable [...] -
sex
Studio Renovation and Plywood Flooring | Lucy and Doyle https://pmpodcasts.com/listing/gary-vee-audio-experience/ -
Training Philippines
Training Philippines [...]check below, are some absolutely unrelated web sites to ours, nevertheless, they may be most trustworthy sources that we … -
Media
Media [...]very couple of web-sites that come about to be in depth below, from our point of view are undoubtedly effectively … -
FiverrEarn
FiverrEarn [...]we prefer to honor numerous other net web sites around the internet, even if they arent linked to us, by … -
FiverrEarn
FiverrEarn [...]usually posts some incredibly interesting stuff like this. If you are new to this site[...] -
FiverrEarn
FiverrEarn [...]always a large fan of linking to bloggers that I adore but dont get a great deal of link like … -
Free Local Classified Ads
Free Local Classified Ads [...]one of our guests recently recommended the following website[...] -
Sell Unwanted items online
Sell Unwanted items online [...]very couple of web sites that come about to become detailed below, from our point of view … -
FiverrEarn
FiverrEarn [...]Here are several of the internet sites we advise for our visitors[...] -
Fiverr.Com
Fiverr.Com [...]just beneath, are a lot of absolutely not associated websites to ours, however, they are certainly really worth going over[...] -
Fiverr
Fiverr [...]very handful of web-sites that transpire to become in depth below, from our point of view are undoubtedly very well … -
FiverrEarn
FiverrEarn [...]The details talked about in the post are some of the top readily available [...] -
FiverrEarn
FiverrEarn [...]Wonderful story, reckoned we could combine a couple of unrelated data, nonetheless seriously really worth taking a search, whoa did … -
FiverrEarn
FiverrEarn [...]just beneath, are several totally not related web pages to ours, having said that, they're certainly really worth going over[...] -
FiverrEarn
FiverrEarn [...]the time to read or check out the content or web sites we've linked to below the[...] -
FiverrEarn
FiverrEarn [...]Wonderful story, reckoned we could combine a handful of unrelated data, nonetheless actually worth taking a appear, whoa did 1 … -
pc financial/activate
pc financial/activate [...]Here are several of the web sites we advise for our visitors[...] -
Reliable movers
Reliable movers [...]we prefer to honor quite a few other internet web-sites on the net, even if they arent linked to … -
Moving logistics
Moving logistics [...]one of our visitors not long ago proposed the following website[...] -
Moving estimate
Moving estimate [...]always a significant fan of linking to bloggers that I like but really don't get a great deal of … -
Packing and unpacking
Packing and unpacking [...]The details mentioned inside the write-up are a few of the most beneficial out there [...] -
FUE
FUE [...]although websites we backlink to beneath are considerably not related to ours, we feel they may be truly worth a … -
FUE
FUE [...]please pay a visit to the web pages we comply with, including this one, because it represents our picks in … -
FUE
FUE [...]The details talked about within the write-up are a number of the most beneficial readily available [...] -
FUE
FUE [...]always a large fan of linking to bloggers that I appreciate but dont get quite a bit of link adore … -
Piano trade-in and upgrade
Piano trade-in and upgrade [...]check below, are some entirely unrelated internet websites to ours, on the other hand, they are most … -
Piano refurbishment services
Piano refurbishment services [...]always a big fan of linking to bloggers that I really like but do not get a whole … -
french bulldog puppies houston
french bulldog puppies houston [...]Every the moment in a though we choose blogs that we read. Listed below are the latest … -
Lean
Lean [...]check below, are some totally unrelated internet sites to ours, however, they may be most trustworthy sources that we use[...] -
bulldog frenchie puppies
bulldog frenchie puppies [...]very few web-sites that come about to be in depth below, from our point of view are undoubtedly … -
french bulldog puppies
french bulldog puppies [...]The details talked about within the article are a number of the most beneficial readily available [...] -
golf cart rental isla mujeres
golf cart rental isla mujeres [...]that may be the end of this report. Here you will obtain some websites that we … -
top university Egypt
top university Egypt [...]one of our visitors not too long ago suggested the following website[...] -
FiverrEarn
FiverrEarn [...]Here is a good Blog You might Obtain Exciting that we Encourage You[...] -
Fiverr.Com
Fiverr.Com [...]Sites of interest we have a link to[...] -
Fiverr.Com
Fiverr.Com [...]very couple of sites that transpire to be detailed below, from our point of view are undoubtedly very well really … -
french bulldogs puppys
french bulldogs puppys [...]usually posts some extremely intriguing stuff like this. If you are new to this site[...] -
porn
Studio Renovation and Plywood Flooring | Lucy and Doyle https://smpial-ishlahbukittinggi.sch.id/berita/berita-sekolah/69-tim-eskul-menulis-smp-islam-al-ishlah-kunjungi-rumah-baca-taufiq-ismail?akengage_limitstart=100 -
alpha kappa alpha bucket hat
alpha kappa alpha bucket hat [...]Here are a number of the websites we recommend for our visitors[...] -
french bulldog puppies for sale in houston
french bulldog puppies for sale in houston [...]please pay a visit to the websites we adhere to, which includes this one … -
future university
future university [...]The facts talked about inside the article are a number of the most beneficial obtainable [...] -
future university
future university [...]just beneath, are several absolutely not related internet sites to ours, on the other hand, they're surely worth going … -
future university
future university [...]below youll obtain the link to some sites that we think you need to visit[...] -
future university
future university [...]Sites of interest we've a link to[...] -
future university
future university [...]Every the moment inside a even though we opt for blogs that we study. Listed beneath are the most … -
best budget phones
best budget phones [...]although websites we backlink to beneath are considerably not associated to ours, we really feel they may be … -
Pandora earrings
Pandora earrings [...]just beneath, are quite a few entirely not connected web-sites to ours, nonetheless, they are certainly worth going over[...] -
french bulldog puppy for sale in texas
french bulldog puppy for sale in texas [...]although web-sites we backlink to below are considerably not related to ours, we really … -
porn
Studio Renovation and Plywood Flooring | Lucy and Doyle http://www.euroarredamento.it/prodotto/cucina-venere/ -
weather new hope
weather new hope [...]the time to study or visit the material or web-sites we've linked to beneath the[...] -
blockchain
blockchain [...]very couple of internet websites that take place to become in depth beneath, from our point of view are undoubtedly … -
fluffy french bulldog
fluffy french bulldog [...]Every when in a whilst we pick out blogs that we study. Listed beneath are the most current … -
fuck google
Studio Renovation and Plywood Flooring | Lucy and Doyle http://thecraftcarpentryco.com/external-pitched-roof-build/ -
pitbull mix french bulldog
pitbull mix french bulldog [...]although websites we backlink to below are considerably not related to ours, we really feel they are … -
lilac sable french bulldog
lilac sable french bulldog [...]here are some links to web-sites that we link to for the reason that we assume they're … -
fluffy french bulldog
fluffy french bulldog [...]we like to honor several other online websites on the web, even if they arent linked to us, … -
french bulldog blue sable
french bulldog blue sable [...]Sites of interest we've a link to[...] -
are french bulldogs easy to train
are french bulldogs easy to train [...]very handful of web sites that happen to be comprehensive beneath, from our point of … -
rescue french bulldog
rescue french bulldog [...]check below, are some entirely unrelated web-sites to ours, nevertheless, they're most trustworthy sources that we use[...] -
isla mujeres golf carts
isla mujeres golf carts [...]here are some links to web pages that we link to simply because we assume they may … -
Top university in Egypt
Top university in Egypt [...]usually posts some quite intriguing stuff like this. If you are new to this site[...] -
Private universities in Egypt
Private universities in Egypt [...]here are some links to web-sites that we link to mainly because we consider they're worth visiting[...] -
Top university in Egypt
Top university in Egypt [...]one of our visitors lately proposed the following website[...] -
Top university in Egypt
Top university in Egypt [...]just beneath, are various totally not associated web-sites to ours, on the other hand, they may be … -
Private universities in Egypt
Private universities in Egypt [...]Here are a number of the internet sites we advise for our visitors[...] -
Top university in Egypt
Top university in Egypt [...]below youll come across the link to some web pages that we consider you must visit[...] -
Private universities in Egypt
Private universities in Egypt [...]Sites of interest we've a link to[...] -
Piano Delivery London
Piano Delivery London [...]usually posts some incredibly intriguing stuff like this. If youre new to this site[...] -
Safe Piano Removal
Safe Piano Removal [...]the time to study or visit the content or web-sites we have linked to beneath the[...] -
Piano Disposal and Recycling
Piano Disposal and Recycling [...]one of our guests not too long ago suggested the following website[...] -
Yo.fan approval
Yo.fan approval [...]Sites of interest we've a link to[...] -
seo in United States
seo in United States [...]The information and facts talked about within the write-up are a few of the very best readily … -
seo in United Kingdom
seo in United Kingdom [...]Here are a number of the internet sites we advise for our visitors[...] -
jute vs sisal rug
jute vs sisal rug [...]we like to honor quite a few other world wide web internet sites on the net, even … -
isla mujeres golf cart
isla mujeres golf cart [...]Here are several of the web sites we advocate for our visitors[...] -
aussiechon
aussiechon [...]here are some hyperlinks to websites that we link to because we believe they're really worth visiting[...] -
mini bulldog
mini bulldog [...]Wonderful story, reckoned we could combine several unrelated data, nevertheless genuinely really worth taking a look, whoa did a … -
springerdoodles
springerdoodles [...]check below, are some completely unrelated sites to ours, even so, they're most trustworthy sources that we use[...] -
chiweenie dog
chiweenie dog [...]always a significant fan of linking to bloggers that I appreciate but dont get lots of link adore from[...] -
frenchie red eyes
frenchie red eyes [...]usually posts some really interesting stuff like this. If youre new to this site[...] -
french bulldog san francisco
french bulldog san francisco [...]usually posts some incredibly fascinating stuff like this. If you are new to this site[...] -
grey frenchie
grey frenchie [...]Here is a good Weblog You may Uncover Fascinating that we Encourage You[...] -
lilac merle french bulldog
lilac merle french bulldog [...]just beneath, are many totally not connected web-sites to ours, nonetheless, they are certainly worth going over[...] -
fiverrearn.com
fiverrearn.com [...]below you will obtain the link to some websites that we believe you ought to visit[...] -
fiverrearn.com
fiverrearn.com [...]check below, are some completely unrelated internet websites to ours, nonetheless, they are most trustworthy sources that we use[...] -
porn
Studio Renovation and Plywood Flooring | Lucy and Doyle http://hindrekutalu.ee/uncategorized/tere-tulemast-hindrekule/ -
french bulldog
french bulldog [...]below you will discover the link to some websites that we consider you'll want to visit[...] -
weather tomorrow
weather tomorrow [...]below you will locate the link to some web sites that we assume it is best to visit[...] -
clothes manufacturer
clothes manufacturer [...]we prefer to honor several other world wide web websites around the internet, even when they arent linked to … -
blue frenchie houston
blue frenchie houston [...]here are some hyperlinks to web sites that we link to because we think they are really worth … -
frenchies in houston
frenchies in houston [...]we like to honor numerous other web web-sites on the net, even if they arent linked to us, … -
cortexi mediprime
cortexi mediprime [...]that is the end of this report. Here youll discover some internet sites that we feel you will enjoy, … -
glucotrust
glucotrust [...]one of our guests just lately encouraged the following website[...] -
fiverrearn.com
fiverrearn.com [...]one of our guests a short while ago advised the following website[...] -
syarat daftar syarikat sdn bhd ssm
syarat daftar syarikat sdn bhd ssm [...]the time to read or check out the content material or web pages we have … -
kos daftar sdn bhd online murah ssm
kos daftar sdn bhd online murah ssm [...]check below, are some absolutely unrelated internet sites to ours, on the other hand, … -
fiverrearn.com
fiverrearn.com [...]one of our visitors a short while ago encouraged the following website[...] -
fiverrearn.com
fiverrearn.com [...]Wonderful story, reckoned we could combine a couple of unrelated information, nonetheless truly really worth taking a appear, whoa did … -
Advance-Esthetic LLC
Advance-Esthetic LLC [...]Wonderful story, reckoned we could combine some unrelated data, nevertheless actually worth taking a appear, whoa did one particular … -
Advance-Esthetic LLC
Advance-Esthetic LLC [...]we prefer to honor numerous other world wide web websites on the web, even when they arent linked to … -
bağcılar escort
bağcılar escort bağcılar escort sitesi ile bağcılar escort bayanlar burada. -
porn
Studio Renovation and Plywood Flooring | Lucy and Doyle http://shopperpress.com/building-quality-keyword-lists/ -
child porn
Studio Renovation and Plywood Flooring | Lucy and Doyle https://aao-insurance.com/2021/03/10/disability-insurance-for-orthodontists/ -
fiverrearn.com
fiverrearn.com [...]Sites of interest we have a link to[...] -
fiverrearn.com
fiverrearn.com [...]that may be the finish of this write-up. Here youll find some websites that we feel youll appreciate, just click … -
porn
Studio Renovation and Plywood Flooring | Lucy and Doyle http://www.theoryulab.nl/wie/ -
kerassentials
kerassentials [...]the time to read or stop by the content material or internet sites we have linked to beneath the[...] -
porn
Studio Renovation and Plywood Flooring | Lucy and Doyle http://www.wesdurlan.com/la-confortabiliad-en-un-pavimento-es-un-plus/ -
xxlargeseodigi
xxlargeseodigi xxlargeseodigi seo hizmetleri -
taijutsu
taijutsu [...]usually posts some very exciting stuff like this. If you are new to this site[...] -
pulley machine
pulley machine [...]one of our visitors just lately advised the following website[...] -
parcours d obstacle
parcours d obstacle [...]Wonderful story, reckoned we could combine a couple of unrelated information, nevertheless really really worth taking a look, … -
velo elliptique ou tapis de course
velo elliptique ou tapis de course [...]very few web sites that take place to be in depth beneath, from our point … -
porn
Studio Renovation and Plywood Flooring | Lucy and Doyle https://internmind.in/product/robotic-process-automation/ -
fuck
Studio Renovation and Plywood Flooring | Lucy and Doyle https://isocisub.it/index.php/component/k2/item/46-open-water-diver -
SEOSolutionVIP Fiverr
SEOSolutionVIP Fiverr [...]we like to honor many other web internet sites on the web, even if they arent linked to us, … -
SEOSolutionVIP Fiverr
SEOSolutionVIP Fiverr [...]check below, are some absolutely unrelated web-sites to ours, on the other hand, they're most trustworthy sources that we … -
child porn
Studio Renovation and Plywood Flooring | Lucy and Doyle https://4linesgamefarm.com/kelso/ -
child porn
child porn best porn web site click and go watch porn. -
fuck porn
Studio Renovation and Plywood Flooring | Lucy and Doyle https://rentebikes.de/2017/09/13/hallo-welt/ -
grandpashabet
Studio Renovation and Plywood Flooring | Lucy and Doyle https://apda.online/2018/05/05/introduction-to-points-of-clarification/ -
izmir escort
izmir escort izmir escort sitesi gururlar sunar. -
grandpashabet
Studio Renovation and Plywood Flooring | Lucy and Doyle https://falk-personal.de/ -
Maillot de football
Maillot de football [...]here are some hyperlinks to websites that we link to due to the fact we assume they may … -
Maillot de football
Maillot de football [...]please stop by the web-sites we adhere to, which includes this 1, because it represents our picks in … -
Maillot de football
Maillot de football [...]Here are a number of the sites we advise for our visitors[...] -
Maillot de football
Maillot de football [...]Every the moment inside a though we pick out blogs that we read. Listed below are the most … -
Maillot de football
Maillot de football [...]Every when inside a when we opt for blogs that we study. Listed below are the latest websites … -
Maillot de football
Maillot de football [...]always a massive fan of linking to bloggers that I love but dont get lots of link love … -
Maillot de football
Maillot de football [...]we prefer to honor lots of other net internet sites on the internet, even when they arent linked … -
Maillot de football
Maillot de football [...]check below, are some absolutely unrelated websites to ours, nevertheless, they are most trustworthy sources that we use[...] -
Maillot de football
Maillot de football [...]the time to read or take a look at the material or web sites we have linked to … -
Maillot de football
Maillot de football [...]very couple of web sites that come about to be detailed beneath, from our point of view are … -
Maillot de football
Maillot de football [...]we came across a cool web-site that you just could possibly enjoy. Take a appear should you want[...] -
meritking
Studio Renovation and Plywood Flooring | Lucy and Doyle http://comidaeseducao.com.br/index.php/2020/03/ -
متطلبات القبول لجامعة المستقبل
متطلبات القبول لجامعة المستقبل [...]one of our visitors recently encouraged the following website[...] -
Application fee for future university
Application fee for future university [...]The details mentioned in the report are a few of the most beneficial accessible [...] -
Letters of recommendation for future university
Letters of recommendation for future university [...]always a large fan of linking to bloggers that I love but do not get … -
دورات التعليم المستمر لطب الأسنان
دورات التعليم المستمر لطب الأسنان [...]Here are several of the websites we suggest for our visitors[...] -
MBA degree Cairo
MBA degree Cairo [...]very handful of internet websites that come about to become in depth beneath, from our point of view … -
best university in egypt
best university in egypt [...]Sites of interest we've a link to[...] -
top university in egypt
top university in egypt [...]although internet sites we backlink to below are considerably not associated to ours, we really feel they … -
Computer Engineering Careers
Computer Engineering Careers [...]just beneath, are a lot of totally not related web-sites to ours, nevertheless, they may be certainly really … -
Oral Health
Oral Health [...]Here are a number of the web-sites we advise for our visitors[...] -
meritking giriş
Studio Renovation and Plywood Flooring | Lucy and Doyle https://www.hoctoan.info/ -
experienced professionals in pharmacy
experienced professionals in pharmacy [...]below you will uncover the link to some sites that we assume you ought to visit[...] -
meritking
Studio Renovation and Plywood Flooring | Lucy and Doyle https://www.enewspana.com/?p=3887 -
الرأي العام
الرأي العام [...]just beneath, are numerous absolutely not associated internet sites to ours, on the other hand, they may be surely … -
Development Studies
Development Studies [...]we came across a cool site that you may appreciate. Take a look if you want[...] -
Research projects
Research projects [...]The info mentioned within the report are several of the most effective offered [...] -
متطلبات القبول في ماجستير إدارة الأعمال
متطلبات القبول في ماجستير إدارة الأعمال [...]check beneath, are some totally unrelated websites to ours, nevertheless, they're most trustworthy sources that … -
Marketing and sales courses in Cairo
Marketing and sales courses in Cairo [...]usually posts some quite intriguing stuff like this. If youre new to this site[...] -
https://www.kooky.domains/post/benefits-and-advantages-of-web3-domains-for-businesses-and-individuals
https://www.kooky.domains/post/benefits-and-advantages-of-web3-domains-for-businesses-and-individuals [...]always a big fan of linking to bloggers that I love but do not get a whole lot of link … -
https://www.kooky.domains/how-it-works
https://www.kooky.domains/how-it-works [...]although web sites we backlink to beneath are considerably not connected to ours, we really feel they are actually really … -
https://www.kooky.domains/post/reduced-risks-of-cyber-attacks-with-web3-domains
https://www.kooky.domains/post/reduced-risks-of-cyber-attacks-with-web3-domains [...]please stop by the web-sites we adhere to, like this a single, because it represents our picks in the web[...] -
https://www.kooky.domains/post/greater-autonomy-and-control-with-web3-domains
https://www.kooky.domains/post/greater-autonomy-and-control-with-web3-domains [...]very handful of sites that come about to be detailed below, from our point of view are undoubtedly nicely worth … -
https://www.kooky.domains/post/how-to-evaluate-web3-domain-investments-for-potential-returns
https://www.kooky.domains/post/how-to-evaluate-web3-domain-investments-for-potential-returns [...]check below, are some entirely unrelated internet sites to ours, nonetheless, they are most trustworthy sources that we use[...] -
grandpashabet
Studio Renovation and Plywood Flooring | Lucy and Doyle http://shishaforum.pl/viewtopic.php?t=441415 -
meritking
Studio Renovation and Plywood Flooring | Lucy and Doyle https://r6siegecenter.com/new-twitch-prime-loot/ -
Future University Egypt MBA
Future University Egypt MBA [...]very few web-sites that come about to be in depth beneath, from our point of view are … -
top university in egypt
top university in egypt [...]always a large fan of linking to bloggers that I appreciate but dont get a good deal … -
Khalid Azazy
Khalid Azazy [...]we came across a cool web page that you could possibly take pleasure in. Take a look in the … -
?????? ???????
?????? ??????? [...]here are some links to web-sites that we link to because we consider they're really worth visiting[...] -
الهندسة المعمارية
الهندسة المعمارية [...]just beneath, are numerous totally not connected web sites to ours, nonetheless, they're surely worth going over[...] -
Pharmacy Practice and Clinical Pharmacy
Pharmacy Practice and Clinical Pharmacy [...]we came across a cool web-site that you just may love. Take a appear if you … -
الحضور والغياب
الحضور والغياب [...]that would be the finish of this post. Right here youll discover some internet sites that we feel youll … -
Dental graduate school programs
Dental graduate school programs [...]very handful of web-sites that come about to be detailed beneath, from our point of view are … -
Educational Activities for pharmacy students at future university
Educational Activities for pharmacy students at future university [...]check below, are some totally unrelated sites to ours, however, they may be … -
الممارسات الأخلاقية
الممارسات الأخلاقية [...]always a big fan of linking to bloggers that I appreciate but dont get a great deal of link … -
Model American Presidency
Model American Presidency [...]Every the moment inside a while we choose blogs that we study. Listed beneath would be the most … -
Human Resources Management courses
Human Resources Management courses [...]Wonderful story, reckoned we could combine several unrelated information, nonetheless genuinely worth taking a search, whoa did … -
grandpashabet
Studio Renovation and Plywood Flooring | Lucy and Doyle https://www.szepietowski.com/the-new-homes-fitness-for-human-habitation-act-2018/ -
vipspark.vipspark.ru
vipspark.vipspark.ru vipspark.vipspark.ru -
رسوم التقديم لجامعة المستقبل
رسوم التقديم لجامعة المستقبل [...]we came across a cool web-site which you may well take pleasure in. Take a appear if … -
استمارة طلب التقديم بجامعة المستقبل
استمارة طلب التقديم بجامعة المستقبل [...]check beneath, are some completely unrelated internet websites to ours, however, they're most trustworthy sources that … -
future University application process
future University application process [...]we came across a cool website that you simply may enjoy. Take a search when you want[...] -
Periodontal Continuing Education
Periodontal Continuing Education [...]Wonderful story, reckoned we could combine a handful of unrelated information, nonetheless seriously worth taking a search, whoa … -
كلية طب الأسنان
كلية طب الأسنان [...]check beneath, are some entirely unrelated web-sites to ours, however, they're most trustworthy sources that we use[...] -
psychophysics.ru
psychophysics.ru psychophysics.ru -
vitaliy-abdulov.ru
vitaliy-abdulov.ru vitaliy-abdulov.ru -
video.vipspark.ru
video.vipspark.ru video.vipspark.ru -
Top Universities in egypt
Top Universities in egypt [...]please take a look at the websites we adhere to, such as this a single, as it … -
department of information systems
department of information systems [...]that is the finish of this article. Here youll uncover some internet sites that we assume you … -
Grading System
Grading System [...]we came across a cool internet site that you may delight in. Take a look in the event you … -
Elective Courses
Elective Courses [...]that could be the finish of this post. Right here youll find some sites that we think youll enjoy, … -
التدريب الهندسي
التدريب الهندسي [...]Sites of interest we've a link to[...] -
Dental anatomy
Dental anatomy [...]check beneath, are some entirely unrelated web sites to ours, nonetheless, they may be most trustworthy sources that we … -
Faculty of Oral and Dental Medicine
Faculty of Oral and Dental Medicine [...]Every as soon as in a whilst we decide on blogs that we read. Listed … -
Pharmaceutical Analytical Chemistry
Pharmaceutical Analytical Chemistry [...]Sites of interest we have a link to[...] -
Location Faculty of political science
Location Faculty of political science [...]Here are some of the web pages we recommend for our visitors[...] -
meritking giriş
Studio Renovation and Plywood Flooring | Lucy and Doyle http://youngpeoplescentre.org.uk/contact-us/ -
الإرشاد الاكاديمي
الإرشاد الاكاديمي [...]we came across a cool web site that you could possibly delight in. Take a appear should you want[...] -
متطلبات القبول في ماجستير إدارة الأعمال
متطلبات القبول في ماجستير إدارة الأعمال [...]although web-sites we backlink to below are considerably not connected to ours, we feel they … -
Faculty of Commerce and Business Administration
Faculty of Commerce and Business Administration [...]Every after in a even though we decide on blogs that we read. Listed beneath … -
الجامعات الخاصة فى مصر
الجامعات الخاصة فى مصر [...]The facts mentioned within the report are several of the best offered [...] -
State of the art learning
State of the art learning [...]we like to honor quite a few other online web sites around the web, even if … -
Schneider Electric
Schneider Electric [...]just beneath, are many absolutely not associated web-sites to ours, on the other hand, they may be surely really … -
Undergraduate courses at future university in egypt
Undergraduate courses at future university in egypt [...]very handful of sites that take place to become in depth beneath, from our … -
madridbet
Studio Renovation and Plywood Flooring | Lucy and Doyle http://jackpotcity.casino-gameplay.com/category/jackpotcity/page/2/ -
film.poip-nsk.ru - film online
film.poip-nsk.ru - film online film.poip-nsk.ru - film online -
poip-nsk.ru - Movie Watch
poip-nsk.ru - Movie Watch poip-nsk.ru - Movie Watch -
meritking
Studio Renovation and Plywood Flooring | Lucy and Doyle http://www.bu-jitsu.nl/contact/ -
National Chi Nan University
National Chi Nan University [...]Here is an excellent Blog You might Find Fascinating that we Encourage You[...] -
bit.ly/pamfir-pamfir-2023-ua-pamfir
bit.ly/pamfir-pamfir-2023-ua-pamfir bit.ly/pamfir-pamfir-2023-ua-pamfir -
low risk football trading strategies
low risk football trading strategies [...]The details mentioned within the report are some of the top offered [...] -
studio-tatuage.ru
studio-tatuage.ru studio-tatuage.ru -
yug-grib.ru
yug-grib.ru yug-grib.ru -
porn
Studio Renovation and Plywood Flooring | Lucy and Doyle http://chancerlven.fireblogz.com/26925375/escort-secrets -
ipsychologos
ipsychologos ipsychologos -
Äèçàéí ÷åëîâåêà
Äèçàéí ÷åëîâåêà Äèçàéí ÷åëîâåêà -
IRA Empire
IRA Empire [...]usually posts some very fascinating stuff like this. If you are new to this site[...] -
rip
rip [...]Find a Grave and milion of death and cemetery records [...] -
social security number
social security number [...]A Free Genealogy Resource [...] -
find people
find people [...]Funeral server and funeral planing [...] -
online memorial
online memorial [...]Search for cemetery records [...] -
obituaries
obituaries [...]Family History and Genealogy records [...] -
tombstones
tombstones [...]Online memorial website and virtual cemetery [...] -
funeral director
funeral director [...]Sysoon is a free resource for finding the final resting places of famous folks, friends or family members and … -
2023
2023 2023 -
2023 Books
2023 Books [...]Wonderful story, reckoned we could combine a number of unrelated data, nonetheless really worth taking a search, whoa did … -
https://tinyurl.com/2lacn6n3
https://tinyurl.com/2lacn6n3 https://tinyurl.com/2lacn6n3 -
vsovezdeisrazu
vsovezdeisrazu vsovezdeisrazu -
fundos imobiliários para iniciante
fundos imobiliários para iniciante [...]Sites of interest we have a link to[...] -
curso formula negócio online funciona?
curso formula negócio online funciona? [...]the time to study or visit the content or sites we've linked to below the[...] -
reputation defenders
reputation defenders [...]very few web-sites that occur to be in depth beneath, from our point of view are undoubtedly effectively worth … -
Sex Australia
Sex Australia [...]here are some links to sites that we link to mainly because we feel they're really worth visiting[...] -
elizavetaboyarskaya.ru
elizavetaboyarskaya.ru elizavetaboyarskaya.ru -
seed funding for startups
seed funding for startups [...]Here is a great Blog You may Uncover Intriguing that we Encourage You[...] -
best website for small business
best website for small business [...]Sites of interest we've a link to[...] -
how to run a cardano stake pool
how to run a cardano stake pool [...]we like to honor lots of other world wide web web-sites around the web, … -
batmanapollo psychologist
batmanapollo psychologist batmanapollo psychologist -
batmanapollo.ru - psychologist
batmanapollo.ru - psychologist batmanapollo.ru - psychologist -
premium-domain-name
premium-domain-name [...]Sites of interest we have a link to[...] -
buy-domains
buy-domains [...]usually posts some quite fascinating stuff like this. If youre new to this site[...] -
batmanapollo
batmanapollo batmanapollo -
신뢰할 수 있는 카지노 사이트
신뢰할 수 있는 카지노 사이트 [...]Every once inside a although we pick blogs that we read. Listed beneath are the latest … -
카지노 게임 플레이
카지노 게임 플레이 [...]always a significant fan of linking to bloggers that I enjoy but dont get quite a bit of … -
kinokrad
kinokrad kinokrad -
Click Here
Click Here [...]we prefer to honor several other world wide web sites around the web, even if they arent linked to … -
Click Here
Click Here [...]here are some links to websites that we link to since we consider they are really worth visiting[...] -
Click Here
Click Here [...]Here are some of the web sites we recommend for our visitors[...] -
Click Here
Click Here [...]Here is a good Weblog You may Come across Fascinating that we Encourage You[...] -
Click Here
Click Here [...]we came across a cool internet site that you just could possibly enjoy. Take a look for those who … -
Click Here
Click Here [...]usually posts some pretty interesting stuff like this. If you are new to this site[...] -
Click Here
Click Here [...]Here is a good Blog You might Come across Intriguing that we Encourage You[...] -
Click Here
Click Here [...]the time to study or stop by the content material or web-sites we have linked to beneath the[...] -
Click Here
Click Here [...]that will be the finish of this write-up. Here you will discover some web pages that we assume you … -
Click Here
Click Here [...]although web-sites we backlink to below are considerably not related to ours, we really feel they may be actually … -
Click Here
Click Here [...]check below, are some absolutely unrelated sites to ours, even so, they may be most trustworthy sources that we … -
Click Here
Click Here [...]please stop by the web-sites we stick to, such as this 1, because it represents our picks from the … -
Click Here
Click Here [...]we came across a cool website that you just could possibly appreciate. Take a search when you want[...] -
make money online
make money online [...]please check out the websites we follow, such as this one, as it represents our picks in the … -
Click Here
Click Here [...]that could be the end of this write-up. Here you will uncover some web pages that we believe youll … -
Click Here
Click Here [...]the time to read or go to the subject material or websites we have linked to beneath the[...] -
Click Here
Click Here [...]one of our guests not long ago advised the following website[...] -
Click Here
Click Here [...]that would be the end of this article. Here youll discover some websites that we feel you will value, … -
Click Here
Click Here [...]please take a look at the web-sites we follow, which includes this one, as it represents our picks through … -
Click Here
Click Here [...]Wonderful story, reckoned we could combine some unrelated data, nevertheless seriously worth taking a search, whoa did one study … -
Click Here
Click Here [...]The details talked about in the write-up are some of the most beneficial available [...] -
Click Here
Click Here [...]below youll discover the link to some web sites that we believe you must visit[...] -
Click Here
Click Here [...]very few web sites that transpire to be in depth beneath, from our point of view are undoubtedly well … -
Click Here
Click Here [...]although web sites we backlink to below are considerably not connected to ours, we feel they're basically really worth … -
Click Here
Click Here [...]we came across a cool site which you might love. Take a search for those who want[...] -
Click Here
Click Here [...]here are some links to sites that we link to mainly because we think they're really worth visiting[...] -
Click Here
Click Here [...]usually posts some quite interesting stuff like this. If youre new to this site[...] -
https://gquery.org/
https://gquery.org/ [...]please pay a visit to the sites we adhere to, like this a single, because it represents our picks through … -
Click Here
Click Here [...]always a massive fan of linking to bloggers that I appreciate but do not get a lot of link … -
Security Guard Services
Security Guard Services [...]just beneath, are various absolutely not related web-sites to ours, even so, they may be certainly really worth … -
Click Here
Click Here [...]very couple of sites that come about to be comprehensive beneath, from our point of view are undoubtedly well … -
grand rapids teeth whitening
grand rapids teeth whitening [...]Wonderful story, reckoned we could combine some unrelated data, nonetheless definitely really worth taking a look, whoa … -
Click Here
Click Here [...]check beneath, are some entirely unrelated web-sites to ours, nonetheless, they are most trustworthy sources that we use[...] -
Click Here
Click Here [...]very couple of web-sites that take place to be detailed beneath, from our point of view are undoubtedly very … -
Click Here
Click Here [...]one of our guests recently suggested the following website[...] -
Click Here
Click Here [...]the time to study or visit the content or web-sites we have linked to below the[...] -
Click Here
Click Here [...]we came across a cool web-site that you simply could possibly get pleasure from. Take a search when you … -
Click Here
Click Here [...]we like to honor several other world wide web sites around the net, even if they arent linked to … -
Click Here
Click Here [...]Here is a good Blog You may Uncover Intriguing that we Encourage You[...] -
Click Here
Click Here [...]please stop by the web-sites we stick to, including this one, as it represents our picks from the web[...] -
Click Here
Click Here [...]Every the moment inside a although we choose blogs that we read. Listed below would be the most recent … -
Click Here
Click Here [...]Wonderful story, reckoned we could combine a number of unrelated information, nevertheless seriously really worth taking a search, whoa … -
Click Here
Click Here [...]The facts mentioned within the write-up are several of the best available [...] -
Click Here
Click Here [...]check below, are some totally unrelated websites to ours, having said that, they're most trustworthy sources that we use[...] -
Click Here
Click Here [...]we came across a cool web-site that you just might love. Take a search in the event you want[...] -
Click Here
Click Here [...]Here are a few of the websites we advise for our visitors[...] -
Click Here
Click Here [...]Wonderful story, reckoned we could combine some unrelated data, nevertheless actually really worth taking a look, whoa did 1 … -
Click Here
Click Here [...]always a major fan of linking to bloggers that I appreciate but do not get a good deal of … -
Reputation Defenders
Reputation Defenders [...]we prefer to honor many other world wide web internet sites around the web, even when they arent linked … -
Click Here
Click Here [...]usually posts some quite exciting stuff like this. If youre new to this site[...] -
Reputation Defenders
Reputation Defenders [...]Wonderful story, reckoned we could combine several unrelated data, nevertheless genuinely really worth taking a look, whoa did one … -
Click Here
Click Here [...]The information mentioned in the post are several of the ideal available [...] -
moveit studio
moveit studio [...]usually posts some pretty fascinating stuff like this. If you are new to this site[...] -
Click Here
Click Here [...]here are some links to web-sites that we link to since we assume they're worth visiting[...] -
meet girls for free
adult dating site https://freewebdating.net/ -
free dating sites online
tinder online https://freewebdating.net/ -
ourtime
international dating sites https://freewebdating.net/ -
tinder gratis
online marriage sites in usa https://freewebdating.net/ -
date game online
pof login online https://freedatinglive.com/ -
dating singles for free sites
singles websites https://freedatinglive.com/ -
eris free downloads chatting apps
woman dating sites https://freedatinglive.com/ -
top online sites
free dating site for ladys https://freedatinglive.com/ -
plentyoffish free online dating site
our time dating https://allaboutdatingsites.com/ -
free site for dating
personals free https://allaboutdatingsites.com/ -
dating sifes
good free dating sites https://allaboutdatingsites.com/ -
single women dating
ourtime login https://allaboutdatingsites.com/ -
free dating sites online
singles websites https://datingwebsiteshopper.com/ -
fdating international
tinder dating site https://datingwebsiteshopper.com/ -
free single dating online
dating free https://datingwebsiteshopper.com/ -
online free dating personals for singles
online dating service https://datingwebsiteshopper.com/ -
free and best
free sex chat sites https://onlinedatinghunks.com/ -
st аugstine fl book matches online dateing
dating site asian https://onlinedatinghunks.com/ -
online free dating site
personals free https://onlinedatinghunks.com/ -
online dating simulator
yahoo dating personals https://onlinedatinghunks.com/ -
pof dating site
local dating sites free https://onlinedatingsuccessguide.com/ -
single site web
free and single https://onlinedatingsuccessguide.com/ -
best free online dating websites
best free date sites https://onlinedatingsuccessguide.com/ -
date website free
best sites for online dating https://onlinedatingsuccessguide.com/ -
free dating site for men
dating sites really free https://onlinedatingsurvey.com/ -
matchmeetups dating site
videodating https://onlinedatingsurvey.com/ -
dating singles
singles online dating https://onlinedatingsurvey.com/ -
meet european singles in usa
dating sites really free https://onlinedatingsurvey.com/ -
best date online
free web girl https://sexanddatingonline.com/ -
free dating websites
dating web sites for free https://sexanddatingonline.com/ -
free single dating sites
relative dating https://sexanddatingonline.com/ -
singles ads
dating sites in usa https://free-dating-sites-free-personals.com/ -
dating wites
connecting singles https://free-dating-sites-free-personals.com/ -
gay, dating singles gmail
dateing websites https://free-dating-sites-free-personals.com/ -
free chat
aduilt dating https://free-dating-sites-free-personals.com/ -
sex dating
free gay dating sites chat https://jewish-dating-online.net/ -
matchmaking services
shemale dating https://jewish-dating-online.net/ -
online dating sites
share dating https://jewish-dating-online.net/ -
single woman dating for free
singles near me free https://jewish-dating-online.net/ -
gay mature dating
positive single https://jewish-dating-online.net/ -
dating services online
personals free https://freewebdating.net/ -
connecting singles dating site
dating direct https://freewebdating.net/ -
free app for online meeting
find online dating https://freewebdating.net/ -
a dating site
free single personal ads https://freewebdating.net/ -
Click Here
Click Here [...]although web-sites we backlink to beneath are considerably not related to ours, we really feel they're essentially really worth … -
Click Here
Click Here [...]we prefer to honor lots of other world-wide-web web-sites around the net, even if they arent linked to us, … -
coursework in english
creative writing coursework ideas https://courseworkdomau.com/ -
coursework on a resume
courseworks help https://courseworkdomau.com/ -
custom coursework
coursework writing https://courseworkdomau.com/ -
coursework writing service uk
online coursework https://courseworkdomau.com/ -
Click Here
Click Here [...]please visit the web sites we follow, including this 1, as it represents our picks through the web[...] -
custom coursework writing service
coursework paper https://buycoursework.org/ -
coursework moderation
degree coursework https://buycoursework.org/ -
coursework help
creative writing coursework ideas https://buycoursework.org/ -
design and technology gcse coursework
coursework uk https://buycoursework.org/ -
coursework writing
coursework marking https://teachingcoursework.com/ -
coursework research
coursework writing services https://teachingcoursework.com/ -
Click Here
Click Here [...]Here are a number of the sites we suggest for our visitors[...] -
coursework writing services
creative writing coursework ideas https://teachingcoursework.com/ -
do my coursework online
https://teachingcoursework.com/ -
do my coursework for me
do my coursework for me https://coursework-expert.com/ -
design technology coursework
coursework writing https://coursework-expert.com/ -
coursework info
coursework writer uk https://coursework-expert.com/ -
coursework questions
database coursework https://coursework-expert.com/ -
design and technology gcse coursework
degree coursework https://courseworkinfotest.com/ -
design and technology gcse coursework
coursework questions https://courseworkinfotest.com/ -
coursework marking
coursework writing service https://courseworkinfotest.com/ -
coursework help
design technology coursework https://courseworkinfotest.com/ -
cpa coursework
help with coursework https://courseworkdownloads.com/ -
coursework uk
coursework history https://courseworkdownloads.com/ -
coursework support
coursework plagiarism checker https://courseworkdownloads.com/ -
Click Here
Click Here [...]below youll discover the link to some web pages that we believe you ought to visit[...] -
coursework planner
custom coursework writing service https://mycourseworkhelp.net/ -
coursework help university
coursework master https://mycourseworkhelp.net/ -
custom coursework writing service
coursework master https://mycourseworkhelp.net/ -
coursework
buy coursework https://writingacoursework.com/ -
Click Here
Click Here [...]Sites of interest we've a link to[...] -
coursework history
coursework paper https://writingacoursework.com/ -
coursework help university
coursework writing service uk https://writingacoursework.com/ -
coursework online
custom coursework writing https://writingacoursework.com/ -
design technology coursework
coursework plagiarism checker https://courseworkninja.com/ -
coursework paper
coursework master https://courseworkninja.com/ -
courseworks help
coursework history https://courseworkninja.com/ -
coursework
coursework writer https://courseworkninja.com/ -
coursework paper
coursework in english https://brainycoursework.com/ -
coursework psychology
coursework papers https://brainycoursework.com/ -
coursework marking
degree coursework https://brainycoursework.com/ -
design coursework
creative writing coursework https://brainycoursework.com/ -
Click Here
Click Here [...]The data mentioned within the report are a number of the best obtainable [...] -
Click Here
Click Here [...]we came across a cool website that you may possibly love. Take a look should you want[...] -
Click Here
Click Here [...]Here are a number of the web sites we advise for our visitors[...] -
Click Here
Click Here [...]we came across a cool site which you could enjoy. Take a search for those who want[...] -
Click Here
Click Here [...]we prefer to honor lots of other internet websites around the internet, even though they arent linked to us, … -
Click Here
Click Here [...]we came across a cool internet site that you simply may love. Take a look in the event you … -
Click Here
Click Here [...]one of our visitors not too long ago encouraged the following website[...] -
Click Here
Click Here [...]Here is a good Weblog You may Locate Exciting that we Encourage You[...] -
Click Here
Click Here [...]Wonderful story, reckoned we could combine several unrelated data, nonetheless genuinely worth taking a look, whoa did a single … -
Click Here
Click Here [...]we prefer to honor quite a few other internet websites around the internet, even when they arent linked to … -
1enhance
1creative -
Click Here
Click Here [...]although internet websites we backlink to beneath are considerably not related to ours, we feel they may be basically … -
1baleful
2morphia -
3integrating
3smuggle -
1deployment
2faithless -
123movies
123movies 123movies -
xnxx
xnxx xnxx -
9xflix
9xflix 9xflix -
x
x x -
organic feet
organic feet [...]Wonderful story, reckoned we could combine a number of unrelated data, nonetheless really really worth taking a look, whoa … -
valentines gift
valentines gift [...]the time to read or go to the content material or web-sites we have linked to below the[...] -
https://gdznew.ru/
https://gdznew.ru/ https://gdznew.ru/ -
Write My Assignment
Write My Assignment [...]we came across a cool web-site that you just might delight in. Take a look if you want[...] -
Online Assignment Writers
Online Assignment Writers [...]always a huge fan of linking to bloggers that I really like but dont get quite a bit … -
Assignment writer
Assignment writer [...]just beneath, are numerous totally not associated web pages to ours, having said that, they are certainly really worth … -
Assignment Writing
Assignment Writing [...]usually posts some pretty interesting stuff like this. If youre new to this site[...] -
premium-domain-names
premium-domain-names [...]Here are several of the web sites we advocate for our visitors[...] -
MILFCity
MILFCity [...]Wonderful story, reckoned we could combine a couple of unrelated data, nonetheless seriously really worth taking a look, whoa did … -
Madelyn Monroe MILF Porn
Madelyn Monroe MILF Porn [...]please pay a visit to the sites we stick to, such as this one particular, because it … -
Cory Chase MILFCity
Cory Chase MILFCity [...]very couple of sites that take place to be comprehensive beneath, from our point of view are undoubtedly … -
madridbet
Studio Renovation and Plywood Flooring | Lucy and Doyle https://lifeskills.center/not-so-perfect-father-figures/ -
fuck google
Studio Renovation and Plywood Flooring | Lucy and Doyle http://blog.appfactorie.com/2018/10/04/ditch-the-food-aggregators/ -
türk porno seks
Studio Renovation and Plywood Flooring | Lucy and Doyle http://battletech-liga.de/4images/details.php?image_id=265 -
Leandro Farland
Leandro Farland [...]just beneath, are various entirely not associated web-sites to ours, even so, they are surely really worth going over[...] -
https://bitbin.it/X5y9A1Fd/
https://bitbin.it/X5y9A1Fd/ https://bitbin.it/X5y9A1Fd/ -
https://bitbin.it/yeCU06m7/
https://bitbin.it/yeCU06m7/ https://bitbin.it/yeCU06m7/ -
https://bit.ly/n39i18b
https://bit.ly/n39i18b https://bit.ly/n39i18b -
https://bit.ly/okaybaybay
https://bit.ly/okaybaybay https://bit.ly/okaybaybay -
klondayk2022
klondayk2022 klondayk2022 -
irannews.ru
irannews.ru irannews.ru -
uluro-ado
uluro-ado uluro-ado -
rusnewsweek
rusnewsweek rusnewsweek -
24hours-news
24hours-news 24hours-news -
icf
icf icf -
www
www www -
bep5w0Df
bep5w0Df bep5w0Df -
grandpashabet
Studio Renovation and Plywood Flooring | Lucy and Doyle http://www.anualadearhitectura.ro/2009/proiecte/6 -
bit.ly/3GQNK0J
bit.ly/3GQNK0J bit.ly/3GQNK0J -
bit.ly/3ig2UT5
bit.ly/3ig2UT5 bit.ly/3ig2UT5 -
bit.ly/3ARFdXA
bit.ly/3ARFdXA bit.ly/3ARFdXA -
bit.ly/3gGFqGq
bit.ly/3gGFqGq bit.ly/3gGFqGq -
bit.ly/3OEzOZR
bit.ly/3OEzOZR bit.ly/3OEzOZR -
matchonline2022.ru
matchonline2022.ru matchonline2022.ru -
cttdu.ru
cttdu.ru cttdu.ru -
1c789.ru
1c789.ru 1c789.ru -
sitestats01
sitestats01 sitestats01 -
buy propecia in australia
getting a propecia prescription online buy generic propecia online -
propecia online forum
where to buy cheapest propecia best place to buy generic propecia -
site 2023
site 2023 site 2023 -
brutv
brutv brutv -
tftl.ru
tftl.ru tftl.ru -
edu-design.ru
edu-design.ru edu-design.ru -
pay someone to do my paper
best custom paper writing service https://studentpaperhelp.com/ -
paper writing company
write my paper canada https://studentpaperhelp.com/ -
need someone write my paper
someone write my paper for me https://ypaywallpapers.com/ -
college paper writers
help with college paper writing https://ypaywallpapers.com/ -
pay to write a paper
help in writing paper https://premiumpapershelp.com/ -
write my sociology paper
cheap custom written papers https://premiumpapershelp.com/ -
help write my paper
what should i write my paper about https://papercranewritingservices.com/ -
paper writing service reviews
best custom paper writing service https://papercranewritingservices.com/ -
pay to do my paper
buying papers online college https://essaybuypaper.com/ -
paper helper
write my paper for me https://essaybuypaper.com/ -
write my papers
custom paper writing service https://writemypaperquick.com/ -
custom college paper
write my nursing paper https://writemypaperquick.com/ -
who can write my paper for me
cheap custom papers https://mypaperwritinghelp.com/ -
write my paper reviews
paying someone to write a paper https://mypaperwritinghelp.com/ -
buy dissertation paper
someone write my paper for me https://buyessaypaperz.com/ -
help writing paper
college papers for sale https://buyessaypaperz.com/ -
buying college papers online
order papers online https://writingpaperservice.net/ -
buy dissertation paper
writing paper help https://writingpaperservice.net/ -
write my persuasive paper
write my paper online https://cheapcustompaper.org/ -
buy cheap papers
can i pay someone to write my paper https://cheapcustompaper.org/ -
custom paper writing
pay someone to do my paper https://researchpaperswriting.org/ -
write my sociology paper
where can i find someone to write my college paper https://researchpaperswriting.org/ -
write my paper for cheap
custom written paper https://top100custompapernapkins.com/ -
pay for someone to write your paper
some to write my paper https://doyourpapersonline.com/ -
papers writing help
pay someone to write your paper https://doyourpapersonline.com/ -
buy college paper
need help write my paper https://write-my-paper-for-me.org/ -
buying papers for college
paper writing services best https://write-my-paper-for-me.org/ -
order a paper online
buy cheap paper https://writepapersformoney.com/ -
write my paper fast
professional college paper writers https://writepapersformoney.com/ -
custom college papers
buy writing paper https://paperwritinghq.com/ -
buy a paper for college
pay for a paper https://paperwritinghq.com/ -
custom written paper
online paper writers https://uktermpaperwriters.com/ -
what should i write my paper about
college paper writers https://uktermpaperwriters.com/ -
help with your paper
order custom paper https://sociologypapershelp.com/ -
need help write my paper
paper writing service superiorpapers https://sociologypapershelp.com/ -
writer paper
order custom paper https://term-paper-help.org/ -
paper writing help
help with writing a paper https://term-paper-help.org/ -
gay chat las vegas
gay phone chat meet locals "welcome to the https://gaymanchatrooms.com/ -
gay sex cam chat mobile android
1-800 contacts refined gay men chat https://gaymanchatrooms.com/ -
kamagra from canada
kamagra jelly capsules buy kamagra 100 mg online -
newsukraine.ru
newsukraine.ru newsukraine.ru -
history-of-ukraine.ru news ukraine
history-of-ukraine.ru news ukraine history-of-ukraine.ru news ukraine -
mb588.ru
mb588.ru mb588.ru -
3o9cpydyue4s8.ru
3o9cpydyue4s8.ru 3o9cpydyue4s8.ru -
kin0shki.ru
kin0shki.ru kin0shki.ru -
hydroxychloroquine ingredients
hydroxychloroquine azithromycin interaction where to buy hydroxychloroquine over the counter -
https://clck.ru/32JaEo
https://clck.ru/32JaEo https://clck.ru/32JaEo -
dolpsy.ru
dolpsy.ru dolpsy.ru -
https://bitbin.it/JI5X9Xvu/
https://bitbin.it/JI5X9Xvu/ https://bitbin.it/JI5X9Xvu/ -
https://bitbin.it/bn1QAiBO/
https://bitbin.it/bn1QAiBO/ https://bitbin.it/bn1QAiBO/ -
rftrip.ru
rftrip.ru rftrip.ru -
hydroxychloroquine interactions
hydroxychloroquine 200 mg american journal of medicine hydroxychloroquine -
wwwi.odnoklassniki-film.ru
wwwi.odnoklassniki-film.ru wwwi.odnoklassniki-film.ru -
3DGofO7
3DGofO7 3DGofO7 -
3SoTS32
3SoTS32 3SoTS32 -
000-1
000-1 000-1 -
stromectol 3mg
stromectol for lice stromectol buy -
psy-news.ru
psy-news.ru psy-news.ru -
socionika-eniostyle.ru
socionika-eniostyle.ru socionika-eniostyle.ru -
sezons.store
sezons.store sezons.store -
video-2
video-2 video-2 -
3qAIwwN
3qAIwwN 3qAIwwN -
psycholog-moskva.ru
psycholog-moskva.ru psycholog-moskva.ru -
psycholog-v-moskve.ru
psycholog-v-moskve.ru psycholog-v-moskve.ru -
where to buy stromectol in us
where to buy ivermectin buy stromectol for humans in mexico -
gay chat rooms free in illinois
gay chat video https://gayinteracialchat.com/ -
programma peredach na segodnya
programma peredach na segodnya programma peredach na segodnya -
321 gay teen chat
live gay web cam chat rooms https://gayinteracialchat.com/ -
gay phone chat meet locals "welcome to the
gay chat random https://free-gay-sex-chat.com/ -
gay chat room finding sex
atlanta gay phone chat https://free-gay-sex-chat.com/ -
shemale/gay online chat sites
gay sex chat roulette https://gaymusclechatrooms.com/ -
film onlinee
film onlinee film onlinee -
chat with sexy black gay men
gay chat pittsburgh https://gaymusclechatrooms.com/ -
gay dirty chat
best free gay chat https://gaychatnorules.com/ -
b - gay chat
free gay chat apps for windows https://gaychatnorules.com/ -
gay chat cam random
gay chicago webcam chat software https://gayphillychat.com/ -
asain gay chat phone lines free
live free gay web cam chat rooms https://gayphillychat.com/ -
gay chat the ave
best gay chat site 2017 https://chatcongays.com/ -
local gay chat
profile tube boys user gay chat boi https://chatcongays.com/ -
gay chat pittsburgh
zoom chat rooms gay chat https://gay-live-chat.net/ -
b-gay chat
free gay chat rooms by zip code https://gay-live-chat.net/ -
gay annonymous chat
gay teen chat with nudes https://gaychatspots.com/ -
gay video chat apps
gay univere men chat https://gaychatspots.com/ -
gay chat rulette
kik chat gay penis https://gaychatcams.net/ -
free gay chat lines in fitchburg,ma
free chat rooms gay chat https://gaychatcams.net/ -
shemale/gay online chat sites
free cookeville tn gay chat rooms https://newgaychat.com/ -
video chat for gay men
free gay chat avenue #1 https://newgaychat.com/ -
2variation
2anachronism -
u s online casino
gta online diamond casino https://casinosonlinex.com/ -
iowa online casino
atlantic city online casino https://casinosonlinex.com/ -
online casino with free signup bonus real money no deposit
no deposit online casino https://online2casino.com/ -
real casino games online
online casino games that pay real money https://onlinecasinos4me.com/ -
free online casino
star casino online https://onlinecasinos4me.com/ -
lalochesia
lalochesia lalochesia -
adilt dating
meet local singles free https://onlinedatingservicesecrets.com/ -
datting
best dating website in usa https://zonlinedating.com/ -
danting site
best dating websites https://virtual-online-dating-service.com/ -
singles dating site
best sites online dating https://freeadultdatingpasses.com/ -
local women dates
dating sites https://lavaonlinedating.com/ -
dating services for seniors
free dating services https://wowdatingsites.com/ -
free adult personal ads
men dating sites https://datingpersonalsonline.com/ -
singles near you
skip the game dating site free search https://speedatingwebsites.com/ -
single chat sites
website dating service https://online-internet-dating.net/ -
date free website
online dating women https://adult-classifieds-online-dating.com/ -
date online site
free online personals https://adult-singles-online-dating.com/ -
pof dating website
dating apps https://onlinedatingbabes.com/ -
psy 3CtwvjS
psy 3CtwvjS psy 3CtwvjS -
all dating sites in usa
international singles https://freephotodating.com/ -
gay christian dating indiana
gay closet dating https://datinggayservices.com/ -
is it smart for gay teens to use dating apps
dating guys wen 18 gay https://gayedating.com/ -
gay dating websites
free gay dating games https://gay-singles-dating.com/ -
TwnE4zl6
TwnE4zl6 TwnE4zl6 -
Dim Drakona 2022
Dim Drakona 2022 Dim Drakona 2022 -
Usik Dzhoshua 2 2022
Usik Dzhoshua 2 2022 Usik Dzhoshua 2 2022 -
A片
???? goodddd thankssss youuuu -
psikholog moskva
psikholog moskva psikholog moskva -
ìûøëåíèå
ìûøëåíèå ìûøëåíèå -
aOuSjapt
aOuSjapt aOuSjapt -
JGXldbkj
JGXldbkj JGXldbkj -
Dom drakona
Dom drakona Dom drakona -
sY5am
sY5am sY5am -
vpn provider reviews
best rated vpn 2018 https://rsvpnorthvalley.com/ -
vpn free reddit
best vpn windows https://free-vpn-proxy.com/ -
free vpn list
best free vpn for utorrent https://superfreevpn.net/ -
best mac vpn
best free vpn for tor https://imfreevpn.net/ -
free vpn proxy
top rated vpn services https://ippowervpn.net/ -
free vpn for linux
best torrenting vpn https://freehostingvpn.com/ -
free vpn canada
tor vpn https://shiva-vpn.com/ -
best vpn location for netflix
best vpn proxy https://freevpnconnection.com/ -
stat.netstate.ru
stat.netstate.ru stat.netstate.ru -
rodnoe-kino-ru
rodnoe-kino-ru rodnoe-kino-ru -
filmgoda.ru
filmgoda.ru filmgoda.ru -
smotret-polnyj-film-smotret-v-khoroshem-kachestve
smotret-polnyj-film-smotret-v-khoroshem-kachestve smotret-polnyj-film-smotret-v-khoroshem-kachestve -
liusia-8-seriiaonlain
liusia-8-seriiaonlain liusia-8-seriiaonlain -
free sign up bonus online casino
borgata free online casino https://casino8online.com/ -
online casino stocks
chumba online casino login https://all-online-casino-games.com/ -
online casino ca
harrah's online casino https://ownonlinecasino.com/ -
ocean online casino app
sugarhouse online casino pa https://onlineplayerscasino.com/ -
resorts casino online
greektown casino online https://casino-online-jackpot.com/ -
virginia online casino
online casino paysafe https://casino-online-roulette.com/ -
online games casino
betmgm online casino michigan https://vrgamescasino.com/ -
online casino arizona
gokken in online casino https://1freeslotscasino.com/ -
watch casino online
online casino dealer https://cybertimeonlinecasino.com/ -
online casino news
online casino arizona https://internet-casinos-online.net/ -
betting casino online
online casino blackjack https://free-online-casinos.net/ -
play online casino for real money
online casino list https://9lineslotscasino.com/ -
gta online diamond casino heist
md live online casino https://onlinecasinosdirectory.org/ -
free sign up bonus online casino
online casino texas https://trust-online-casino.com/ -
slots wynn online casino
parx casino online gambling https://newlasvegascasinos.com/ -
online casino paysafecard 10€
watch casino online free https://onlinecasinofortunes.com/ -
turning stone online casino login
casino online canada https://firstonlinecasino.org/ -
slotocash online casino
jackpot casino online https://download-casino-slots.com/ -
is cialis better than viagra
tadalafil troche cialis vs.levitra -
film
film film -
video
video video -
film.8filmov.ru
film.8filmov.ru film.8filmov.ru -
web
web web -
mir dikogo zapada 4 sezon 4 seriya
mir dikogo zapada 4 sezon 4 seriya mir dikogo zapada 4 sezon 4 seriya -
purchase stromectol online
stromectol cost uk stromectol price uk -
gidonline
gidonline gidonline -
movies
movies movies -
Ukraine-war
Ukraine-war Ukraine-war -
stats
stats stats -
dissertation writing tips
a dissertation https://customthesiswritingservices.com/ -
need help with dissertation
dissertation writing services uk https://dissertationhelperhub.com/ -
tips on writing a dissertation
master dissertation https://dissertationhelpspecialist.com/ -
doctoral dissertation help history
nursing dissertation help https://writingadissertationproposal.com/ -
dissertation writing tutor
writing a dissertation prospectus https://customdissertationwritinghelp.com/ -
dissertation help leicester
dissertation writing uk https://businessdissertationhelp.com/ -
dissertation writing service
how to write a dissertation proposal https://bestdissertationwritingservice.net/ -
rutgers dissertation proposal help
dissertation online help https://writing-a-dissertation.net/ -
help writing a dissertation
writing a masters dissertation https://examplesofdissertation.com/ -
ucl dissertation help
dissertation cover page https://accountingdissertationhelp.com/ -
phd dissertation
dissertation crossword clue https://dissertationhelpexpert.com/ -
site
site site -
online dissertation writing
free dissertation help https://dissertationwritingcenter.com/ -
defending your dissertation
dissertation title examples https://helpwithdissertationwritinglondon.com/ -
stromectol 12mg
stromectol 12mg online stromectol for lice -
sample dissertation
writing a masters dissertation https://professionaldissertationwriting.com/ -
dissertation meaning
help me https://professionaldissertationwriting.org/ -
2permanence
1bologna -
The Latest Ukraine News
The Latest Ukraine News The Latest Ukraine News -
Ukraine news live
Ukraine news live Ukraine news live -
Ukraine
Ukraine Ukraine -
War in Ukraine
War in Ukraine War in Ukraine -
bucha killings
bucha killings bucha killings -
cleantalkorg2.ru
cleantalkorg2.ru cleantalkorg2.ru -
bit.ly
bit.ly bit.ly -
stromectol without doctor
generic stromectol without a doctor order stromectol 6 mg -
chelovek soznaniye mozg
chelovek soznaniye mozg chelovek soznaniye mozg -
psy
psy psy -
ivermectin 6
stromectol preis ivermectin dose -
ivermectin oral 0 8
ivermectine kory stromectol pill price -
ivermectin cream 5%
ivermectin uk coronavirus stromectol 0.1 -
Link
Link Link -
3breakfast
1triumphal -
https://bit.ly/psikholog-muzhchina-onlayn
https://bit.ly/psikholog-muzhchina-onlayn https://bit.ly/psikholog-muzhchina-onlayn -
netstate.ru
netstate.ru netstate.ru -
3agonised
1sanitary -
Psikholog
Psikholog Psikholog -
purchase oral ivermectin
ivermectin 2ml generic ivermectin cream -
hdorg2.ru
hdorg2.ru hdorg2.ru -
hd-tor-2022
hd-tor-2022 hd-tor-2022 -
film-tor-2022
film-tor-2022 film-tor-2022 -
tor-lyubov-i-grom
tor-lyubov-i-grom tor-lyubov-i-grom -
01211
01211 01211 21546 -
3NOZC44
3NOZC44 3NOZC44 -
3Hk12Bl
3Hk12Bl 3Hk12Bl -
chelovek-iz-90-h
chelovek-iz-90-h chelovek-iz-90-h -
russianmanagement.com
russianmanagement.com russianmanagement.com -
Øêàëà òîíîâ
Øêàëà òîíîâ Øêàëà òîíîâ -
SHKALA TONOV
SHKALA TONOV SHKALA TONOV -
https://ria.ru/20100906/272903623.html
https://ria.ru/20100906/272903623.html https://ria.ru/20100906/272903623.html -
D6tuzANh
D6tuzANh D6tuzANh -
qQ8KZZE6
qQ8KZZE6 qQ8KZZE6 -
DPTPtNqS
DPTPtNqS DPTPtNqS -
bahis siteleri
perfect thank you for a very good article -
generic for ivermectin
ivermectin in humans ivermectin 3mg dose -
uels ukrain
uels ukrain uels ukrain -
psy online
psy online psy online -
slovar po psihoanalizu laplansh
slovar po psihoanalizu laplansh slovar po psihoanalizu laplansh -
moskva psiholog online
moskva psiholog online moskva psiholog online -
projectio
projectio projectio -
psy-
psy- psy- -
cost of ivermectin 1% cream
ivermectin history ivermectin manufacturer -
purchase oral ivermectin
ivermectin 3mg tab stromectol online -
us generic cialis
where can i get cialis over the counter cialis alternative -
plaquenil hydroxychloroquine
hydroxychloroquine for sale hydroxychloroquine for sale -
buy hydroxychloroquine 200 mg
hydroxychloroquine are doctors taking hydroxychloroquine -
where to buy ivermectin australia
ivermectin cream uk ivermectin 15 mg -
cialis over the counter at walmart
walmart pharmacy cialis over counter -
topical ivermectin cost
stromectol 3 mg buy ivermectin in canada -
stromectol walgreens
ivermectin prescription stromectol ivermectin tablets -
ivermectin for covid
ivermectin 24 mg ivermectin 3mg for lice -
cheap stromectol
stromectol 3 mg ivermectin for human -
ivermectin pills human
stromectol ivermectin for humans ivermectin 9 mg -
cialis walmart
generic cialis at walmart pharmacy walmart cialis over the counter -
ivermectin liquid
ivermectin for dogs imverctin -
ivermectin canada
stromectol 3 mg tablet stromectol 3 mg tablet -
buy stromectol 12mg
ivermectin 0.5% lotion ivermectine posologie -
ivermectin lotion 0.5
cost for ivermectin 3mg ivermectin cream 5 -
hydroxychloroquine online
where can i buy hydroxychloroquine hydroxychloroquine and pregnancy -
stromectol 6mg
nih ivermectin ivermectin for covid -
luckyland casino online
lucky land slots.com lucky slots -
madridbet giriş
Studio Renovation and Plywood Flooring | Lucy and Doyle http://www.ppsae.pl/2018/09/19/ostatnia-szansa-na-zlapanie-flar-iridium/ -
cialis vs.viagra reviews
cialis manufacturer coupon lilly when does cialis go generic -
ivermectin 3mg for lice
stromectol medicine ivermectin new zealand -
stromectol 0.5 mg
ivermectin 200mg mectin ivermectin -
push health ivermectin
ivermectin 4 tablets price ivermectin 250ml -
stromectol how much it cost
ivermectin buy australia stromectol ivermectin tablets -
stromectol 3 mg price
where can i buy oral ivermectin iwermektyna -
furosemide 40 mg buy online uk
furosemide in canada furosemide online no prescription -
medication furosemide
where to buy lasix lasix 40 mg tabs -
ivermectin 8000
price of ivermectin liquid ivermectin for horses -
ivermectin 0.5% brand name
ivermectin tablet 1mg where to buy ivermectin online -
order ivermectin 12 mg online
ivermectin tab price ivermectin 3 mg tablets for humans for sale -
ivermectin ebay
ivermectin 6mg oral ivermectin cost -
price of ivermectin tablets
how much is ivermectin buy ivermectin 12 mg online -
buy ivermectin 12mg tablets
buy ivermectin 12 mg ivermectin 3mg for sale -
ivermectin cream canada cost
ivermectin 0.08% where to get ivermectin -
buy generic cialis online
cialis goodrx cialis professional -
order ivermectin 6mg online
ivermectin 6 mg tabs order ivermectin 6mg -
stromectol price
frontline doctors ivermectin india and ivermectin -
where to buy ivermectin in canada
ivermectin cost canada cost of stromectol medication -
ivermectin 6 mg over the counter
ivermectin 3 mg tablet price ivermectin pill cost -
ivermectin lotion for scabies
ivermectin 5 mg price use of ivermectin -
ivermectin 3 mg for sale
ivermectin tablet 1mg buy ivermectin canada -
ivermectin withdrawal time
ivermectin brand name iver mectin -
stromectol cost
ivermectin 10 ml ivermectin tablets -
casinos online usa
live casino online deals new no deposit online casinos -
ivermectina tabletas
mexico ivermectin ivermectina tabletas -
cialis online pharmacy
cheap tadalafil cialis best price -
real viagra pills online
viagra pills generic brand natural viagra -
can you still get tan on accutane
get accutane prescribed accutane generic price -
cialis without a doctor prescription
cialis price cialis pills -
cialis at walmart
cialis generic online cialis us -
play for real money online casino
$1000 free casino no deposit play casino online -
buy ivermectin canada
ivermectin for sale stromectol south africa -
stromectol 3 mg tablet
ivermectin cost canada generic name for ivermectin -
the borgata online
borgata restaurants my borgata -
cheap cialis india
cheap tadalafil how can i get cheap cialis -
generic tadalafil
best price for cialis tadalafil generic cost -
viagra canada discount
sildenafil walgreens generic viagra canada cost -
viagra cost
online viagra cost viagra connect -
best online casino usa
$1000 free casino no deposit fanduel casino slots -
tadalafil cialis
generic cialis generic cialis tadalafil -
steroid side effects
prednisone side effects in dogs side effects of prednisone -
buy generic viagra canada online
buy viagra for female online sildenafil price walmart -
meritroyalbet
Studio Renovation and Plywood Flooring | Lucy and Doyle https://www.remotepro.ng/remote-workers-tend-to-work-longer-hours-uk-study-finds/ -
cost of ivermectin 1 cream
ivermectin can ivermectin lotion -
cialis at walmart
buy cialis canada cialis vs viagra -
how to get cialis discount
cialis australia what is cialis -
viagra cialis levitra
can i buy cialis in mexico generic cialis professional -
merck covid treatment
molnopiravir molnupiravir vs ivermectin -
gout prednisone 20mg
what are the side effects for prednisone 20mg buy cheap prednisone -
prednisone 20mg short term side effects
how to taper prednisone 20mg does prednisone 20mg pill look like -
canadian cialis pills
buy viagra online goodrx tadalafil -
cialis kaufen
generic name for cialis cialis rezeptfrei -
tombala siteleri
Studio Renovation and Plywood Flooring | Lucy and Doyle http://abpatriots.com/mens-cross-country-team-claim-first-nccaa-national-championship/ -
what is cialis
buy cialis online generic cialis -
how to buy sildenafil pills
purchase sildenafil pills sildenafil tablets australia -
sildenafil tablets uk
sildenafil tablets for men sildenafil citrate tablets -
stromectol order
ivermectin 500mg stromectol tablete cena -
can i take one 20 mg cialis everyday
[…] viagra capsules for men viagra 100mg price in philippines […] -
marketing dissertation help
nursing dissertation writing services https://helpon-doctoral-dissertations.net/ -
dissertation defense help
master dissertation writing services https://dissertations-writing.org/ -
social work dissertation help
online dissertation help professional https://mydissertationwritinghelp.com/ -
best price for cialis
generic cialis tadalafil tadalafil walmart -
baymavi
Studio Renovation and Plywood Flooring | Lucy and Doyle https://restaurantbarceloneta.com/ca/el-restaurant/ -
baymavi
Studio Renovation and Plywood Flooring | Lucy and Doyle http://freiwilligenagentur.info/nachbarschaftshilfe-steglitz-zehlendorf/ -
thesis and dissertation
dissertation online help https://help-with-dissertations.com/ -
sildenafil citrate tablets
how to purchase sildenafil pills how to buy sildenafil tablets -
dissertation proposal
best dissertation writing service https://dissertationwriting-service.com/ -
can you buy cialis in canada
cialis tablets cialis medication -
buy cialis cheap canada
tadalafil goodrx medshuku cialis professional -
rx tadalafil tablets 10 mg
buy cialis can you buy cialis safely online -
architecture dissertation help
phd no dissertation https://buydissertationhelp.com/ -
cialis going generic
cialis generique tadalafil side effects -
ivermectin human dosage
ivermectin for humans over the counter cost for ivermectin 3mg -
lasix water pill 20 mg buy no prescription
furosemide online purchase generic lasix online -
viagra connect
online viagra soft otc sildenafil -
generic cialis tadalafil
where to buy cialis in australia levitra vs cialis -
viagra buy with paypal
where to buy viagra in vancouver cheap viagra in canada -
ivermectin generic
stromectol 6 mg tablet stromectol ivermectin tablets -
ivermectin cream canada cost
ivermectin lotion for lice buy ivermectin uk -
provigil for sale us
buy provigil europe provigil online usa -
meritroyalbet
Studio Renovation and Plywood Flooring | Lucy and Doyle http://stockfirmware.androidrootz.com/download-spr-g925pvpu1aocf-20150415164450-zip/ -
meritroyalbet
Studio Renovation and Plywood Flooring | Lucy and Doyle https://mrfixrepair.com/2017/09/app-3/ -
what is tadalafil
tadalafil generico tadalafil generic online -
maxim peptide tadalafil
cialis side effects peptides tadalafil -
purchase prednisone pills
prednisone 10mg uk cost prednisone -
generic for cialis
cialis price walmart cialis online pharmacy -
where to purchase ivermectin
is ivermectin safe for humans ivermectin australia -
madridbet
Studio Renovation and Plywood Flooring | Lucy and Doyle http://www.bauherr-hilft-bauherr.de/von-bauherren-fur-bauherren/bautrager-fingerhaus/ -
free games slots
free slots home 12345 https://slotmachinegameinfo.com/ -
wizard of oz slots
central vally slots https://www-slotmachines.com/ -
ignition casino how to cash out
ignition casino vs bovada ignition casino legal in texas -
ivermectin price
how much does ivermectin cost how much does ivermectin cost -
infinity slots
online slots https://411slotmachine.com/ -
casino slots with bonus
scatter slots by murka https://download-slot-machines.com/ -
slots
free kronos slots for fun https://beat-slot-machines.com/ -
stromectol for sale
ivermectin australia where to buy ivermectin -
aristocrat slots free
emils grayslake slots https://slot-machine-sale.com/ -
real money slots online
cash me out slots youtube https://slotmachinesforum.net/ -
buy stromectol
flccc ivermectin ivermectin cost -
ivermectin australia
frontline doctors ivermectin ivermectin australia -
ivermectin australia
how much does ivermectin cost frontline doctors ivermectin -
ivermectin generic
ivermectin for sale ivermectin buy -
price of ivermectin
order stromectol online ivermectin human -
stromectol cvs
ivermectin online stromectol price in india -
stromectol canada
stromectol cream ivermectin lice -
ivermectin 50ml
ivermectin antiviral stromectol covid -
buy ivermectin canada
ivermectin pills ivermectin generic -
ivermectin cream 1
stromectol 3 mg tablet price ivermectin 1% cream generic -
ivermectin tablets order
ivermectin brand stromectol how much it cost -
ivermectin lotion 0.5
stromectol pill for humans ivermectin manufacturers -
i-mask protocol
flccc ivermectin i-mask -
meritroyalbet
Studio Renovation and Plywood Flooring | Lucy and Doyle https://www.psynsk.ru/kak-najti-vyhod-iz-zhiznennogo-tupika-ili-chto-delat-esli-vse-ne-laditsya/ -
meritroyalbet
... [Trackback] https://9dotslearning.com/?p=19 -
caesars slots
slots games https://slotmachinesworld.com/ -
penny slots 4u
free caesars slots online https://pennyslotmachines.org/ -
slots free single
casino slots free games https://candylandslotmachine.com/ -
free casino slots games
shake the sky real slots https://freeonlneslotmachine.com/ -
omg fortune free slots
goldfish slots https://2-free-slots.com/ -
order ivermectin
defeat the mandate flccc alliance treatment protocol -
flccc ivermectin
dr. kory where can i buy ivectermin -
simply click the up coming website page
simply click the up coming website page Studio Renovation and Plywood Flooring | Lucy and Doyle -
tombala siteleri
Studio Renovation and Plywood Flooring | Lucy and Doyle http://comet.iaps.inaf.it/alternanza-scuola-lavoro/ -
tombala siteleri
Studio Renovation and Plywood Flooring | Lucy and Doyle http://lowerawareness.com/2019/02/whatever-you-dont-have-knowledge-of-write-my-english-document-may-just-be-pricing-to-well-over-you-consider/ -
tombala siteleri
Studio Renovation and Plywood Flooring | Lucy and Doyle https://activefitnessmarketing.com/yoga-studio-marketing-strategies/ -
can you buy albuterol online
how much is the generic albuterol buy ventolin online cheap -
stromectol tablets buy online
ivermectin in india ivermectin 3 mg tablet dosage -
trcasino
Studio Renovation and Plywood Flooring | Lucy and Doyle https://raw4paws-sussex.com/2019/05/ -
stromectol 0.5 mg
stromectol generic buy ivermectin on line -
pharmacy canada
cheap generic viagra no prescription can i buy viagra -
generic viagra prescription
cheap generic viagra no prescription viagra canada purchase -
difference between cialis and levitra
buy generic cialis daily cialis medication -
ivermectin 1
stromectol price ivermectin covid -
elexusbet
Studio Renovation and Plywood Flooring | Lucy and Doyle https://bycon.ch/author/bycon/ -
trcasino
Studio Renovation and Plywood Flooring | Lucy and Doyle https://hollasfood.com/2019/10/14/when-while-lovely-valley-teems-with-vapour/ -
eurocasino
Studio Renovation and Plywood Flooring | Lucy and Doyle https://blog.ciudadanasdelmundo.com/2020/02/15/15-de-febrero/ -
stromectol price in india
ivermectin 90 mg stromectol buy uk -
madridbet
Studio Renovation and Plywood Flooring | Lucy and Doyle https://mxguardian.com.mx/dias-de-seguridad/ -
eurocasino
Studio Renovation and Plywood Flooring | Lucy and Doyle http://mavit.es/2018/01/11/examenes-trinity-junio-2018/ -
meritking
Studio Renovation and Plywood Flooring | Lucy and Doyle https://guardianseattle.com/colligi-collagen-คอลลิจิ-คอลลาเจน-กระป๋/ -
meritking
Studio Renovation and Plywood Flooring | Lucy and Doyle http://www.seyso.art/category/tech/ -
elexusbet
Studio Renovation and Plywood Flooring | Lucy and Doyle https://readblackclover.online/manga/black-clover-chapter-314/ -
meritroyalbet
Studio Renovation and Plywood Flooring | Lucy and Doyle https://www.lombardofirm.com/what-is-the-difference-between-annulment-and-divorce/ -
vietnamese viagra
vietnamese viagra Studio Renovation and Plywood Flooring | Lucy and Doyle -
where to by cialis
where to by cialis Studio Renovation and Plywood Flooring | Lucy and Doyle -
cialis online without prescription
cialis online without prescription Studio Renovation and Plywood Flooring | Lucy and Doyle -
cheapest cialis review
cheapest cialis review Studio Renovation and Plywood Flooring | Lucy and Doyle -
viagra commercial 2016
viagra commercial 2016 Studio Renovation and Plywood Flooring | Lucy and Doyle -
gay men vs women dating as a bi man
gay dating for ftm's https://speedgaydate.com/ -
blue cialis pill
[…] generic for cialis […] -
gay chat by zip code
mens gay chat https://gay-buddies.com/ -
cialis wirkung
cialis wirkung WALCOME -
gay depression chat
gay vid chat https://gaytgpost.com/ -
free gay dating sites grindr craigslist
gay geek dating https://gaypridee.com/ -
gay dirty chat
free gay webcam chat https://bjsgaychatroom.info/ -
what color is viagra pills
[…] black viagra pills cenforce 200mg […] -
play blackjacks
[…] best online casino for usa users […] -
gay men dating site
gay senior dating https://gaysugardaddydatingsites.com -
popular gay dating apps
senior gay women dating sites https://gayfade.com -
gay dating sit
superchub gay dating https://speedgaydate.com -
tucson free local gay only dating sites
gay dating in jackson tn https://gayprideusa.com -
gay man, straight man dating
best gay dating sites for southwest florida https://gay-buddies.com -
about dating gay spanish men rtics
adam for adam gay dating website https://gaypridee.com -
1unbridled
1emotions -
essay conclusion
300 word essay https://windowsvpns.com/ -
how to write a title in an essay
how to start an essay introduction https://vpn4torrents.com/ -
essay checker
thesis statement argumentative essay https://vpnsrank.com/ -
how do you start an essay
write my essay for me cheap https://vpnshroud.com/ -
mla format essay
how to write a high school essay? https://vpn4home.com/ -
how many paragraphs are in a essay
essay connectors https://thebestvpnpro.com/ -
race essay
descriptive essay https://topvpndeals.net/ -
process analysis essay examples
rewrite my essay https://choosevpn.net/ -
a fundamental concern of critical thinking is
critical thinking word puzzles https://uncriticalthinking.com/ -
how to increase critical thinking skills
decision making and critical thinking https://criticalthinking2020.net/ -
critical thinking skills examples
four beginning stages of critical thinking https://criticalthinkinginstitute.com/ -
critical thinking and the nursing process
critical thinking nursing https://criticalthinkingbasics.com/ -
gay speed dating manchester uk
gay dating rules https://gaysugardaddydatingsites.com/ -
dating sites for gay men
gay dating for virgins https://gayfade.com/ -
active gay dating site
hung gay dating https://gayprideusa.com/ -
what to write about for college essay
writing a reflective essay https://checkyouressay.com/ -
writing numbers in essays
the best essay writing services https://howtowriteessaytips.com/ -
write compare and contrast essay
writing a literary analysis essay https://yoursuperessay.com/ -
help write essay
admission essay writing service https://topessayswriter.com/ -
buy viagra online
buy viagra online WALCOME -
write an essay online
essays to write about https://anenglishessay.com/ -
keto orange chicken
keto strips https://ketogendiets.com/ -
keto chicken bacon ranch casserole
keto crackers recipe https://ketogenicdietinfo.com/ -
keto broccoli salad
keto green smoothie https://ketogendiet.net/ -
speed keto
are pickles keto https://ketogenicdiets.net/ -
hims viagra
hims viagra WALCOME -
casino online real money no deposit
hard rock casino online https://casinosonlinex.com/ -
paradise casino online
online casino paypal https://casinoonlinet.com/ -
riversweeps online casino download
caesars casino free online slot machine games https://online2casino.com/ -
online casino deposit bonuses
el royale online casino https://onlinecasinos4me.com/ -
virgin online casino
fastest withdrawal online casino https://conline-casinos-hub.com/ -
best online usa casino
best casino online usa https://casinogamesmachines.com/ -
female viagra
female viagra WALCOME -
online casino software providers
raging bull online casino https://onlinecasinoad.com/ -
online casino review
twin river online casino https://casinoonlinek.com/ -
sex simulation games
html5 sex games https://cybersexgames.net/ -
cost of viagra
cost of viagra WALCOME -
female viagra pill
female viagra pill WALCOME -
buying viagra
buying viagra WALCOME -
cheap online viagra
cheap online viagra WALCOME -
can you buy over the counter viagra
viagra canada otc bedroom saturated fat guarantee -
viagra without a doctor prescription
viagra without a doctor prescription WALCOME -
viagra homme
viagra homme WALCOME -
viagra vs cialis
viagra vs cialis WALCOME -
natural alternatives to viagra
natural alternatives to viagra WALCOME -
viagra danger myths
viagra danger myths WALCOME -
lady viagra
lady viagra WALCOME -
low cost viagra with prescription
low cost viagra with prescription WALCOME -
need a prescription for viagra
need a prescription for viagra WALCOME -
sildenafil citrate
sildenafil citrate WALCOME -
cheap viagra online
cheap viagra online WALCOME -
viagra generic
viagra generic WALCOME -
does ivermectin kill ticks
does ivermectin kill ticks Studio Renovation and Plywood Flooring | Lucy and Doyle -
best meds for ed
[…] best ed pills over the counter […] -
sildenafil 20mg
sildenafil 20mg WALCOME -
who sells viagra over the counter
who sells viagra over the counter WALCOME -
buy viagra kamagra online
buy viagra kamagra online WALCOME -
buy viagra online to canada
[…] buy viagra rite aid […] -
tadalafil zydus
tadalafil zydus WALCOME -
where to buy cheap cialis online
[…] buy cialis uk cheap […] -
cialis mastercard
cialis mastercard WALCOME -
is generic viagra from for hims safe
is generic viagra from for hims safe WALCOME -
generic viagra - buy on line
generic viagra - buy on line WALCOME -
ivermectin side effects in humans
ivermectin side effects in humans Studio Renovation and Plywood Flooring | Lucy and Doyle -
how long does it take ivermectin to work
how long does it take ivermectin to work Studio Renovation and Plywood Flooring | Lucy and Doyle -
what is the cost of stendra and viagra 100mg
what is the cost of stendra and viagra 100mg WALCOME -
name brand viagra online
name brand viagra online WALCOME -
ivermectin pour on for chickens
ivermectin pour on for chickens Studio Renovation and Plywood Flooring | Lucy and Doyle -
cialis best price
cialis best price WALCOME -
stromectol for e coli uti
talicia medication eventually epicondylitis tiny -
generic viagra for sale online
generic viagra for sale online WALCOME -
ivermectina mg
how much ivermectin for 200 pound person expand demineralization offense -
canadian pharmacy viagra 100
canadian pharmacy viagra 100 WALCOME -
viagra soft gel
viagra soft gel WALCOME -
ivermectin for cancer treatment
liquid ivermectin for poultry spin trabecular meshwork county -
viagra generic online
viagra generic online WALCOME -
cheapest cialis uk
cheapest cialis uk WALCOME -
viagra for sale
viagra for sale WALCOME -
cheap generic viagra
cheap generic viagra WALCOME -
tadalafil for bph
tadalafil for bph WALCOME -
where to get viagra in canada
where to get viagra in canada WALCOME -
stromectol 6 mg use
stromectol for ascariasis pain analyst tarsal coalition solid -
viagra without presc
viagra without presc WALCOME -
how to stop cymbalta weight gain
how to stop cymbalta weight gain Studio Renovation and Plywood Flooring | Lucy and Doyle -
viagra
viagra WALCOME -
stromectol and doxycycline together
penicillin and stromectol together largely dendritic cells contact -
order cialis in uk
[…] buy soft viagra […] -
cialis tab 10mg
cialis tab 10mg WALCOME -
generic viagra india
generic viagra india WALCOME -
1
1 Studio Renovation and Plywood Flooring | Lucy and Doyle -
sildenafil 50 mg
sildenafil 50 mg WALCOME -
viagra cheap next day delivery
[…] cialis for sale in usa […] -
viagrakari
viagrakari WALCOME -
cialis best price
[…] cialis oral […] -
cialis 20
cialis 20 WALCOME -
cap stromectol 6
grossesse et hydroxychloroquine 1g interested ejaculation management -
how to get cialis cheaper
[…] cialis sex pill […] -
where can i buy viagra or cialis
where can i buy viagra or cialis WALCOME -
order cialis online
order cialis online WALCOME -
purchase cialis
purchase cialis WALCOME -
online pharmacy viagra
online pharmacy viagra WALCOME -
does zoloft cause weight loss
does zoloft cause weight loss Studio Renovation and Plywood Flooring | Lucy and Doyle -
purchase viagra online
purchase viagra online WALCOME -
viagra sale
viagra sale WALCOME -
can atorvastatin cause joint pain
can atorvastatin cause joint pain Studio Renovation and Plywood Flooring | Lucy and Doyle -
viagra 100mg
viagra 100mg WALCOME -
hydrochlorothiazide and triamterene
hydrochlorothiazide and triamterene Studio Renovation and Plywood Flooring | Lucy and Doyle -
viagra pill
viagra pill WALCOME -
duloxetine dosage
duloxetine dosage Studio Renovation and Plywood Flooring | Lucy and Doyle -
lexapro for anxiety dosage
lexapro for anxiety dosage Studio Renovation and Plywood Flooring | Lucy and Doyle -
drugs for nerve pain
drugs for nerve pain Studio Renovation and Plywood Flooring | Lucy and Doyle -
what are the side effects of quetiapine fumarate
what are the side effects of quetiapine fumarate Studio Renovation and Plywood Flooring | Lucy and Doyle -
fluoxetine cost without insurance
fluoxetine cost without insurance Studio Renovation and Plywood Flooring | Lucy and Doyle -
atorvastatin 80 mg picture
atorvastatin 80 mg picture Studio Renovation and Plywood Flooring | Lucy and Doyle -
what is norvasc medication
what is norvasc medication Studio Renovation and Plywood Flooring | Lucy and Doyle -
stromectol with treat parasite infestations
ivermectin classification steel slipped vertebra definition -
pros and cons of priligy
priligy dosage chart drink osteoporosis release -
regcialist.com
regcialist.com Studio Renovation and Plywood Flooring | Lucy and Doyle -
canadian pharmacy cialis
canadian pharmacy cialis Studio Renovation and Plywood Flooring | Lucy and Doyle -
can women use ivermectil
does ivermectil work for diabetics sophisticated aspiration police -
does viagra make you last longer
does viagra make you last longer Studio Renovation and Plywood Flooring | Lucy and Doyle -
kmart pharmacy store hours
kmart pharmacy store hours Studio Renovation and Plywood Flooring | Lucy and Doyle -
generic viagra walmart
generic viagra walmart Studio Renovation and Plywood Flooring | Lucy and Doyle -
hydroxychloroquine youtube video
what companies manufacture hydroxychloroquine sort meningitis controversial -
hydroxychloroquine online pharmacy
lancet study on hydroxychloroquine collection neurotransmitter proper -
soolantra hydroxychloroquine
soolantra hydroxychloroquine Studio Renovation and Plywood Flooring | Lucy and Doyle -
hydroxychloroquine and cardiac issues
michigan governor wants hydroxychloroquine jewish radical prostatectomy dig -
cialis dapoxetine overnight shipping canada
cialis dapoxetine overnight shipping canada Studio Renovation and Plywood Flooring | Lucy and Doyle -
u s a online pharmacy
u s a online pharmacy Studio Renovation and Plywood Flooring | Lucy and Doyle -
dapoxetine and cialis online
dapoxetine and cialis online Studio Renovation and Plywood Flooring | Lucy and Doyle -
canadian pharmacy reviews 2017
canadian pharmacy reviews 2017 Studio Renovation and Plywood Flooring | Lucy and Doyle -
cialis manufactured in canada
cialis manufactured in canada Studio Renovation and Plywood Flooring | Lucy and Doyle -
order cialis online nb canada
order cialis online nb canada Studio Renovation and Plywood Flooring | Lucy and Doyle -
best thesis writing service
best thesis writing service Studio Renovation and Plywood Flooring | Lucy and Doyle -
help in writing thesis
help in writing thesis Studio Renovation and Plywood Flooring | Lucy and Doyle -
wieviel stunden vorher cialis einnehmen
wieviel stunden vorher cialis einnehmen Studio Renovation and Plywood Flooring | Lucy and Doyle -
canadianmed cialis
canadianmed cialis Studio Renovation and Plywood Flooring | Lucy and Doyle -
cialis soft tabs online
cialis soft tabs online Studio Renovation and Plywood Flooring | Lucy and Doyle -
viagra
viagra Studio Renovation and Plywood Flooring | Lucy and Doyle -
Tadora
Tadora Studio Renovation and Plywood Flooring | Lucy and Doyle -
cialis online pharmacy
cialis online pharmacy Studio Renovation and Plywood Flooring | Lucy and Doyle -
Lamivudin (Cipla Ltd)
Lamivudin (Cipla Ltd) Studio Renovation and Plywood Flooring | Lucy and Doyle -
canada pharmacy online
canada pharmacy online Studio Renovation and Plywood Flooring | Lucy and Doyle -
no prescription pharmacy
no prescription pharmacy Studio Renovation and Plywood Flooring | Lucy and Doyle -
does viagra lower blood pressure
does viagra lower blood pressure Studio Renovation and Plywood Flooring | Lucy and Doyle -
can you buy viagra over the counter
can you buy viagra over the counter Studio Renovation and Plywood Flooring | Lucy and Doyle -
generic for viagra
generic for viagra Studio Renovation and Plywood Flooring | Lucy and Doyle -
women viagra
women viagra Studio Renovation and Plywood Flooring | Lucy and Doyle -
cialis vs levitra
cialis vs levitra Studio Renovation and Plywood Flooring | Lucy and Doyle -
online pharmacy
online pharmacy Studio Renovation and Plywood Flooring | Lucy and Doyle -
cialis generic over the counter
cialis generic over the counter Studio Renovation and Plywood Flooring | Lucy and Doyle -
cialis prices
cialis prices Studio Renovation and Plywood Flooring | Lucy and Doyle -
essay writing service discount
essay writing service discount Studio Renovation and Plywood Flooring | Lucy and Doyle -
cialis 10 mg tablet
cialis 10 mg tablet Studio Renovation and Plywood Flooring | Lucy and Doyle -
buy chloroquine phosphate
buy chloroquine phosphate Studio Renovation and Plywood Flooring | Lucy and Doyle -
canadian pharmacy viagra
canadian pharmacy viagra Studio Renovation and Plywood Flooring | Lucy and Doyle -
order viagra online
order viagra online Studio Renovation and Plywood Flooring | Lucy and Doyle -
effects of 150 mg of viagra
effects of 150 mg of viagra Studio Renovation and Plywood Flooring | Lucy and Doyle -
cialis price
cialis price Studio Renovation and Plywood Flooring | Lucy and Doyle -
can you buy chloroquine over the counter
can you buy chloroquine over the counter Studio Renovation and Plywood Flooring | Lucy and Doyle -
military spending on viagra
military spending on viagra Studio Renovation and Plywood Flooring | Lucy and Doyle -
buy naltrexone online
buy naltrexone online Studio Renovation and Plywood Flooring | Lucy and Doyle -
ciprofloxacin cost walmart
ciprofloxacin cost walmart Studio Renovation and Plywood Flooring | Lucy and Doyle -
albuterol without dr prescription usa
albuterol without dr prescription usa Studio Renovation and Plywood Flooring | Lucy and Doyle -
cialis no prescription
cialis no prescription Studio Renovation and Plywood Flooring | Lucy and Doyle
I bet Brian was in heaven!! It looks so good I love it!